In this post: A detailed, step-by-step guide demonstrating the steps I use to solve a problem similar to one encountered in my CS 372 Intro to Networking class.
Imagine a mythical set of protocols with the following details:
Maximum Link-Layer data frame: 1,331 bytes
Network-Layer header size: 29 bytes
Transport-Layer header size: 34 bytes
What is the size, in bytes, of the MSS?
Answer:
1331 - 29 - 34 = 1268
You just subtract the header sizes from the data frame. Easy.
You probably could’ve guessed that, but if you’re in CS372 and you’re reading this then it might be because you weren’t 100% sure wanted to check your work but the class materials didn’t really cover it. And that’s the thing that irked me about this problem: the class just threw it at us as a surprise on the weekly (graded but open-book) exercises in week 6. Then you go a-Googlin’ and end up somewhere like chegg.com who wants $15 to sell you a solution! That’s just silly.
Now you know: calculating the maximum segment size is just a simple subtraction problem.
In this post: A detailed, step-by-step guide demonstrating the steps I use to solve a problem similar to one encountered in my CS 372 Intro to Networking class.
A client’s browser sends an HTTP request to a website. The website responds with a handshake and sets up a TCP connection. The connection setup takes 2.5 ms, including the RTT. The browser then sends the request for the website’s index file. The index file references 2 additional images, which are to be requested/downloaded by the client’s browser. How much longer would non-persistent HTTP take than persistent HTTP?
Suppose they want the answer in milliseconds rounded to 2 decimal places.
You can get fancy with writing out each and every request (and this is what they’ll show in the worksheet), but there’s a faster way, especially if the number of referenced objects is more than a few.
Step 1: Count the total number things you’re getting, ie: 1 index file + 3 images = 3. That’s your N value.
index.html + image1.jpg + image2.jpg = 3 things total
Step 2: For non-persistent HTTP, your answer will be the result of N x 2.
3 x 2 = 6 connections needed for non-persistent HTTP
(That’s because for each and every item you request, you also need to request a TCP connection.)
TCP request
index.htm request
TCP request
image1.jpg request
TCP request
image2.jpg request
Step 3: For persistent HTTP, do N+1
3 + 1 = 4 connections needed for persistent HTTP
(That’s because you only need to connect once, and then request all the things you want.)
TCP request
index.htm request
image1.jpg request
image2.jpg request
Step 4: Now you have:
6 connection requests for non-persistent HTTP
4 connection requests for persistent HTTP
Step 5: Find the difference.
6 - 4 = 2
Non-persistent HTTP needs 2 more connections than persistent.
Step 6: Multiply that difference by how long each connection takes to set up.
2 x 2.5 milliseconds = 5 milliseconds.
Double-check your rounding and units! You might be asked to give this in seconds instead of milliseconds.
In summary
Sum the things (index file and images) to get N
Non-persistent HTTP = N x 2
Persistent HTTP = N + 1
Find the difference
Multiply the difference by how long a round trip takes
In this post: A detailed, step-by-step guide demonstrating the steps I use to solve a problem similar to one encountered in my CS 372 Intro to Networking class.
You’re given a link with a maximum transmission rate of 70.5 Mbps. Two computers, X and Y, want to transmit starting at the same time. Computer X sends File X (18 MiB) and computer Y sends File Y (130 KiB), both starting at time t = 0.
Statistical multiplexing is used, with details as follows
Packet Payload Size = 1000 Bytes
Packet Header Size = 24 Bytes (overhead)
Ignore Processing and Queueing delays
Assume partial packets (packets consisting of less than 1000 Bytes of data) are padded so that they are the same size as full packets.
At what time (t = ?) would File X finish transmitting?
Suppose they want the answer in seconds (hah – not milliseconds like usual!) and they want it rounded to two decimal places.
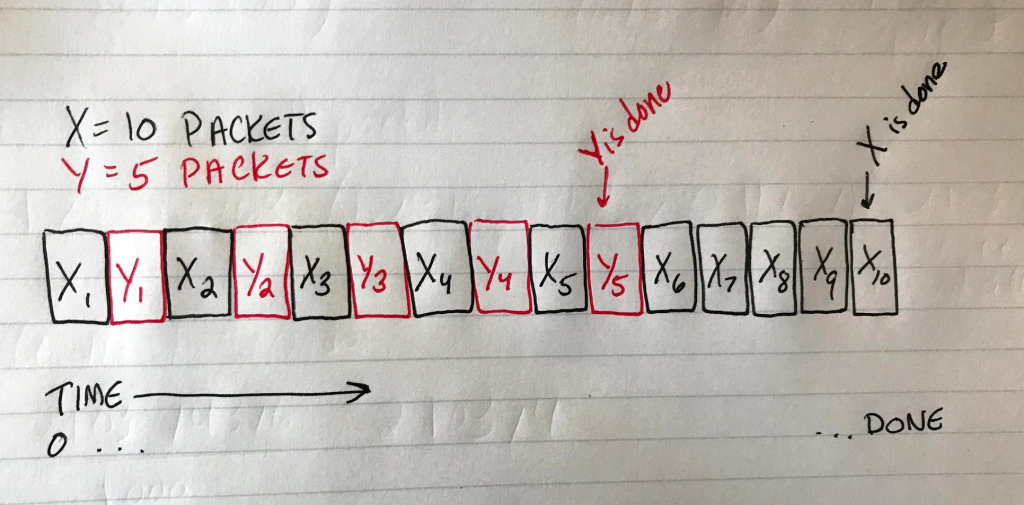
The “twist” of this problem is that File X and File Y take turns being sent in little chunks of 1000 bytes (plus 24 bytes of overhead).
First a piece of X goes, then a piece of Y, then back to X, etc.
Y is smaller so you run out of Y before you run out of X, but fortunately for us, this problem wants to know when X is done being sent. So really what we’re looking for is how long it takes to send both X and Y.
Here’s a drawing I made to visualize the problem (obviously, X and Y are both way more than just 10 and 5 packets in our real problem).
Diagram depicting X1, Y1, X2, Y2, X3, Y3, X4, Y4, X5, Y5, X6, X7, X8, X9, X10 interwoven with each other. Each block represents a packet.
Step 1: Figure out how many packets have to be sent, total
Our packet size (1000 bytes) and our overhead size (24 Bytes) are given in bytes, so I’m going to turn the two filesizes into Bytes instead of bits for this one. (We can always turn it into bits later if needed.)
File X = 18 MiB // turn to bytes by multiplying by 1024 twice
= 18 * 1024 * 1024
= 18874368 bytes
File Y = 130 KiB // turn to bytes by multiplying by 1024 once
= 130 * 1024
= 133120 bytes
Now X and Y are in the same units (bytes) and we can use that to figure out how many packets of 1000 bytes each one would be divided into.
File X = 18874368 Bytes / 1000 = 18874.368 packets
Our result isn’t a whole number. What should we do with the “partial packet”? Well, the problem tells us that any partial packets should be padded up to a full size. In practice, this just means we round up to the next nearest whole number. 18874.368 becomes 18875 packets for File X.
Now do the same for File Y:
File Y = 133120 Bytes / 1000 = 133.12
Round up to get 134 packets for File Y
(Save these numbers for later, we’ll come back to them.)
Step 2: Calculate the time needed to send one packet plus its overhead
Add the packet size and the overhead size (both must be in the same units; here, that’s bytes but your variation of this problem may differ). Since transmission rate is in bits, let’s also multiply the packet size + overhead size by 8 to put it in bits, and multiply the transmission rate by 10^6 to put it in bits also. That looks like…
L/R, where R's units is what the outcome of this calculation will be
= (1000 Bytes + 24 Bytes * 8) / (70.5 Mbps x 10^6)
= (8192) / (70.5 x 10^6)
= 0.0001161985816 seconds // same units as R (bits per second)
= 0.11619858156 msec // multiply by 1000 to get milliseconds
We now know that it takes 0.11619858156 milliseconds to send one packet (and its overhead). Save this number for later.
Step 3: Calculate the time it takes to send all packets
This step is easy: we know how many packets we have between File X and File Y, and we know how long it takes to send one of them, so let’s figure out how long it takes to send all of them.
18875 packets + 134 packets = 19009 packets to send
19009 packets x 0.11619868156 msec = 2208.820738 milliseconds to send all
Step 4: Convert to seconds and round to 2 decimal places to get the final answer
This variation of the problem wants the solution in seconds, so divide our result from Step 3 by 1000 to get 2.208820738 seconds and round it to two decimal places to get 2.21 seconds, which is when time at which File X will be done sending.
What if it wanted to know when the smaller file was done sending?
Well, let’s look at our diagram again. Here we can see that for every packet of Y sent, a packet of X has already been sent.
For every packet of Y that is sent, one from X precedes it. In other words, to send all 5 packets of Y we must also send 5 packets of X.
We know Y is made up of 134 packets, so that many packets of X will also be sent. That means for our final answer all we have to do is figure out how long it’ll take to send 134*2 packets.
134 * 2 = 268 // all of Y + same amount of X
268 packets x 0.11619868156 msec = 31.14124666 msec to send File Y
Convert that answer to seconds and there we have it: 0.03 seconds have elapsed when File Y (the smaller file) is done sending.
In this post: A detailed, step-by-step guide demonstrating the steps I use to solve a problem similar to one encountered in my CS 372 Intro to Networking class.Yeah, I’m still cranky that this class makes no effort to teach this stuff. They just send you a-Googlin’. Welcome, Googlers…
Suppose there are 3 routers in sequence between Host A and Host B, all of which use store-and-forward routing. What is the total end-to-end delay for a packet originating from Host A with destination Host B, under the following conditions.
Each of the link transmission rates are 5.1 Mbps
The total distance from Host A to Host B along its path of transmission is 175.1 km
The speed of propagation through the transmission medium is is 2.7 x 10⁸ m/s
The packet size is 2 KiB
Remember that you must also uplink from Host A to the first router. Suppose this one wants the answer in milliseconds rounded to 1 decimal place.
Step 1: Figure out the transmission delay for one link
The “twist” of this problem is that there are multiple transmission delays to account for. Every “hop” incurs a transmission delay.
We can use the L/R formula with the known packet size (2 KiB and known transmission rate (5.1 Mbps) to calculate the transmission delay for one node to another. Node here means host or router. Be sure to convert both into bits.
Remember that the units R is in determines the outcome, so this result is in seconds. Multiply it by 1000 to turn it into milliseconds and save this result for later.
0.00321254 x 1000 = 3.21254901... milliseconds
Step 2: Figure out the entire path’s transmission delay
Recall that our three routers and two hosts basically look like this:
[A]—[1]—[2]—[3]—[B]
We know the transmission delay (the time it takes for a bit to be placed on the transmission medium) at one host or router, and we know how many routers there are total, so we can figure out how many “transmission delays” our bits will go through by multiplying the total number of routers plus one (to account for being placed on the transmission medium by A) by the transmission delay we calculated in step 1.
(R + 1) * 3.21254901  // R is the number of routers
= (3 + 1) * 3.21254901 // add 1 to account for initial link
= 4 * 3.21254901
= 12.85019604 milliseconds
This number represents the total amount of transmission delay experienced by bits traversing this multi-router path.
Step 3: Figure out the propagation delay
Recall that our distance is 175.1 km and our speed of propagation is 2.7 x 10⁸ m/s and the propagation delay formula is Tprop = d/s. Note that km has to be turned into meters and the result will be in seconds.
In this post: A detailed, step-by-step guide demonstrating the steps I use to solve a problem similar to one encountered in my CS 372 Intro to Networking class.
The “VOIP problem”
You’re given a diagram (you won’t need it) and some values in the form of…
Host A converts analog to digital at a = 40 Kbps
Link transmission rate R = 4.2 Mbps
Host A groups data into packets of length L = 51 bytes
Distance to travel d = 900 km
Propagation speed s = 2.5 x 10⁸ m/s
Host A sends each packet to Host B as soon as it gathers a whole packet.
Host B converts back from digital to analog as soon as it receives a whole packet.
The question asks, How much time elapses from when the first bit starts to be created until the conversion back to analog begins?
Let’s say they want the answer in milliseconds rounded to two decimal places (note: this varies – sometimes the answer has to be in seconds, sometimes they want it rounded to one decimal place – double check your instance of the problem!)
Step 1: Figure out how long it takes to make a single packet
“When the first bit starts to be created” means “when this imaginary machine starts building the very first packet”.
We know how big a packet is: 50 bytes.
We know the rate at which it produces packets: 40 Kbps.
This is the classic L/R (length over rate) you’ve hopefully seen if you’re keeping up with the course materials. We can use L/R here, but we have to turn 51 bytes into bits (multiply it by 8) and we have to turn 40 Kbps into bps (multiply it by 1,000).
We get 0.0102 seconds because the units that R is in determines the outcome. R is in bits per second (bps), so that’s how we know the units we’re looking at here is seconds.
We need this in milliseconds, because we’re going to put everything in milliseconds so that we’re working in the units the question expects. Multiply the seconds answer by 1000 to get milliseconds, like so:
0.0102 x 1000 = 10.2 milliseconds
That’s the time it takes to make one single, complete, ready-to-transmit packet. Save this value for later, we will come back to it in step 4.
Step 2: Figure out the transmission delay
Recall from the course materials that transmission delay is the time it takes to place every bit onto the transmission medium. Transmission delay is not the time it takes to actually send it!
If you like car analogies, consider transmission delay the time it takes to get your car onto the highway. Your car is being placed on the transmission medium, and the time it takes to do that is the transmission delay. (Again, this is not the time it takes to travel the length of the highway! It’s the time it takes to get your car onto the highway.)
We will use the L/R formula again for this step. This time L is the length of the packet (51 bytes) and R is the transmission rate (4.2Mbps). We need both of them in bits, so multiply 51 (bytes) by 8 to get bits, and multiply 3.8 by 1,000,000 to get bps.
Again, the units of R determine what units the result is in, which in this case is seconds (because we had bits per second for our R).
To turn it into milliseconds, multiply by 1000:
0.00010737 x 1000 = 0.10736842 milliseconds
So, what do we have so far? We have the time it takes to make one packet and the time it takes to transmit that packet, both in milliseconds. There is one missing piece: propagation delay.
Step 3: Figure out the propagation delay
Propagation delay is the time it takes a bit to travel the given distance (900 km) at the given speed (2.5 x 10⁸ m/s). The formula for propagation delay is d/s (distance over speed).
To go back to our car analogy, the propagation delay is the time it takes the car to zoom down the highway to its destination.
Like L/R, the d/s result will be in the same units as the bottom number (so, seconds). However, before we proceed, note that the distance we were given is in kilometers and the speed is given in meters per second. We need to convert kilometers to meters when we do our calculation, so multiply that 900 by 1,000.
(900 km * 1,000 / 2.5 x 10⁸) = 0.0036 seconds
Remember to convert that answer to milliseconds:
0.0036 x 1000 = 3.6 milliseconds
Step 4: Add the previous three answers together
Time to generate packet + time to place it on the transmission medium + time for it to propagate = our answer
Step 5: Round to the requested number of decimal places
Since this problem wants the answer rounded to two decimal places, 13.90736842 becomes 13.91
I hope this breakdown of the “VOIP problem” helps someone else!
I have to admit I’m a bit salty this class had us sit through all those lectures, read all those book chapters, and do all those worksheets and couldn’t once be bothered to expose us to even a watered-down or partial version of it before throwing it as us on a graded, timed quiz.
Fortunately, once you’ve mastered solving this problem, a lot of the other “math problems” that CS 372 throws at you in week 1 and week 2 will feel like variations on it.
Next up: adding the Image Upload / Select feature to the plugin. When the user creates a new Product Box, they should be able to pick an image for it (not just paste in a URL, that’s too janky for this fancy plugin). Furthermore, the user also needs to be able to edit that image choice when editing an existing Product Box.
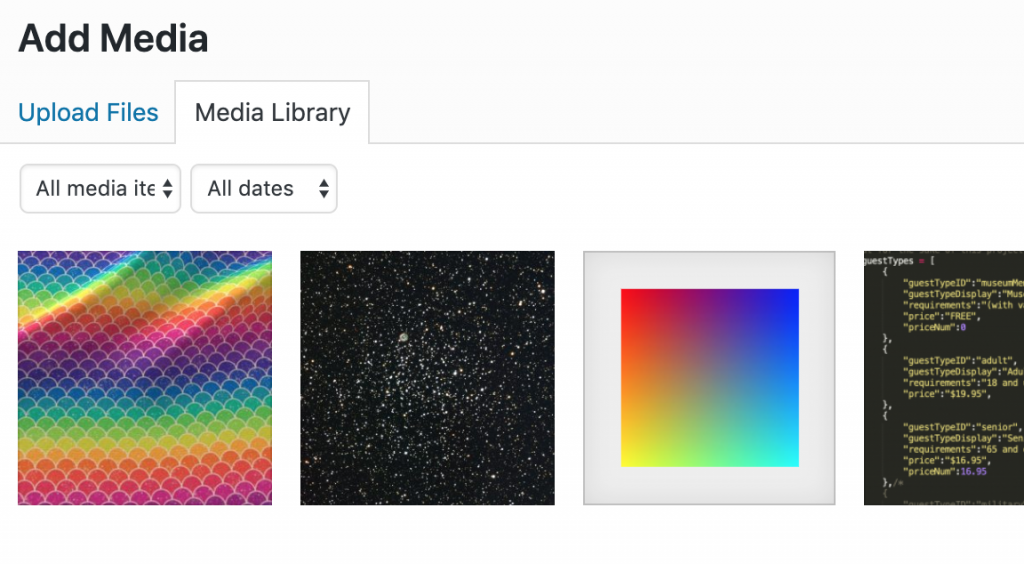
WordPress already has a media management page/popup.
That’s this thing:
Adding WordPress’s built-in Media Uploader to my plugin was quick and painless.
I just needed to hook into this feature from my plugin’s page. I used this tutorial as a starting point.
I didn’t use quite the same structure as this tutorial recommends. I wanted all of my form HTML in the same view files, not echoed in by a php function elsewhere in the codebase, but I did need to add an admin.js file and enqueue it as shown here, in my ‘init’ action. The tutorial left this step out so I’ve included it here:
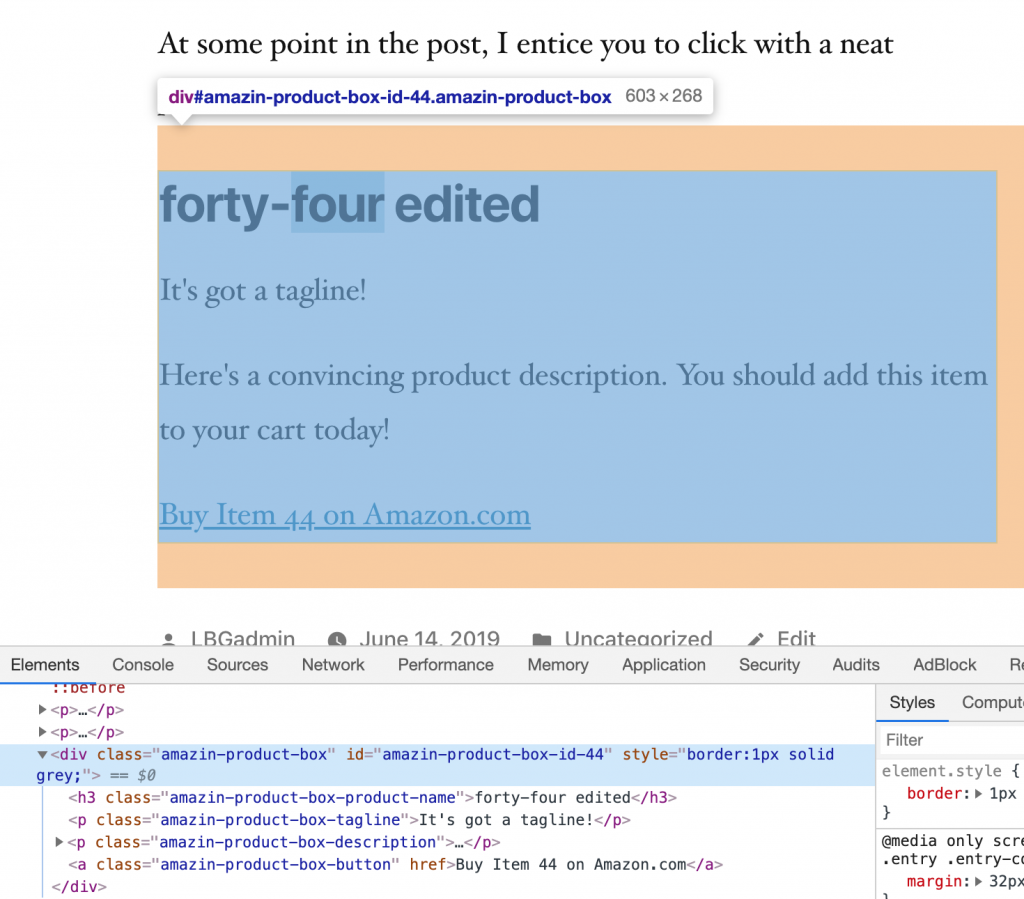
The images are stored in my post content object by their ID (look at the very end – “215” is the image’s ID).
{"productName":"The Rainbow","productTagline":"It\'s got all the colors of the spectrum","productDescription":"Lorem ipsum dolor sit amet, consectetur adipiscing elit. Fusce pulvinar, leo at cursus finibus, lectus massa tincidunt nulla, vitae lobortis lectus orci vitae nunc. Aenean a elit mollis, iaculis felis sed, consectetur velit. ","productUrl":"http://wow.com","productButtonText":"See the rainbow on Amazon.com","productImage":"215"}
I used wp_get_attachment_url() to turn the ID into the full path to the image. This is how it looks in the html that renders the actual product box in the post:
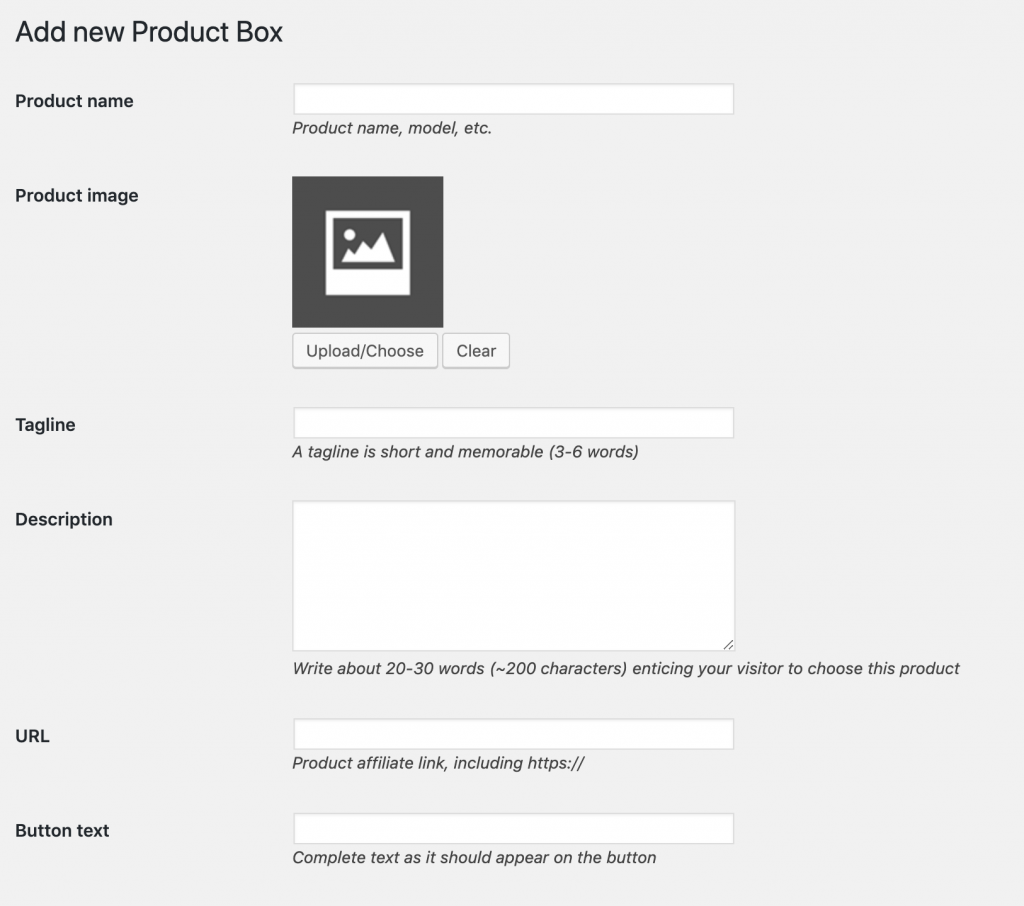
Here’s my New Product Box page as the user first sees it:
And here’s my Edit Product Box page displaying an image the user already chose for a product box:
And here it is in a post!
Smaller images are centered; larger ones fill the frame as shown in this screenshot. Huge ones are stopped from overflowing the box and get scaled to fit. For pleasing results, square images are recommended.
This merged pull request shows the complete image uploading code (plus some bonus CSS styling and tagging to make it all look a bit better).
Day 10: Making the plugin’s settings page
I thought it’d be cool if all the product boxes shared a “headline” phrase, such as “We recommend” or “Our choice”. The user should edit in one place instead of on a per-box basis (though maybe a per-box override could be added, too, in the future).
WordPress calls this sort of thing an “option” and makes it very easy to set/get them. (This tutorial was helpful for identifying which hooks to use.)
Unlike everything else so far, the settings are not saved as posts. They’re saved as options in the _options table. Since all plugins (and WordPress itself) saves their plugins here, it’s important that the option have a unique name. Here’s my new option along with the string I gave it:
I wanted my plugin options to be adjustable from the plugin page (rather than a separate settings/options page elsewhere in the dashboard like some plugins do) so I simply added another form below the list table:
Here’s the form HTML (you can find this in view/product-box-list.php)
And finally, I modified the HTML that displays the actual in-post product box to echo out the setting value instead of a hard-coded string (also in amazin-product-box-plugin.php):
[Bug fixes and improvements] Adding a welcome banner, hiding search, completing the shortcode display, and fixing “sort by name”
Before moving onto a new feature I took a moment to make a few more improvements. There is now a “Welcome” banner at the top of the plugin page, the shortcodes now display in full for each table row, I hid the search bar, and I fixed sorting by name (it used to not work at all because it was trying to run the query on ‘name’ instead of ‘post_title’).
First, I read the official guide on deactivating vs. uninstalling plugins. I figured if there was one place I really didn’t want to just fly blind, this was it.
My uninstall script needed to do the following:
Delete the custom posts of type “amazin_product_box” from the _posts table
Delete the plugin’s setting (“amazin_product_box_option_headline”) from _options
I went the route of making a standalone .php script. The example from WordPress’s developer guide shows dropping a table but that’s a bit extreme for my use, I just needed to delete the posts of type “amazin_product_box”.
Here’s what I did (it’s basically the example from WP’s own site with my own plugin’s names for things instead):
uninstall.php
<?php
// if uninstall.php is not called by WordPress, die
if (!defined('WP_UNINSTALL_PLUGIN')) {
    die;
}

$option_name = 'amazin_product_box_option_headline';

delete_option($option_name);

// for site options in Multisite
delete_site_option($option_name);

// drop a custom database table
global $wpdb;
$wpdb->query("DELETE FROM {$wpdb->prefix}posts WHERE post_type='amazin_product_box'");
?>
With the uninstall script in place, I was able to deactivate and uninstall my plugin. I verified that the custom posts were gone from the _posts database and the headline option was gone from _options and from WordPress’s plugins directory on my server. Everything looked good.
The shortcode gets left behind in the posts, but I don’t think there’s anything I can do about that:
Finally, I reinstalled my plugin. None of the previously-created product boxes were present, which I expected since they were gone from the db, and I was able to create a brand new product box and stick it in a post.
Sweet – back in business.
Phew. I was dreading this part but the uninstall feature turned out to be the easiest, most “got it right on the first try” step of the whole project.
Day 12: Testing, bug fixes, and trying it out on a real website
The last thing I did was install the plugin on one of my actual sites and try it out as if I were an actual user.
I found a few bugs (including one that made the button not actually go anywhere, yikes) and had a few ideas for improving it, so I spent this last day on fixing those things.
[Bug fix] – Editing a product box with an existing image now retains the existing saved image
[Improvement] – Image upload help text added to Edit and New forms
[Improvement] – Added a “plugin action link” that goes directly to Amazin’ Product Box management page via the plugin’s entry in the plugins page
[Bug fix] – Button actually goes to the user’s link now
[Improvement] – Added a setting for whether the button should open the link in a new tab or stay in the same tab
[Improvement] – Product Box is now narrower than the post (I think it looks nicer that way)
Here it is: my first WordPress plugin, just over 2 weeks after I started the project – looking exactly how I’d hoped.
I started blogging about product photography (and later smart home technology) ~5 years ago. I wanted to make my own custom plugins but I was just a baby programmer at the time and I got overwhelmed by terminology and just generally having no clue how to put something like it together.
Even now, after having worked professionally as a full-stack web dev for a few years and having completed most of a computer science degree, I was still a little intimidated by this project. Working in something new is always a bit uncomfortable at first.
Fortunately, this project wasn’t nearly as hard as I’d feared, and while I’m sure there’s something I got wrong with my first attempt at a plugin, I was only a little bit scared to deploy it on one of my live sites. :D
If you read this entire dev journal, thanks for following along – and if you see anything I could’ve done better, don’t hesitate to leave a comment or create a pull request on the project repo.
Resources
For future reference, here are some guides I found helpful for WP plugin development:
Day 8: Refactoring the plugin’s management page with WP_List_Table
I did some soul-searching and realized that while I was happy with what I’d built so far in Part 1 and Part 2, it wasn’t very ‘standardized’. In other words, I had finally learned enough to want to scrap it all and start over.
I’m glad I did – and while it took some effort, it was worth it in the end.
In which I keep what I’ve learned so far but throw out the code and start over.
Using WP List Table for a standard-looking admin table
I noticed many plugins (such as Contact Form 7 and TablePress ) seemed to be using a standardized table design that looks like WP’s own default for managing posts, with Edit and Delete links on hover, a checkbox for each row, and bulk actions.
I dug around a bit and found the WP_List_Table class. It’s not an official developer API, but it’s stable and widely used for the creation of admin tables in plugins.
(I recommend reading all of the aforementioned links before attempting to work with WP List Table, even if through a generator or boilerplate code.)
I used the tareq.co generators to get started. (Definitely watch the video to see how all the parts fit together and how to name the files, using the generators alone is not enough to piece it together).
The generator did not include delete so I implemented that myself.
Implementing Delete (both single and bulk delete) in the WP List Table
I got stuck on implementing “Delete” (both the singular variety and the bulk kind) for a little while, mostly because I was trying to refresh the page myself after calling my delete method. Naively, I tried solutions like wp_redirect() right after calling my delete function, but that didn’t work – the page would reload but the stale, already-deleted row(s) were still in the table until the page was refreshed a second time or I would get a “headers already sent” error.
Ultimately, the solution was not to call any kind of redirect or refresh action but to simply call process_bulk_actions()before getting $items (in my code, that’s apb_get_all_product_boxes()) in the prepare_items() method in list-table.php.
The prepare_items() method (starting at about line 190) is called any time the list page is rendered, and the list page is automatically reloaded and rendered when clicking the Delete link or submitting the bulk action on the form. With that in mind, I didn’t need to reload the page manually – I just needed to make sure the deleted items were processed and removed from the db before retrieving the latest list of items.
It took a few days and it felt like backwards progress for a while, but I’m glad I did it – now my plugin looks more like “professional” plugins, both in-page and in the codebase, and I learned a lot in the process. I’d rather do it right than hold onto prototype-grade code.
Building it myself from scratch was still an important learning step for me. At this point, I feel like I might actually finish this thing because all that’s left is… implementing the image box! (And uninstalling, and finding and fixing bugs, and trying it out on a live site…)
Now it’s time to render the Product Box in a post and give it some attractive styling.
Day 6: Embedding the Product Box in a post using a Shortcode
With the management page built (or at least built enough), the next thing I wanted to do was see a product box in a post. I knew I wanted to do this with a WordPress shortcode, so I started by reading the Shortcode API and a Shortcode tutorial and used it to whip up the most basic Shortcode-driven bit of code in the history of WP plugins:
function amazin_product_box_shortcode( $atts ) {
    $a = shortcode_atts( array(
        'id' => 'id'
        ), $atts );
    return "Hello from Amazin Product Box for post ID " . $a['id'] . '!';
}
add_shortcode( 'amazin-product-box', 'amazin_product_box_shortcode' );
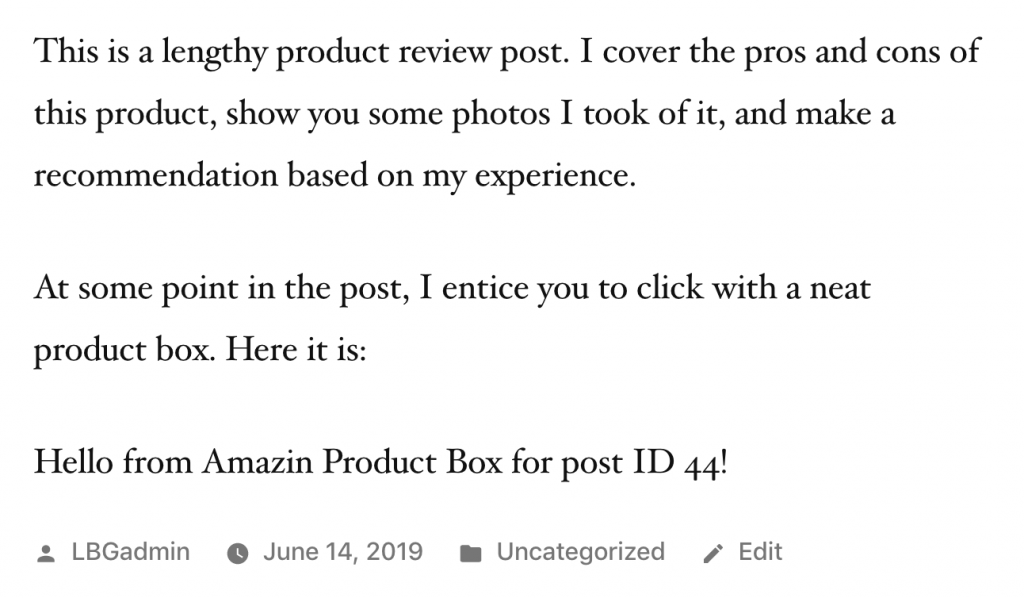
I have the new Gutenberg (blocks) version of WP so I used the “Shortcode” block to put my plugin’s Shortcode into the post:
And here it is in the published post! (It’s the last line, the one that begins with “Hello”.)
Sweet – it’s in the post!
The next step was to make it HTML, not just a string. I encountered a few problems along the way, so I documented them and their fixes here to help explain the code a bit better.
Problem: Plugin HTML output appeared at start of post
Tying up a few loose ends: classes on the HTML tags, Shortcodes in the management table
In preparation for styling the box, I added classes to all the HTML elements. The plugin will have some default styles, but will also expose the CSS for the user to edit to their liking (and save it somewhere).
I also went back to the admin page and made it so Shortcodes display here without rendering as product boxes inside the table. That commit is here.
Day 7: Styling the Product Box
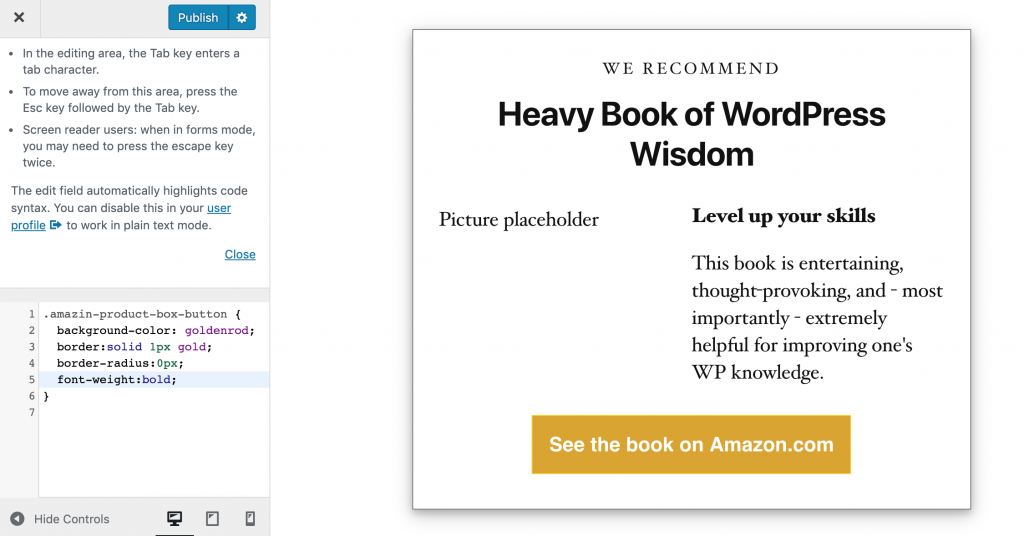
The next thing I did was add a stylesheet to the project, enqueue it, and add a bunch of styles to make the default Product Box look better. Here it is in my post, now styled:
I also added the “We Recommend” text at the top, which is hard-coded for now but will ultimately be something the user can edit in the plugin’s settings (so that the user only has to change it in one place if they want it to say something different, like “Our Pick”, or hide it entirely) and fixed a problem with loading the posts for editing (it was the same “NULL fix” I used for displaying them in the post).
I considered letting the user modify the Amazin’ Product Box’s CSS via the plugin, but realized that 1. this would be a ton of work to develop, debug, and support, likely involving sanitizing the user’s CSS input and saving it to a file in the plugin directory, retrieving it, using it (or parts of it) based on the user’s settings and 2. this functionality is basically already present in WordPress’s own Appearance > Customize tab.
As a test, I restyled the button using WP’s custom CSS area. Anyone who wants to change the look of an Amazin’ Product Box should be able to safely do so via their theme or child theme or WP’s Customize using this same technique.
In this series: watch me code a WordPress plugin from scratch. I’ve never made a WordPress plugin before but I did a bootcamp half a decade ago and I’m good at Googling and trying things until it works, so I’m sure I’ll figure it out.
This began innocently enough. I wanted a thing, so I did what any self-respecting developer would do and spent 5x as long making it myself as it would’ve cost me to simply buy someone else’s solution. (On the bright side, I got exactly what I wanted.)
Here’s my finished product. It’s a “product box” that the user creates, manages, edits from a backend and displays in a post using a shortcode. The idea is to call attention to recommended products and capture affiliate revenue from the button (link) click.
The next 4 posts (and 6000+ words) are my “dev journal” that I added to every time I worked on it. You can follow along and watch me go from plugin newbie to finishing my first plugin and deploying it on a live site.
PS: This first post is by far the longest of the series.
Day 1: Making a plan, setting up a GitHub repo, and getting started
First, I captured the requirements for this plugin. It seemed like a small project but I still like to bang out a page of requirements first so I have something to refer back to and can (hopefully) catch things I didn’t think about when I was all excited about the fun parts of the new idea.
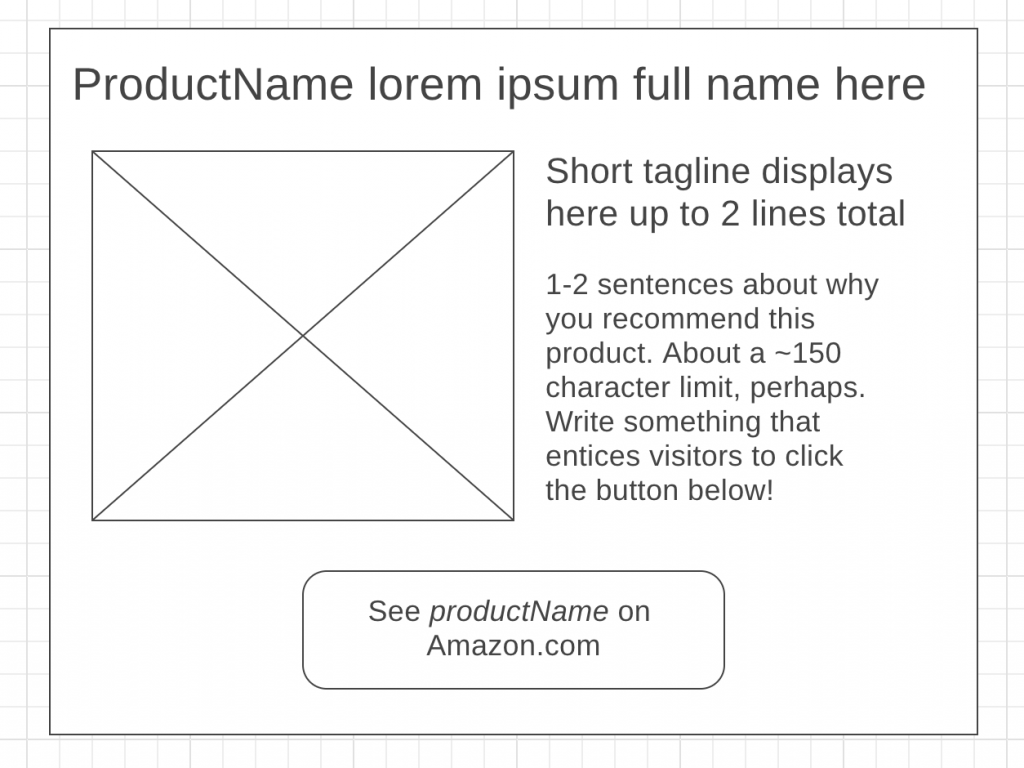
Behold, my simple mockup:
I made this in wireframe.cc. Paper or a drawing in some sand would’ve also been fine.
This simple mockup revealed a lot of requirements:
a way for the user to input a title
a tagline
a short blurb
an affiliate URL for the button to use
an image
maybe I want to let them customize the colors of the button and the text, too
a way to insert it into the post with a shortcode (might look something like [amazin-wp-box id=1])
a way to manage and edit existing Amazin’ product boxes
I collected all of this in a Google Doc that will serve as this project’s documentation and idea repository. No matter how small the project seems at first, it always seems bigger once I start writing down every little thing it needs.
Make a github repo for this project
I usually start projects off with a new GitHub repo. It’s just a good practice and it takes like 2 seconds to make a repo and I sleep better at night knowing my work is backed up offsite.
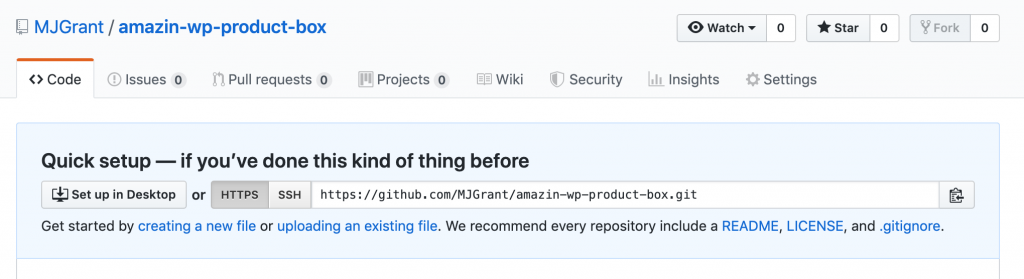
New github repo. I made it public so everyone can see my process (for better or worse).
And then I cloned it locally and cd’d into it.
Boilerplate plugin coding: getting started by adding a button to the admin menu
I’ve never made a WP plugin before but I’m know a ton of other people have and, if I’m lucky, a few of them have documented the process.
<?php
/**
 * Plugin Name: Amazin' Product Box
 * Plugin URI: http://majoh.dev
 * Description: Customizable product box for Amazon products with an affiliate link
 * Version: 1.0
 * Author: Mandi Grant
 * Author URI: http://majoh.dev
 */
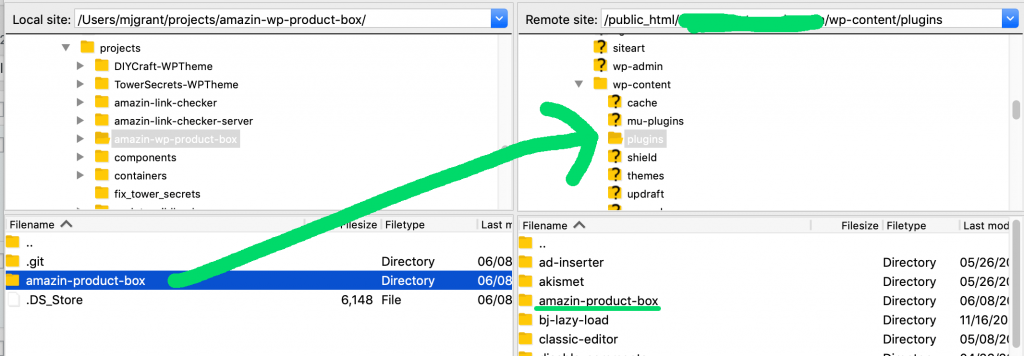
..and uploading it to my site’s plugins directory like so:
I took a domain I wasn’t using for anything, hooked it up to my shared hosting account, and spun up a new WordPress installation on it.
Hey, look, here it is in my site’s plugins! I AM NOW A PLUGIN DEVELOPER
(I’m kidding about the being a plugin developer thing, this is literally all it does so far.)
The next thing I wanted to do was make the plugin have a “page” of its own where the user can add product boxes, delete them, edit them, etc.
That meant:
Adding a “button” (or maybe “link” is a better term for it) to the plugin’s page on the admin_menu (that’s the toolbar down the left side of the WordPress interface)
Make the plugin admin page load and display something so I know it loaded
Mostly this was a lot of trial and error. I didn’t know what WordPress calls that menu down the left, I didn’t know what hook to use, and the Internet is bursting with outdated WordPress tutorials.
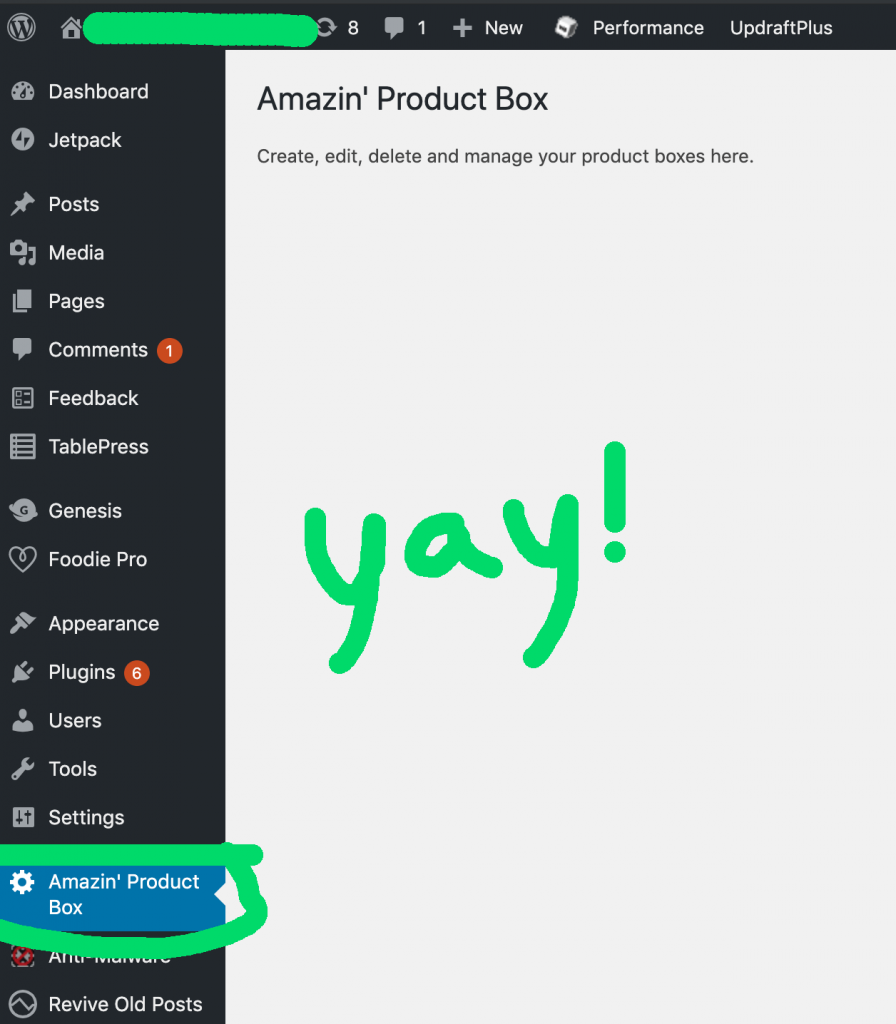
It took some Googling to figure out what this was called and how to “hook” into it. Ultimately, I found my answers in the WP Codex and ended up with this:
Amazin’ Product Box now has a button in the admin menu and some placeholder text I wrote in the page itself.
The next thing I wanted was a management page for my plugin. I went back to my Google Doc and mocked up a quick layout for the management page. Now I have a spec to code to. ;)
Quick text-based mockup of the management page. I’m sure it’ll change as I develop it, but this helps me envision it as I’m coding it.
Building the management page wireframe (just the HTML)
I knew I’d need a form and a table, so I built the HTML portion first. This part was easy, just an HTML form with some inputs.
“Use the existing database tables instead of creating new custom tables if possible. Most use-cases can be accomplished with custom post types and metadata, custom taxonomy and/or one of the other standard tables and using the standard tables provides a lot of UI and other functionality “for free.” Think very carefully before adding a table because it adds complexity to your plugin that many users and site builders prefer to avoid.”
Okay – sounds like I shouldn’t make a new table just for these things. I looked at how TablePress saves its tables, since that plugin works (in some ways) like how I want mine to work.
As it turns out, TablePress saves its tables as posts. Neat.
I can see how I might do the same: product title could be saved as post title, but what about tagline and the affiliate link? I then did some reading on custom post types and considered a custom post type that had all the fields I needed, but I also realized I probably didn’t need a custom post type and I could potentially just serialize the product box data into an array and pull it out for display, thus making the normal post type fine.
Or, I could use custom fields on a normal post. For now, I decided to go with the normal post type and see if I can get a bare-minimum implementation going with just the normal post type. So that’s what I decided on: I’ll ahve it save the form data to the db as a normal post.
That was easy enough: I made the form call a function like so:
And stuck a bunch of placeholder values in the function itself:
function post_new_product_box() {
    $my_post = array(
        'post_title'    => 'Test product box',
        'post_content'  => 'Test description',
        'post_status'   => 'publish',
        'post_author'   => 1,
        'post_category' => array( 8,39 )
    );

    // Insert the post into the database.
    wp_insert_post( $my_post );
}
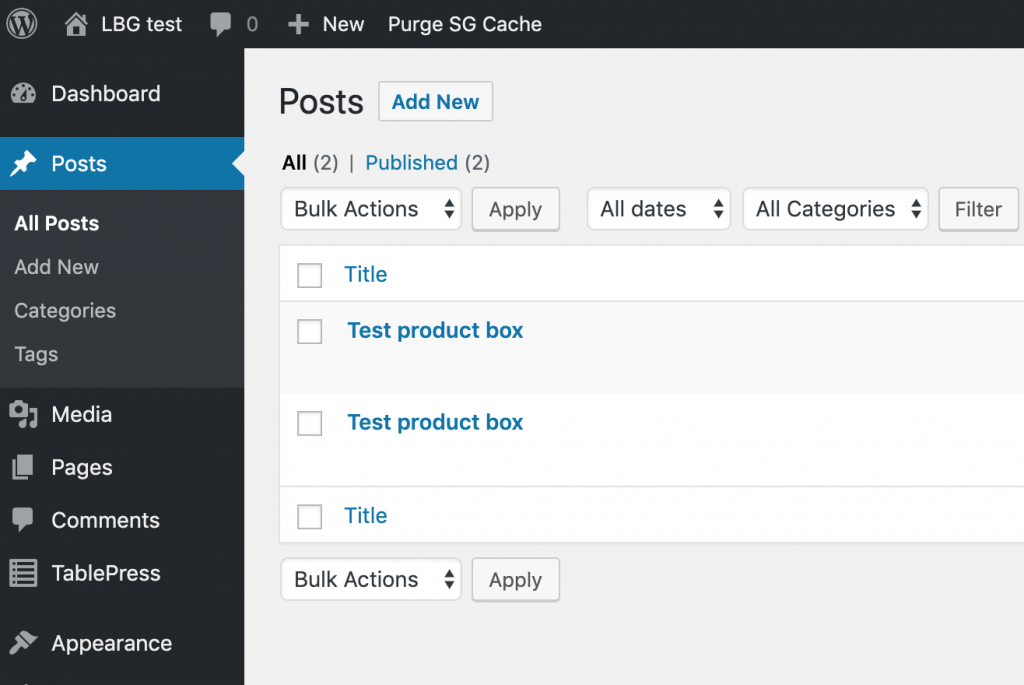
This works – sort of. The new post is in the db, but it also shows up with my regular posts in the Posts section of my blog’s dashboard. (It also shows up twice. Maybe I double clicked the submit button.)
Here’s the commit – I wouldn’t get too excited about it, though. It’s buggy and doesn’t use the form data yet.
Getting the form data from the HTML form, into the php method, and into WordPress’s MySQL database
The next thing I did was start reading on how to get data from the form. This was also about the time I realized that there was a non-zero chance I was doing this all wrong and probably introducing a huge security hole.
But for now, I just want to see form data make it to the database (I can secure it later).
(I’m going to spare you my dozen or so trial and error steps here, such as the “step” where I realized I had a typo in “name” on all of the form inputs and the “steps” where I experimented with different ways to serialize the data.)
I ultimately settled on this way of capturing the form data and encoding it for the database.
function post_new_product_box() {
    if ( isset( $_POST['submit'] ) ) {
        // retrieve the form data by using the element's name attributes
        // value as key $firstname = $_GET['firstname']; $lastname = $_GET['lastname'];
        // display the results echo '<h3>Form GET Method</h3>'; echo 'Your name is ' . $lastname . ' ' . $firstname; exit;
        $content = array(
            "amazin-product-name" => $_POST['amazin-product-name'],
            "amazin-product-tagline" => $_POST['amazin-product-tagline'],
            "amazin-product-description" => $_POST['amazin-product-description'],
            "amazin-product-url" => $_POST['amazin-product-url'],
            "amazin-product-button-text" => $_POST['amazin-product-button-text']
        );

        $product_box = array(
            'post_title'    => $_REQUEST['amazin-product-box-name'],
            'post_content'  => wp_json_encode($content), //broke when switched this from 'none' to the content array
            'post_status'   => 'publish',
            'post_author'   => 1,
            'post_category' => array( 8,39 )
        );

        // Insert the post into the database.
        wp_insert_post( $product_box );
    }
}
(Aside: I swear, I use JSON in everything I build. IT’S JUST SO USEFUL. Turns out WordPress even has a method for encoding stuff into json, so at least this feels legit.)
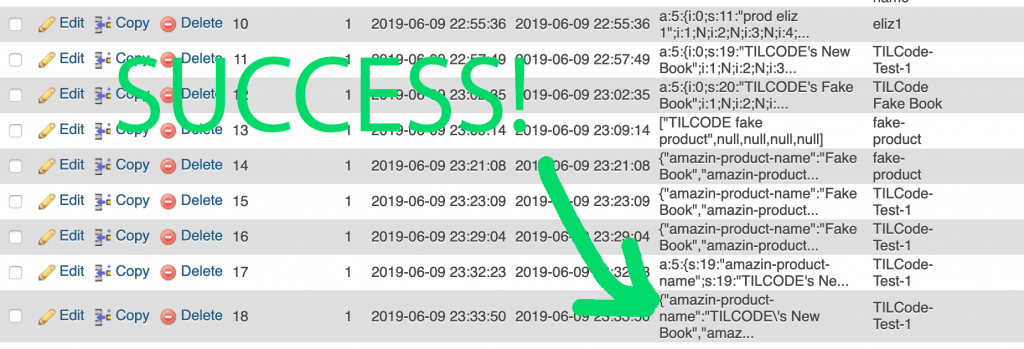
Anyway, this posts to the db. Hooray! Here is my form data, turned into a post and inserted into the db.
I included my earlier failures so that 1. I don’t look like one of those people who magically gets it right on the first try and 2. so you can see my earlier attempts at formatting the data correctly (the weird a:5 {… formatting is an artifact of using serialize() instead of wp_json_encode()).
Now I have this for my “post content”.
{"amazin-product-name":"TILCODE\'s New Book","amazin-product-tagline":"Tagline goes here","amazin-product-description":"Description goes here","amazin-product-url":"http://buy-my-book.com","amazin-product-button-text":"Buy my book!"}
(I’d have called this an “object”, since it’s wrapped in curlies and uses keys, but php likes to call this an array. I am new in php land so I will abide by its terminology and also call this an array.)
I suspected my form was insecure based on the fact that I had done absolutely nothing so far to secure it or sanitize the data sent through it.
So, before I went any further, I read a bit on WordPress plugin and form security. A lot of guides say that using something called a “nonce” (a number used once) is a good, easy way to secure WordPress forms. This page from the Codex explained it nicely and gave an example I could adapt to my own plugin’s code. Getting nonce working was easy though I’m not yet sure how to test that it’s actually doing what it’s supposed to. I’ll come back to this.
Day 4: Hiding the Product Box “posts” from the blog’s main Posts page and displaying them on the plugin page using Custom Post Types
I had a suspicion that my Product Box posts were showing up as normal Posts in WordPress, and sure enough, here they are:
These are product boxes, not posts, and I don’t want to see them when I view my blog’s Posts.
I did some reading and decided that this might be a job for custom post types. This tutorial even says, “One advantage of using custom post types is that it keeps your custom content types away from your regular posts.”
Good enough for me, let’s try it.
The only thing I wasn’t sure about was the part about “create post type” needing to be called “on init”. I wasn’t sure where that was in my plugin, but I guessed it belonged in the same block of code (at the top) that adds the plugin menu to the admin menu.
The code for actually creating the custom post type looks like this. I found this Codex page on registering post types helpful for identifying what parameters to include. (I can always come back and add more later, too, if I need to.)
To bring it all together, the last step was to modify the array of parameters that are passed when creating a product box post. There’s a param for “post_type”, so I added my “amazin_product_box” as the post type here.
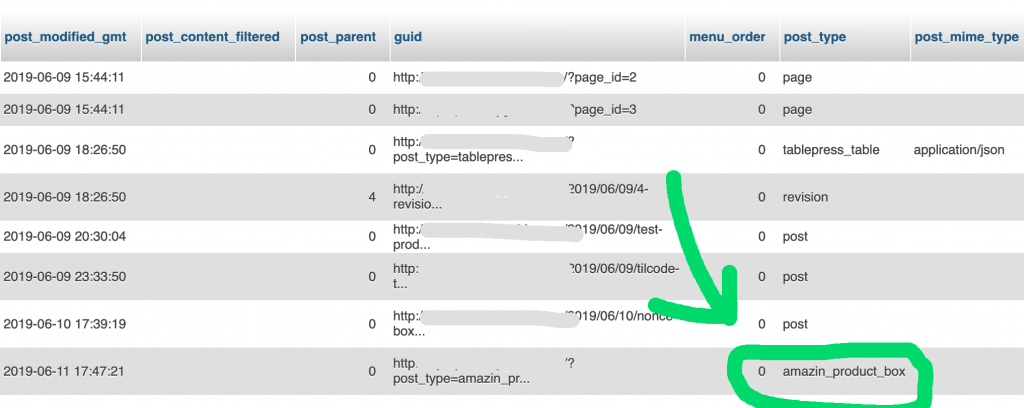
Make a new product box, go back to php myadmin and reload the posts in the db and.. success! My newest product box is now of post_type “amazin_product_box”, and it is nowhere to be seen in the WP dashboard page for Posts.
I deleted all the “post” type product boxes to clean up the Posts screen. We’re gonna be amazin_product_boxes from here on out!
Displaying the product boxes on the Amazin Product Box admin page
So, now that they’re not in the Posts page anymore, maybe now’s a good time to get them to show up on the admin page as their creator intended:
Since they are now their own post type I thought it might be easy to select them by post type. The tricky part will be stuffing their data into my table (I mean, I don’t want the full posts displayed like they’re blog posts…).
Pick out its product name field, author name, last modified
Display each one as a table row using a loop
It wasn’t super difficult but it took some trial and error to get the date right and figure out how, exactly, to pick out things like author meta from a post ID.
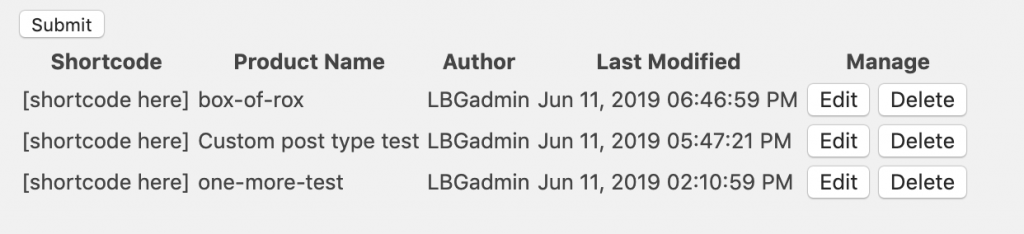
Here’s what I ended up with:
If you’re thinking, “Wow, that’s kinda ugly!” you’re not alone! But I want to get all the hookups working before I venture off into styling land, so it’s going to stay ugly for a little while longer.
(The code’s a bit ugly with the php and HTML mixed together, but I’m not sure yet what the proper conventions are and there’ll be time to tidy it up later.)
Day 5: Hooking up the Delete buttons
Each existing product box should be able to be edited or deleted independently of the others. The Edit and Delete buttons are client-side (HTML) and the php methods they need to call are server-side. AJAX and JQuery to the rescue.
When faced with a novel problem (or just one that I know is going to take some trial and error), I like to do a bare minimum “wiring” as the first pass. For this particular bit of work, that meant 1. associating the post ID with each edit/delete button, 2. passing that ID into the JS methods, 3. logging that ID from the JS method to verify the hookup was successful.
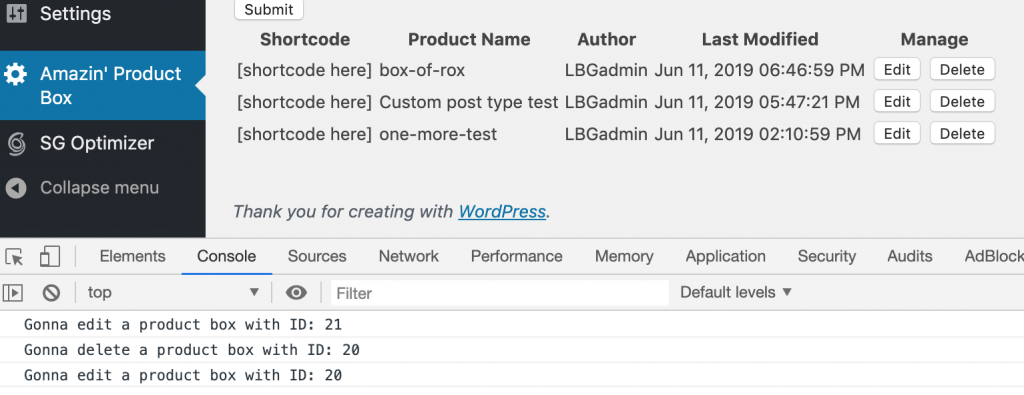
Clicking Edit and Delete logs the post ID. From here, I’ll build up an actual edit and delete functionality.
Looks good – now I know the post IDs can make it over to the JS file’s methods.
Note: I had to include a versionnumber in my call to wp_enqueue_script and increment it every change to the .js file. This is called “cache busting” and without it, the plugin used a stale version of the .js code even though the latest was uploaded to the server.
Every time I change the JS code I increment the last parameter. Below, it’s at 1.06. Next time I update the JS code I’ll change it to be 1.07, and so on.
Using wp_delete_post() from the JS file was a no-go.
Turns out I needed to use Ajax, but WordPress is already set up for this sort of thing. I found this tutorial very helpful for this step. I skipped anything relating to permissions, confirmations, or security on this first iteration, but if you check out this commit, the delete button now deletes the appropriate row (it fades out!) in the table and in the wp database.
Securing the Delete functionality with a nonce
After getting a bare-bones delete functionality working, I went back to the same tutorial that got me started and followed its examples for adding a nonce. My code was a bit different than theirs, but a few educated (lucky?) guesses later and I had it working.
I put the nonce directly on the Delete button input itself like so:
Notice how the input tag accepts nonce=”…”. Surprisingly (to me, anyway) that’s valid syntax. Over in scripts.js I’m then able to pluck it out of the event (“e”) like so:
var nonce = e.target.nonce;
Here’s the commit that adds nonce to delete. I tested it by changing the nonce value on one of the delete buttons (to “12345”) and then clicking delete – and nothing happened. So the nonces do actually seem to do something. Hooray!
Building the “Edit” functionality
First, a few small UX changes: I removed the product name box field (I think I’ll just refer to boxes by their IDs, not by names) and exposed the ID in the table. This commit contains that work.
Populating the existing form
The first bit of work here was to make the Edit button populate the form with the existing post’s contents.
In scripts.js, an ajax call that calls an action (‘amazin_get_existing_post’) defined in the php part of the project and stuffs the data into the appropriate form fields upon success:
$ ( '#admin-table').on( 'click', '.edit-button', function(e) {
        console.log("Gonna edit a product box with ID:", e.target.id);
        var id = e.target.id;

        $.ajax({
            type: 'get',
            url: MyAjax.ajaxurl,
            data: {
                action: 'amazin_get_existing_post',
                id: id
            },
            success: function ( response ) {
                console.log( response );
                var data = JSON.parse(response.productBoxData);
                $ ("#product-name").val(data.productName);
                $ ("#product-tagline").val(data.productTagline);
                $ ("#product-description").val(data.productDescription);
                $ ("#product-url").val(data.productUrl);
                $ ("#product-button-text").val(data.productButtonText);
            }
        });
        return false;
    } );
(Hopefully that makes sense – the overall “journey” goes something like this: the clicking of the Edit button is handled in JS -> that JS method calls an action defined in the PHP file -> that PHP file action gets the post from the db and uses wp_send_json() to kick the data back to the JS method -> the JS method captures that data as the “response” parameter.)
Saving the form contents as an “update” to an existing post
The last bit of work to do on “Edit” was to make the form recognize two states: making a new one and editing an existing one. I chose to do this with a hidden ID field in the form. The hidden field holds either “undefined” or a post ID (placed there by getting a post to edit). When the user submits the form, it uses that ID (or lack of ID) to figure out what to do – either submit a new post or update an existing.
This post is part of an ongoing series recapping my experience in Oregon State University’s eCampus (online) post-baccalaureate Computer Science degree program. You can learn more about the program here.
Six-word summary: A well-designed and satisfying course
I feel like I sometimes write these recap articles to complain and warn other students of landmines, but CS475 was what every OSU online CS course should be: organized, succinct, and educational. I learned so much and enjoyed the course from start to finish.
CS475 Review
It only runs in the Spring quarters, but it’s worth holding out for! You’ll learn a lot, the material is interesting, the course is well-paced, and the exams felt fair.
I picked this class because parallel programming was something I thought sounded intimidating and was unlikely to be something I would attempt on my own. I’m very glad I chose it! It was way less intimidating than I feared, and now I feel entry-level competent in a subject I formerly knew nothing about.
Class structure
10 weeks
8 programming assignments where you code, run the code, and then write an analysis of it
I spent about 7-10 hours on this class each week, making it one of the lighter workloads in the program
Proctored midterm, proctored final
Weekly quizzes in Canvas (usually 5 questions with a full hour to answer them)
About 1-1.5 hours of video lectures each week (sadly they are without captions, but they are very high quality otherwise)
Some code is provided for you to use, saving time for focusing on what the class is really about
Instructor attends office hours! He’s really approachable, you should go even if you don’t have a specific question!
The instructor is SUPER active! You can get on a video chat with him – he’s just sitting there at pre-announced times, waiting for people to show up to his video chat room! He’ll look at your code! He’ll talk to you 1:1 about topics! I’ve never had such a productive “office hours” experience as I did in this class, and I didn’t even show up with any questions.
Contrast this with how most classes in this program hand you a problem and set you loose on figuring it yourself (via Google, Stack Overflow, old projects posted to GitHub, etc). There’s a time and a place for that, sure, but for $2000 in tuition I’m happiest when the class makes me feel like I learned something from the person teaching it. I want an experience I can’t get from Google and an independent project. I want an intelligent, skilled person to say “here’s what I know, and here’s how I think about it”and that’s how Professor Bailey ran this class.
Prof. Bailey also sends out an anonymous survey at the end of the course asking for feedback on each and every assignment as well as time spent. He genuinely cares about the class.
CS475 Project Structure
Unlike most classes, CS475 hands you some “starter code” for every assignment. You still have to put it in the right place, call it at the right time with the right data, and format and analyze the output yourself, but being provided this “starter code” was great for a few reasons:
Less time spent on things that aren’t the point of the assignment
No super fancy math skills needed (the bezier volume calculation formula is given to you, for example)
Less likely that you’ll go off into the weeds and do something ridiculously wrong and miss the point of the assignment
Less time needed overall for each assignment
This class has you throw nearly 100% of your efforts towards parallel programming related coding and analysis. For those of us with a finite number of hours in a week it was so good to just focus on the subject of the class and skip some of the boilerplate project setup. This class would pair well with another less-time consuming class, if you need (or prefer) to double up.
Most of this class’s projects go something like this: start a new C project, bring in the starter code, refactor/add to it to make it do what you need, write a bash script (or whatever you prefer) to run a loop and pass different parameters to the program each run, get all of the output in your Terminal (some people write it to a file), dump the output into a spreadsheet (I used Google Sheets), create graphs and write your analysis (in response to prompts).
Typical project output – here’s my output from Project 2
Bring these into your favorite spreadsheet software and create a pivot table. Then, generate the needed graphs for your analysis.
Somehow I made it this far in life without ever needing a pivot table. In this class, pivot tables made graphs a cinch.
And that’s pretty much how the assignments go.
I was a bit intimidated by this class before I took it. People say it’s dry and the subject has a reputation for being challenging, so I wanted to show other prospective students what’s actually involved and how approachable it really is.
Tips for CS475
NVIDIA CUDA support is limited on some versions of Mac computers. (For example, Apple just doesn’t support it for OS 10.14 at the time of this writing). If you’re on a Mac, I suggest using the school-provided rabbit server for your CUDA assignments and not wasting hours like I did trying to get it all working on a Mac.
Go to the office hours! Seriously, I went on a whim near the end of the quarter and was surprised to find myself alone in a video chat with the professor. I was just going to lurk but it ended up being a great chance to discuss a bunch of class topics one on one. Another student showed up and he stepped through her previous assignment code with her. You can’t beat the value of having an expert review your code with you!
The exams are straightforward. Some classes in this program use exams as an opportunity to test your speediness and your ability to keep track of registers through multiple iterations of multiple loops, but this class kept it fair and simple: watch the lectures, take notes, study those notes and you’ll do fine! He even gives a generous amount of time for the exams.
Overall, it’s just a high quality course. The lectures were freshly recorded, well-paced, on-topic, and relevant to the assignments and tests. The weekly assignments always looked challenging at first but were ultimately quite doable and enjoyable.
I’ve got just 4 classes left to complete my degree. I’ll be back in the fall quarter for Intro to Networks! See you all then!