The site is not huge or complicated, so I started digging…
(Side note: it wasn’t the unused media and it wasn’t trashing all the comments, though deleting them did feel amazing and I highly recommend it)
The culprit: hundreds of tags
WordPress makes it easy to edit and remove Tags – just navigate to Posts on the left and open the Tags section. This slow-to-publish site had a good 250+ tags, most of which were in use by either 0 or 1 post, and almost all of which weren’t even useful (the me of 2014 who made all those tags was just doing her best).
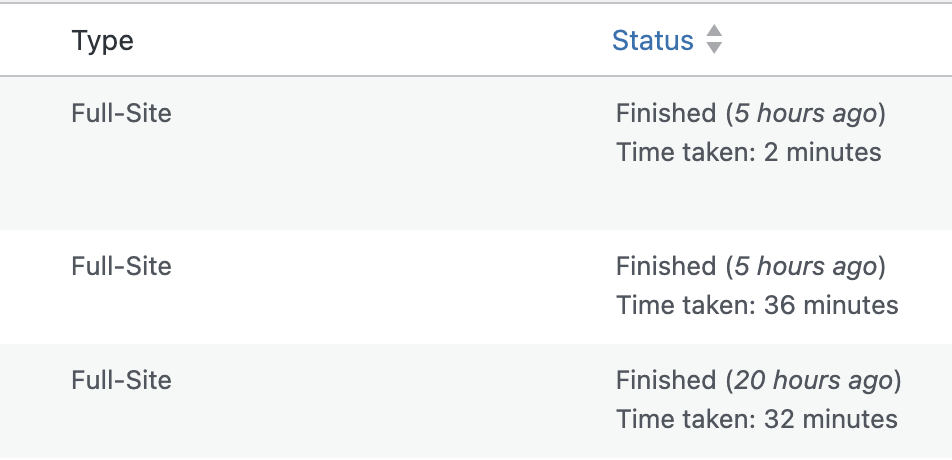
I deleted the vast majority of the tags, and now the site exports in ~2 minutes.
TL;DR: delete all your excess WP tags and Staatic might publish faster
A colleague brought me a fun game of whack-a-mole buggy set of checkboxes made with React. Interacting with any checkbox was also unchecking (or checking) unrelated checkboxes in the collection! It seemed to do so at random. ????
Proving (once again) that someone else’s problems are always more compelling to work on than my own, I workshopped it a bit until I had a repro case:
The problem ended up being in the way that React state was being updated. Here’s how I set it up –
// BAD CODE!!! DON'T USE! consthandleSelectCar = (car: string) => { constcarsCopy = [...cars]; if (cars.includes(car)) {// If the car is already in the list, remove itsetCars(carsCopy.filter((c) =>c !== car)); } else { // If the car is not in the list, add itsetCars([...carsCopy, car]); } };
In this original version of the handler, I thought making a copy of “cars”, altering it, and setting it to the state variable would prevent these kinds of issues. I wasn’t mutating the original, I was using state variables, what gives?
After scratching my head about it for a while and reviewing what the React docs had to say about recycling the previous state, I wondered if I needed to be setting the state via an updater function.
// GOOD CODE! Or at least better... consthandleSelectCar = (car: string) => { setCars((prevCars) => {if (prevCars.includes(car)) {// If the car is already in the list, remove itreturnprevCars.filter((c) =>c !== car); } else {// If the car is not in the list, add itreturn [...prevCars, car]; } });};
And that fixed it:
I think I went wrong in a couple places here:
Using the spread operator ([...]) creates a shallow copy of an array, not a deep copy. (However, simply replacing […cars]; with const carsCopy = _.cloneDeep(cars); was not enough to salvage my original non-working version)
In this article: How I moved several of my WordPress blogs from shared hosting to Netlify as static sites. Article was written June 2024 and minorly updated in February 2026.
I have a collection of WordPress blogs dating 10+ years back. They are all on a shared host who keeps raising the cost to renew. The sites are old and they don’t get many visitors, but rather than take them down I decided to turn them into static sites that are simpler to maintain and less expensive to host.
It is not a difficult process, and I documented all the hiccups I encountered along the way in this guide.
Pre-reqs
You have:
WordPress site hosted on shared hosting (like Bluehost, Siteground, etc.)
Your own domain (optional, but this guide assumes you do)
About 2 hours of time
You want:
Less expensive hosting (Netlify has a free tier that can handle small static sites)
A faster, simpler, and more secure live WordPress site
You can tolerate:
A new workflow for your WordPress site – you will run your site from your own computer, make edits on that version, and then “publish” a static version of your site to Netlify
A simpler “live” version of your site – you can’t have any kind of user interaction like user accounts, comments, or shopping carts
Some debugging – none of my sites came over with 0 problems
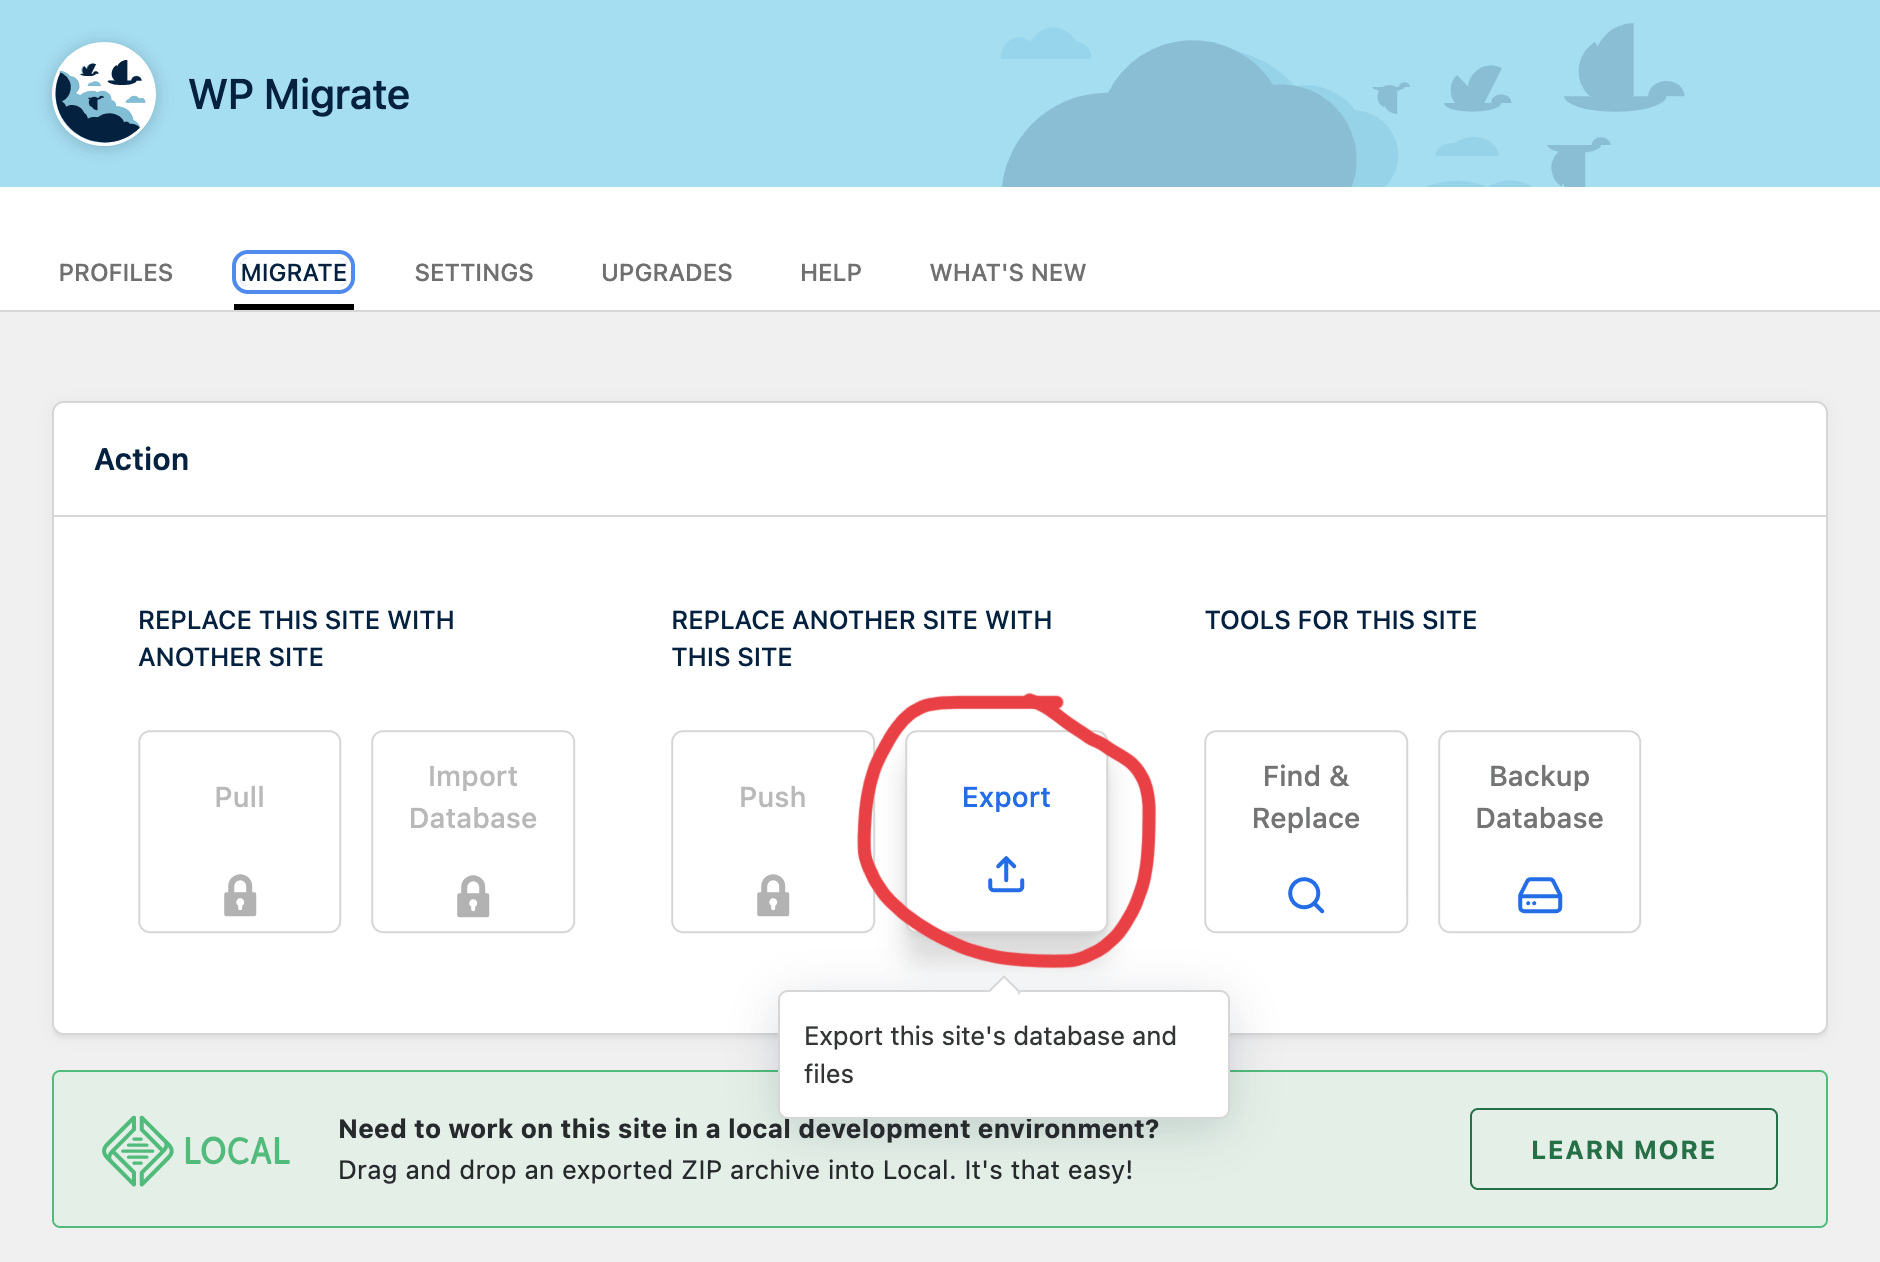
Step 1: Export your WordPress site as a .zip
Log into your WordPress site, install the “WP Migrate Lite” plugin, and export your site. The purpose of this step is to create a .zip file containing everything needed to run your site locally (on your computer).
There are a number of options in this plugin’s config.
I use:
Database – leave as defaults
Media uploads – take all
Themes – export just the ones I use
Plugins – export all
Must-use plugins – export all
Other files – export all
WordPress Core Files – yes, all
Click the “Export” button and wait for it to generate a .zip file. Hopefully it works. If it does not, you may need to adjust what you export or do the old WordPress standard of turning off plugins one by one until it works.
You should leave your actual site up and running. (In fact, your original site can stay up through this entire process.)
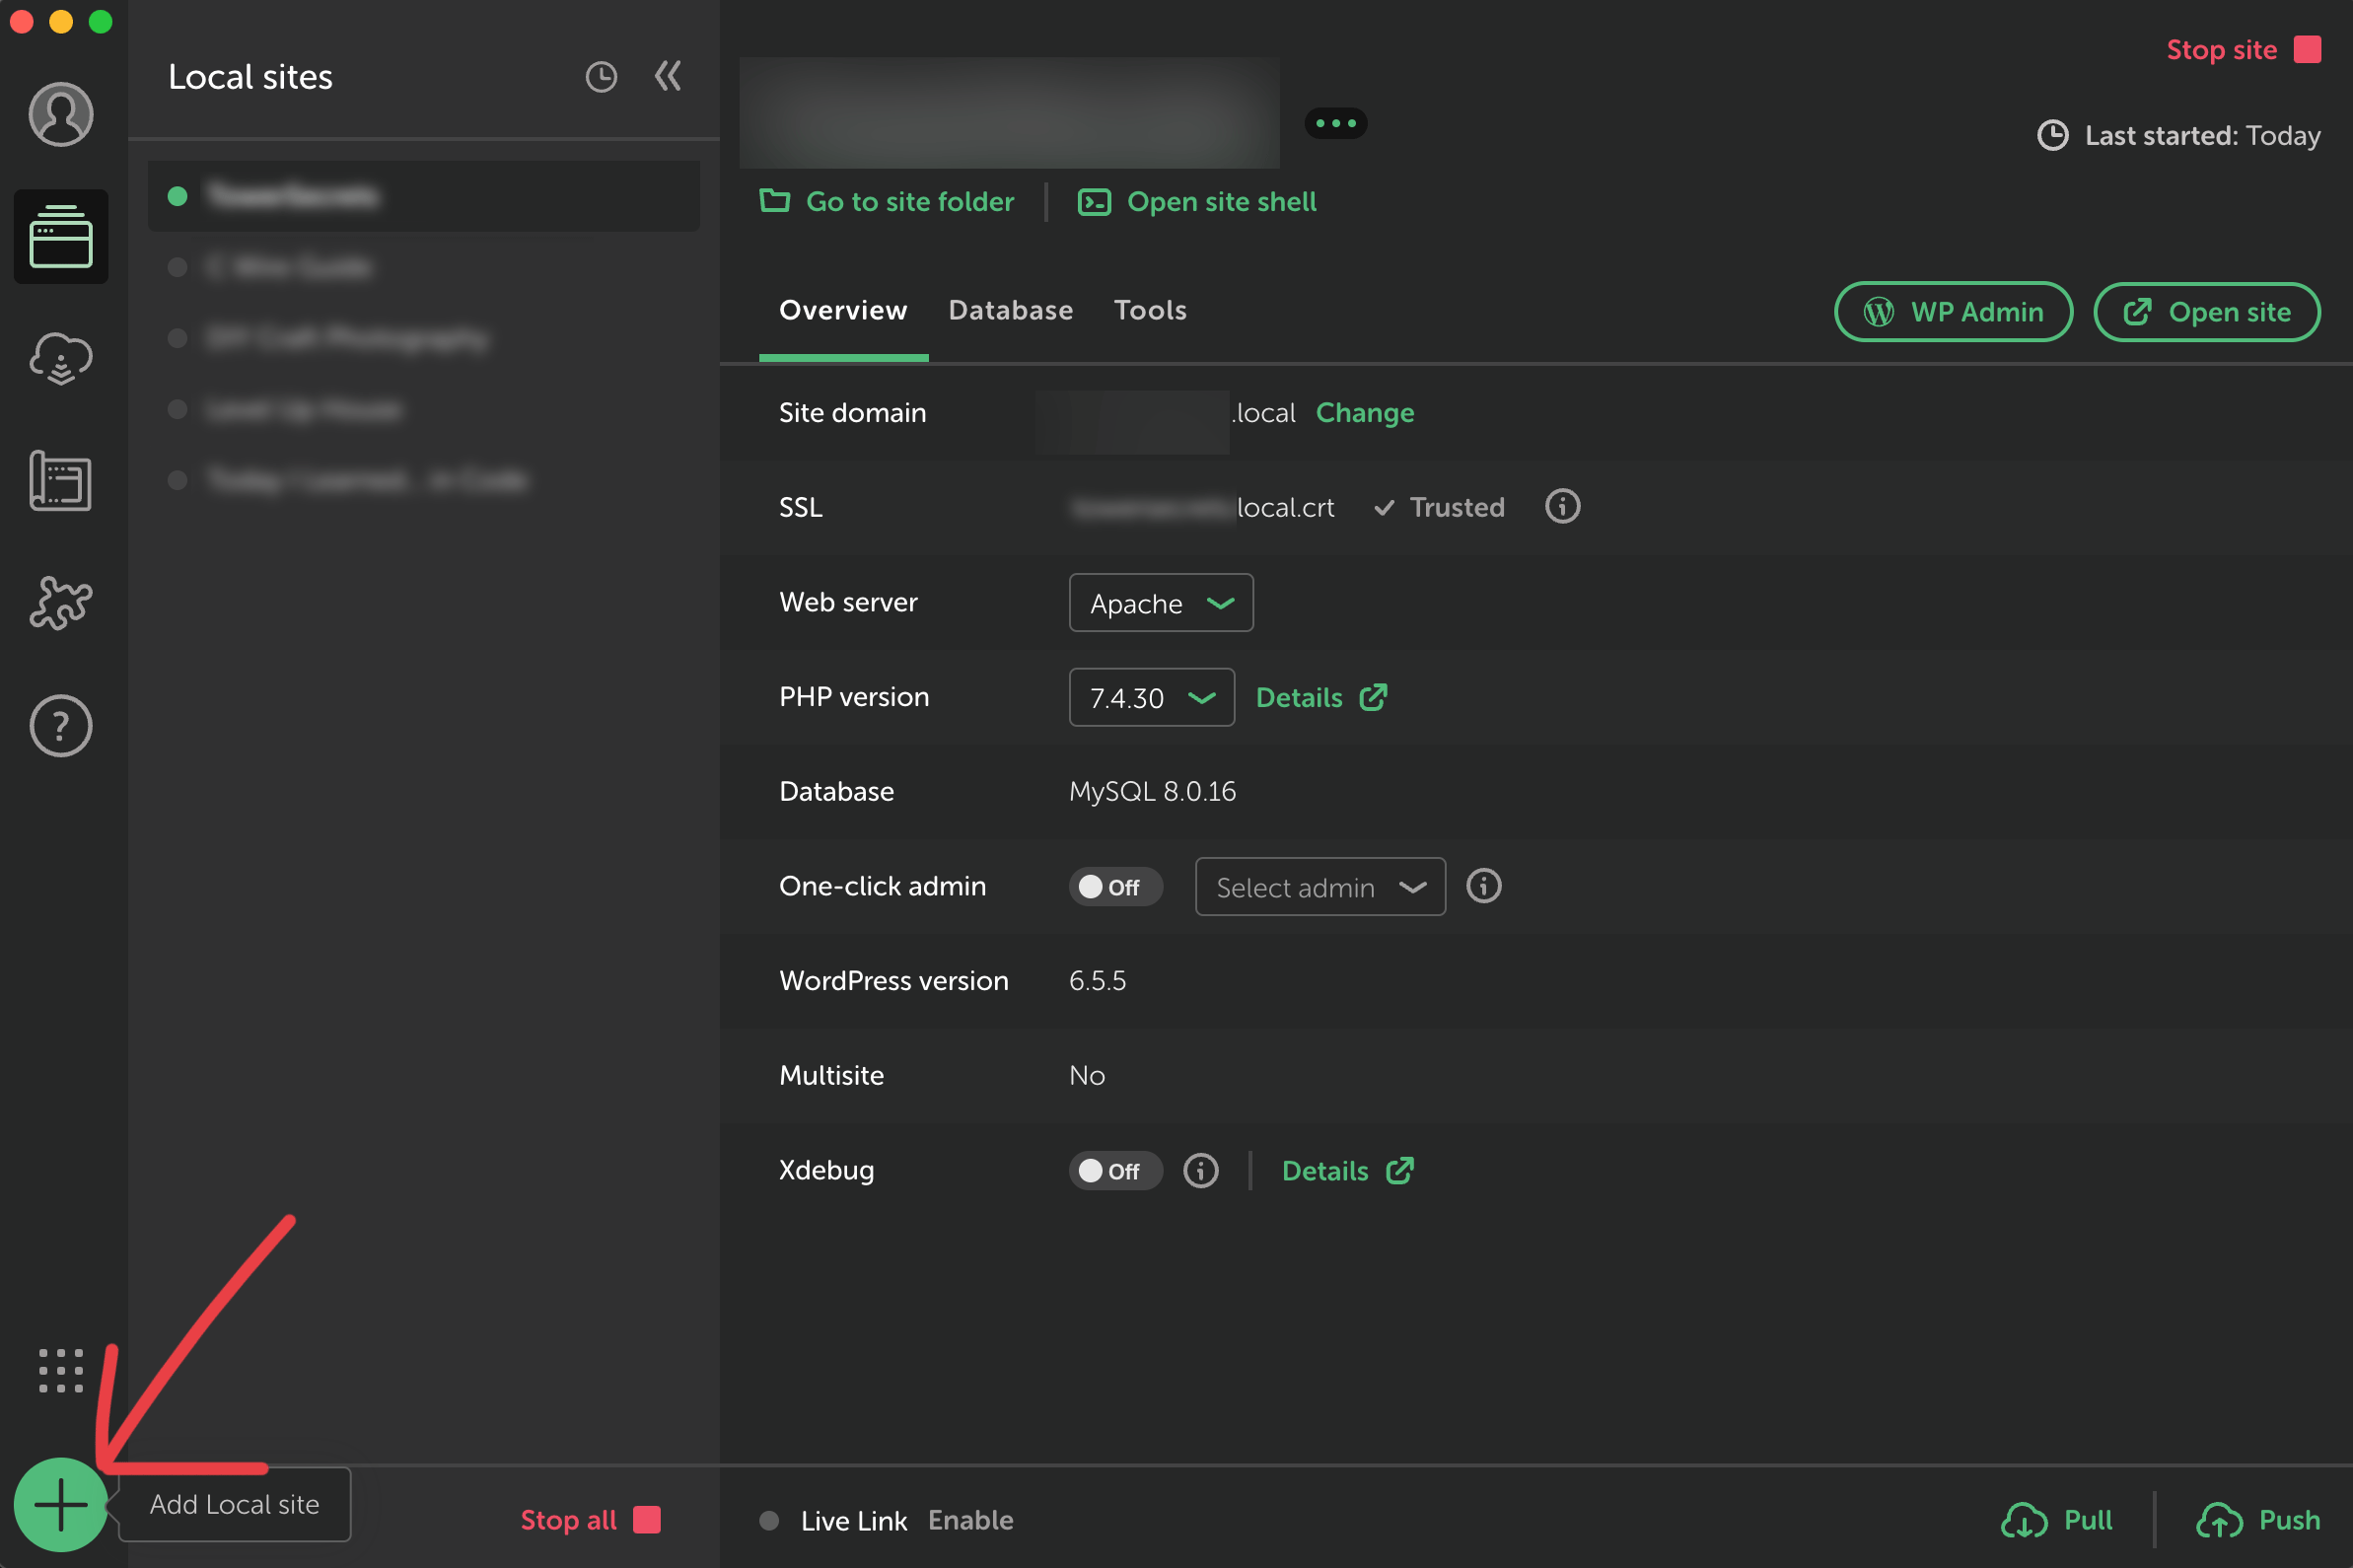
Step 2: Import your WordPress site to Local
I use Local to run my sites on my own computer, and Local has versions for Windows, various flavors of Linux, and Intel and Apple Silicon Mac so hopefully it works for you, too. It’s free.
Click the “+” button to import your site.
Import the .zip file you downloaded in Step 1.
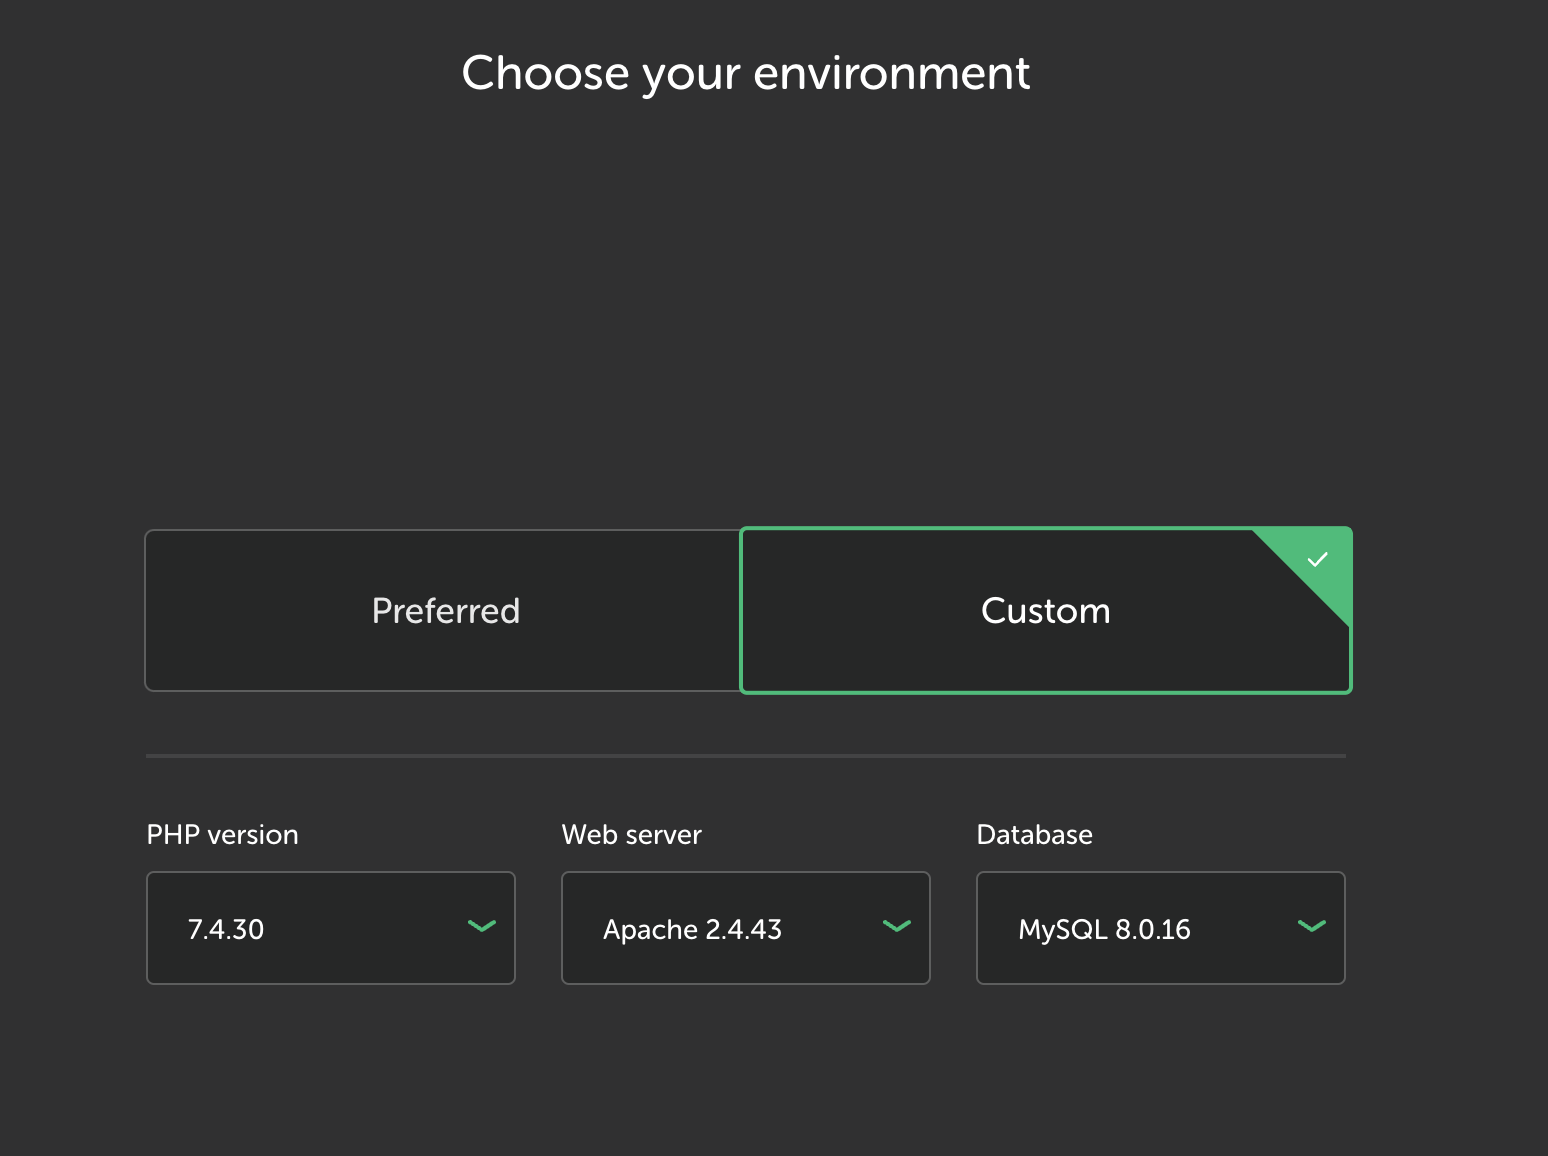
For me, going with the “Custom” environment that it autofills for me has worked so far.
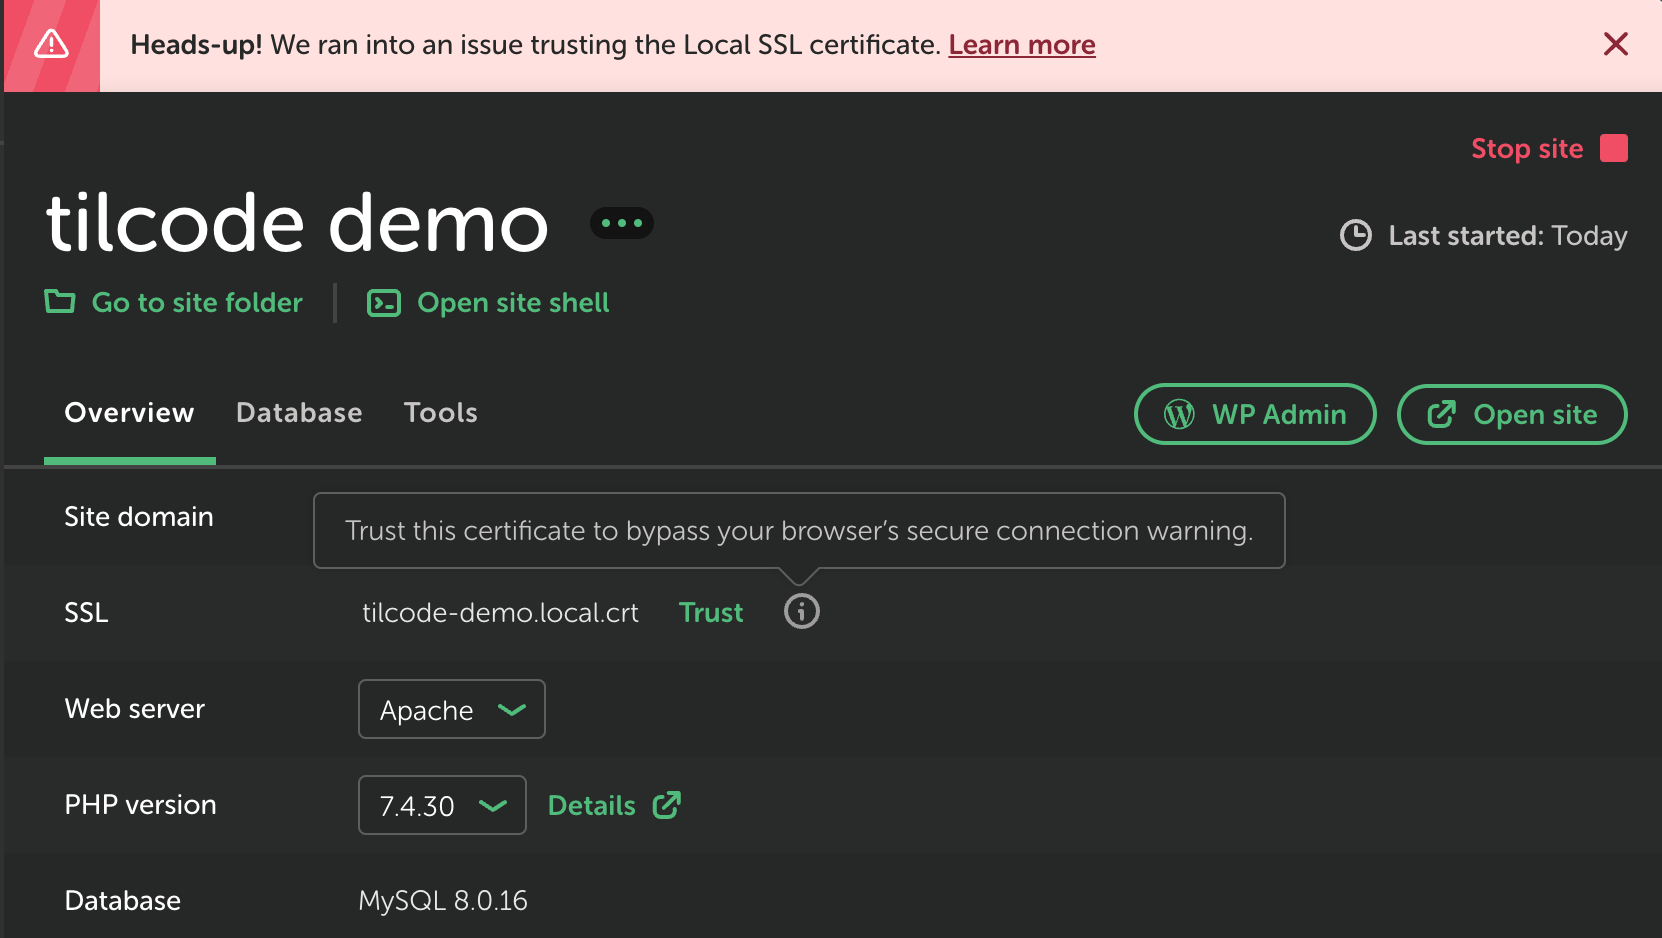
Fix the SSL certificate
The site won’t fully “work” until you approve its SSL certificate. The main page might load but images won’t and you’ll have an annoying banner across the top like so.
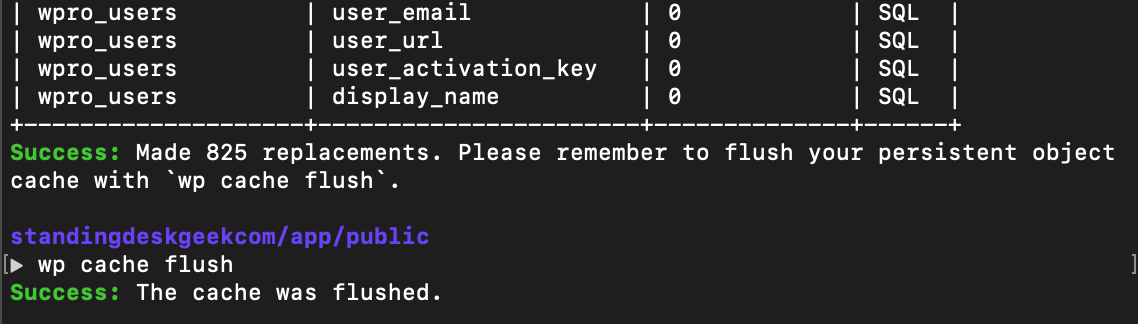
Sometimes I get a message about flushing the cache, which I do with wp cache flush.
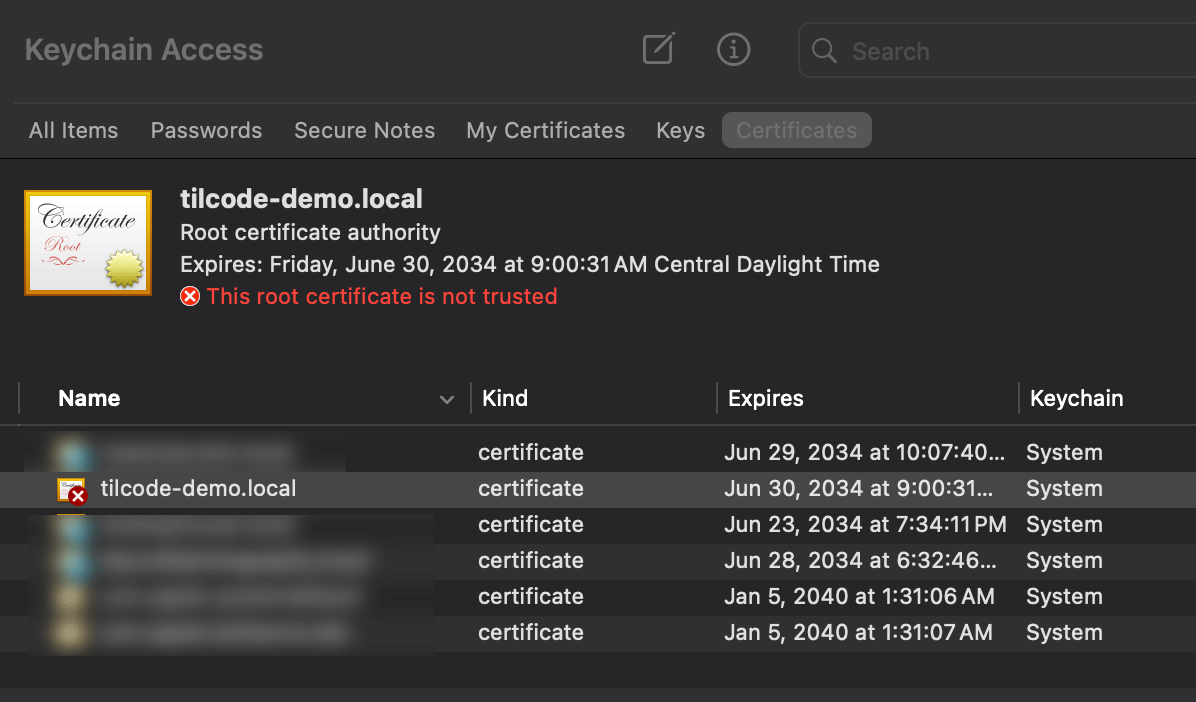
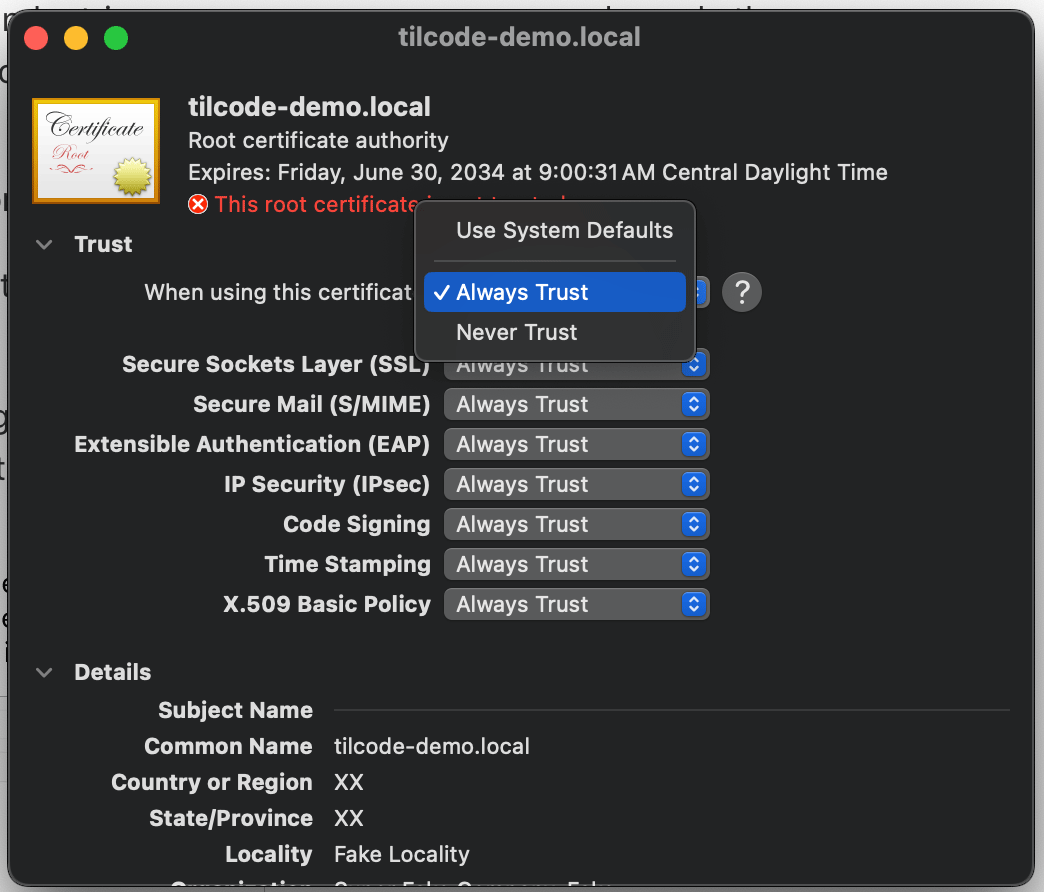
Now I go back to Local and open the site adminpage. If you get a security error, try opening the page via the WP Admin button.
I don’t know why, but Local never seems to know that my site is secure (and it keeps serving me the insecure version) until I actually log in as my admin account. Sometimes it still doesn’t work, so I go back and trust the certificate again. Some combination of restarting the site, trusting the certificate, and logging in as admin eventually gets it all working.
Do not leave this step until you have clicked around your .local site and verified images and links are working and the URL is the secure version.
Step 3: Get Netlify ready to receive your site
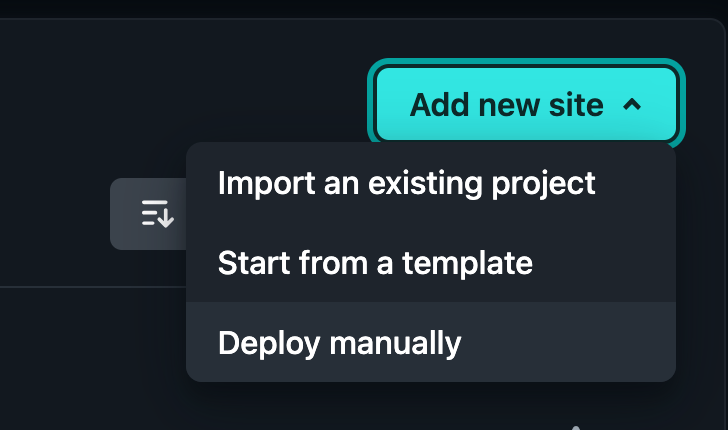
If you haven’t, head over to netlify.com and create an account. Look for “Add new site” and choose “Deploy manually”.
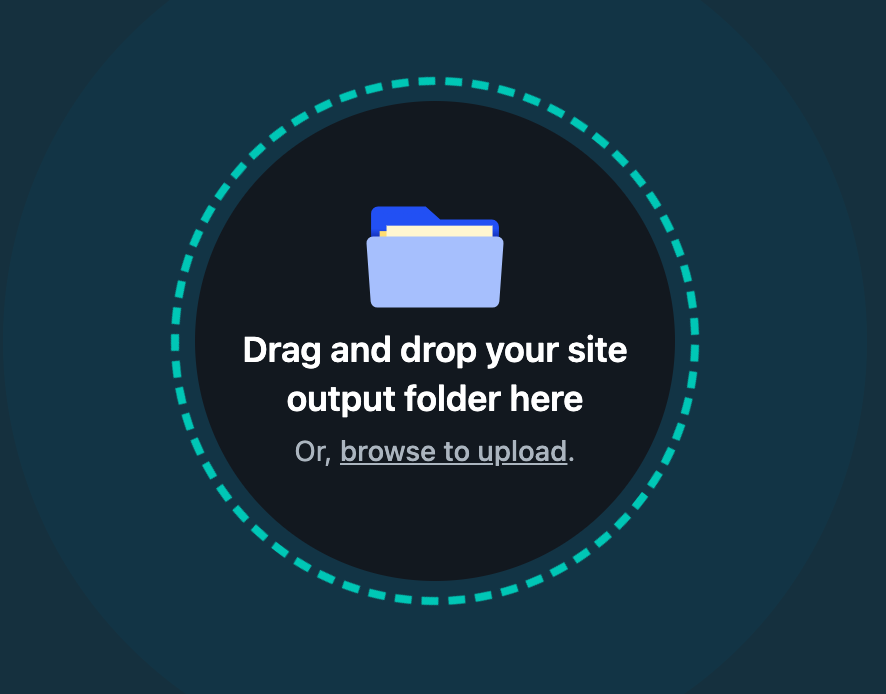
This step assumes you have something to upload, and you’ll be stuck here until you give it something.
Just feed it something simple – I upload a folder (name doesn’t matter) containing index.html (name and extension do matter).
Now you have a Netlify site!
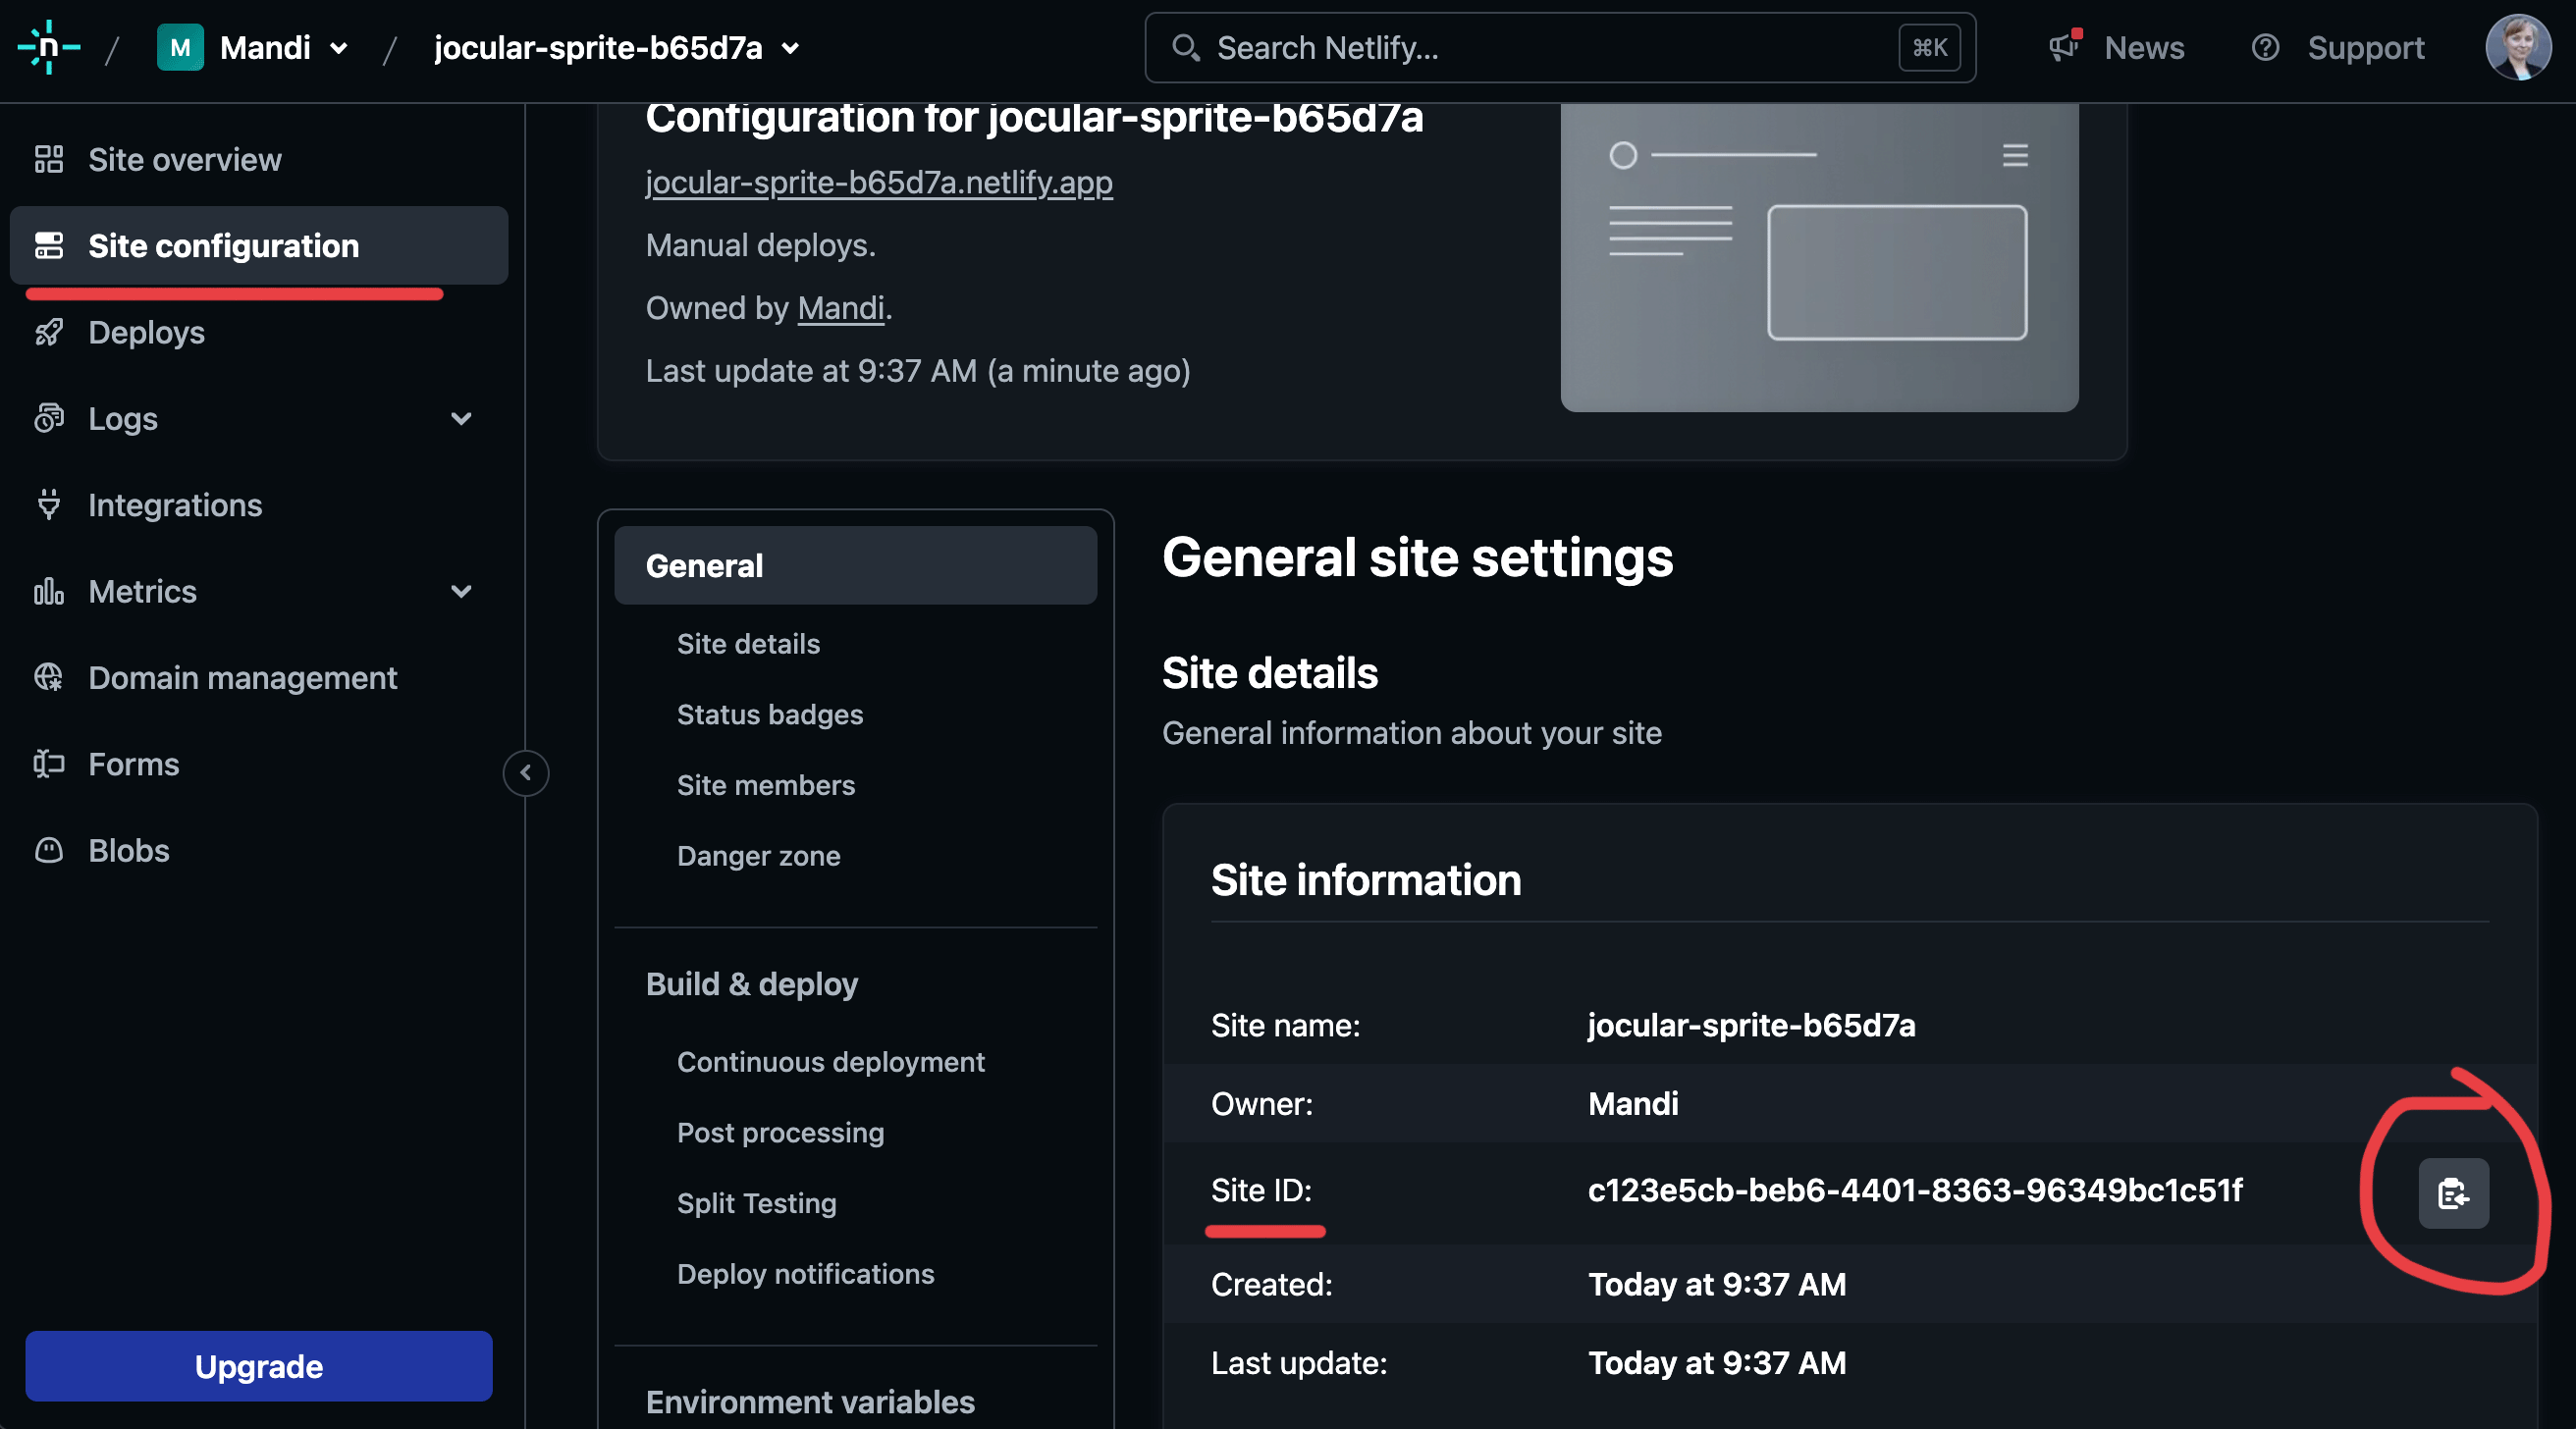
Go to “Site configuration” (on the left) and copy the “Site ID” somewhere.
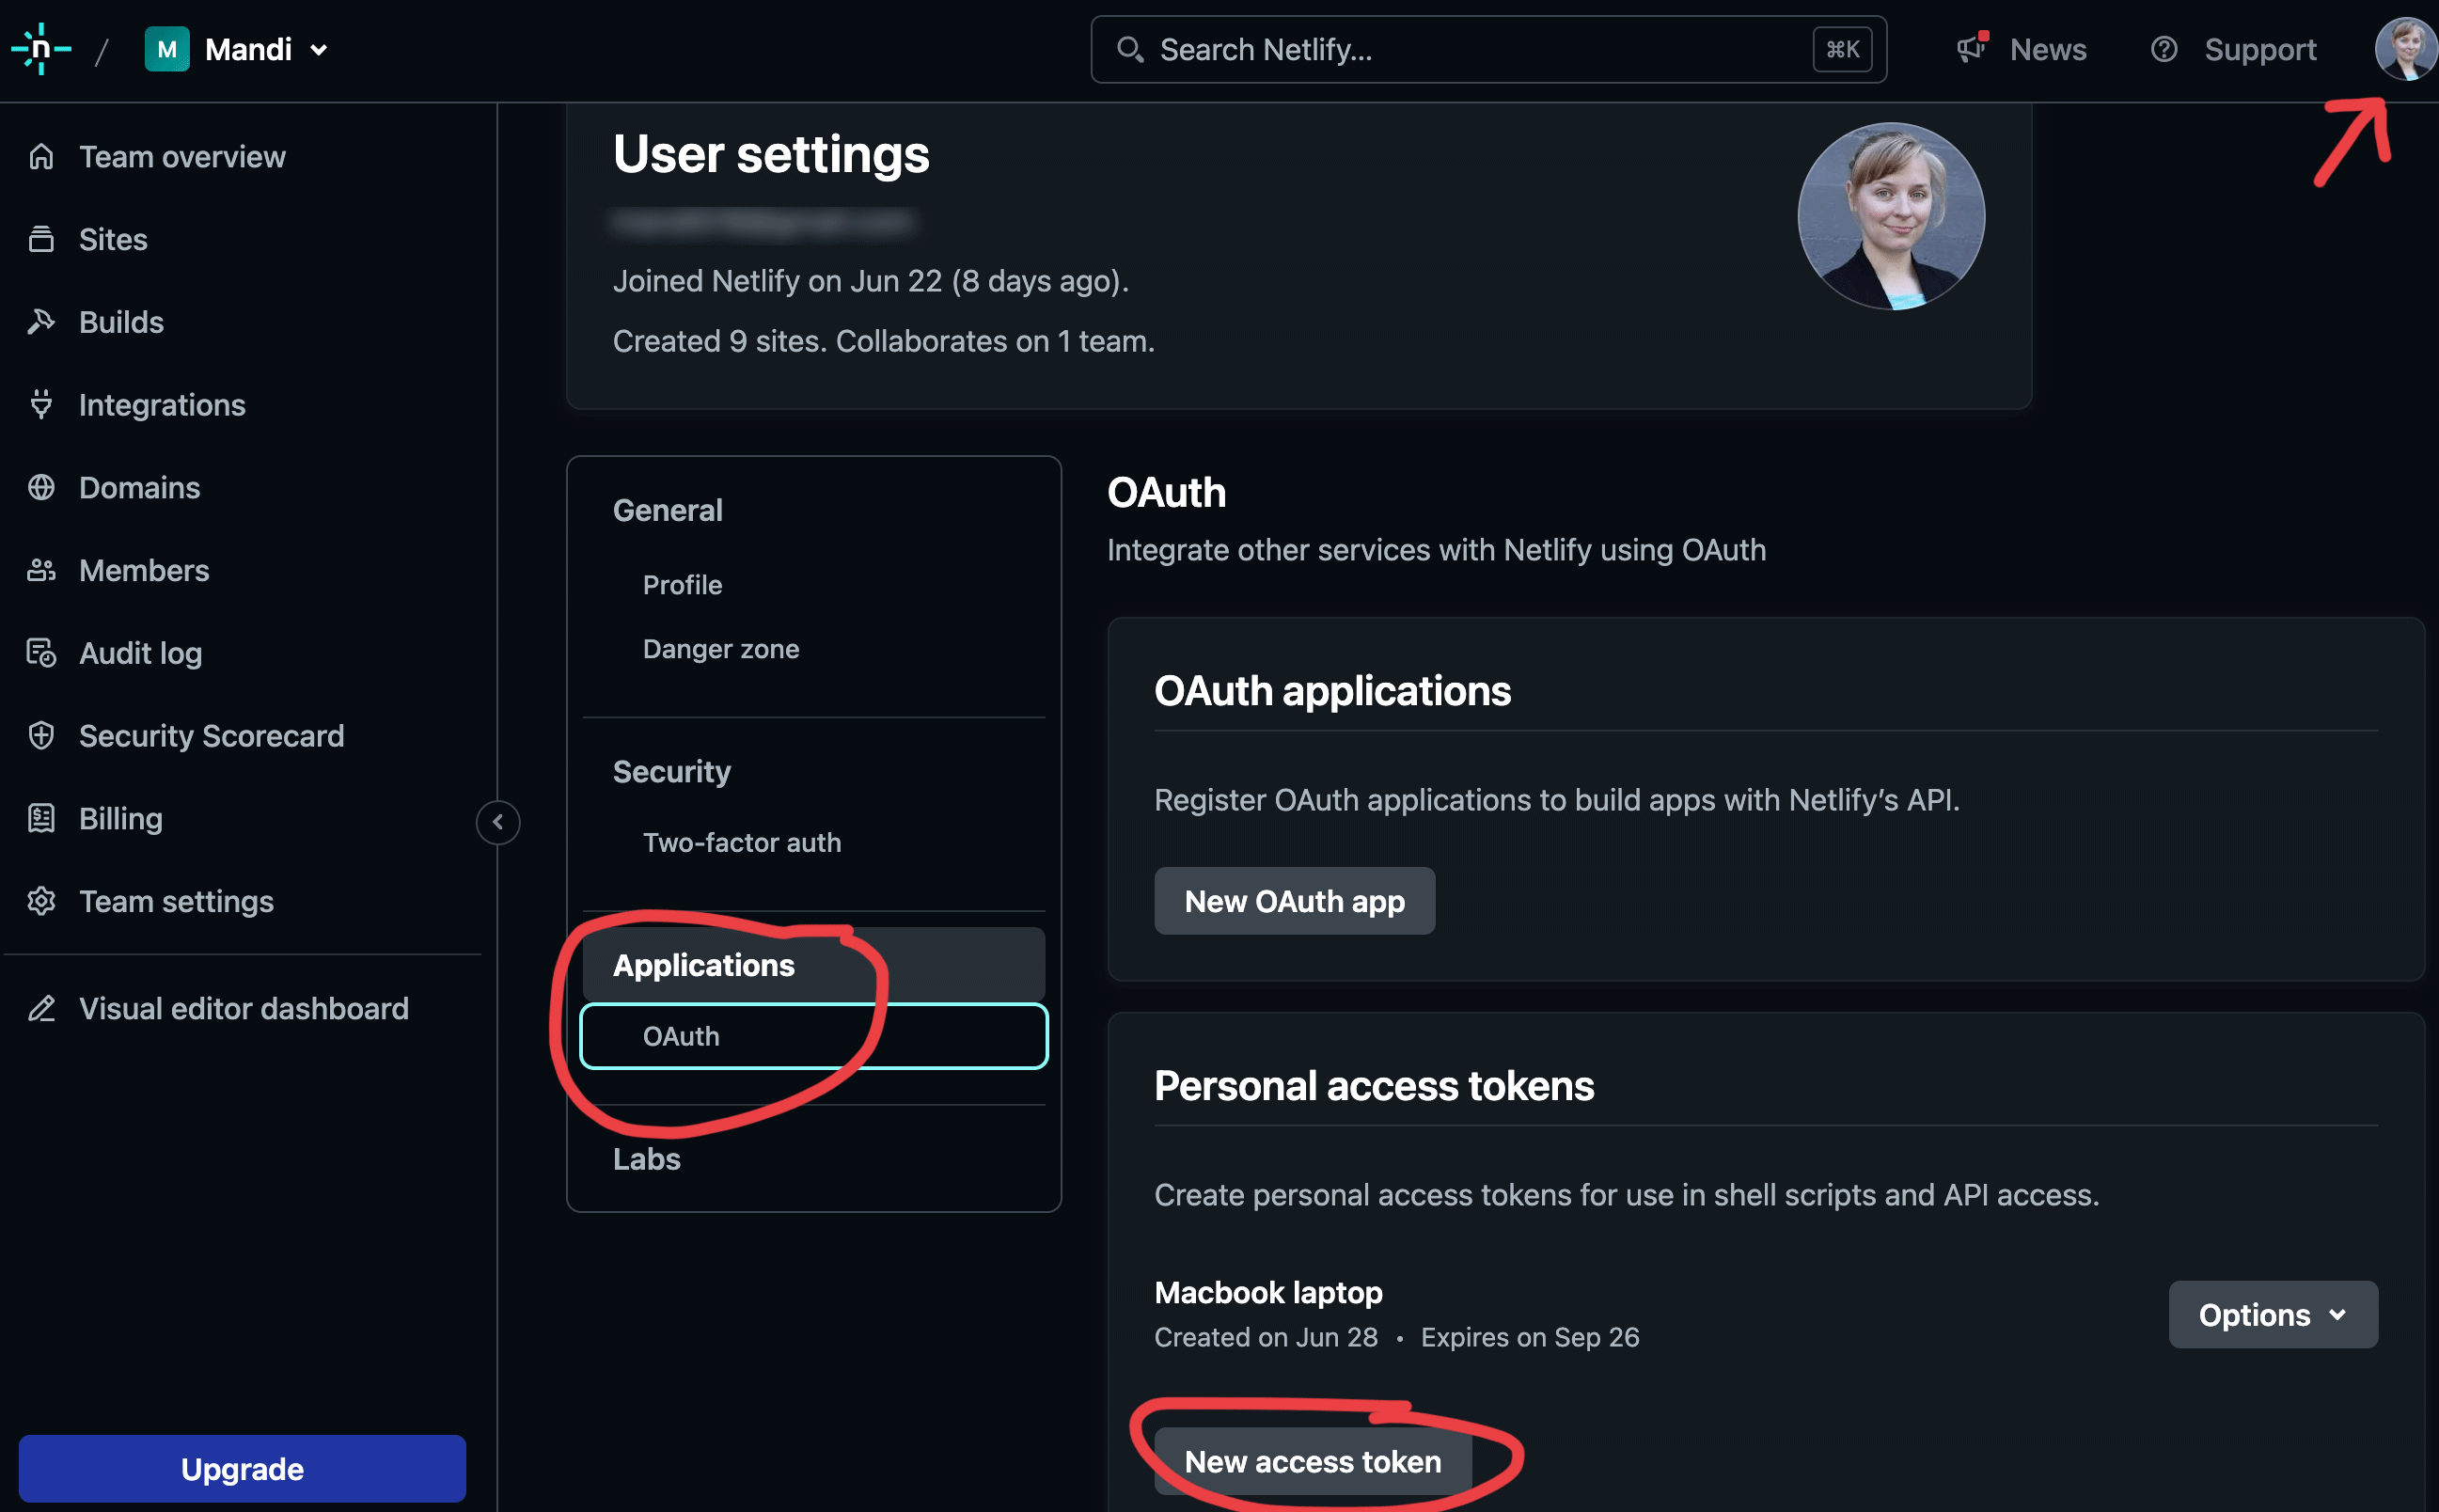
You will also need your Netlify OAuth token, which is created by going into your own personal settings in Netlify.
Copy this string somewhere safe, too.
You should now have:
a site ID
an OAuth acess token
Step 4: Publish your site using Staatic
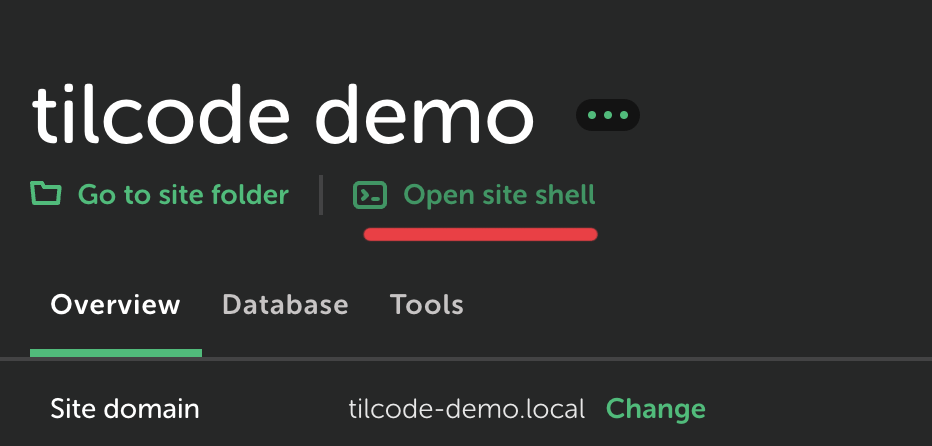
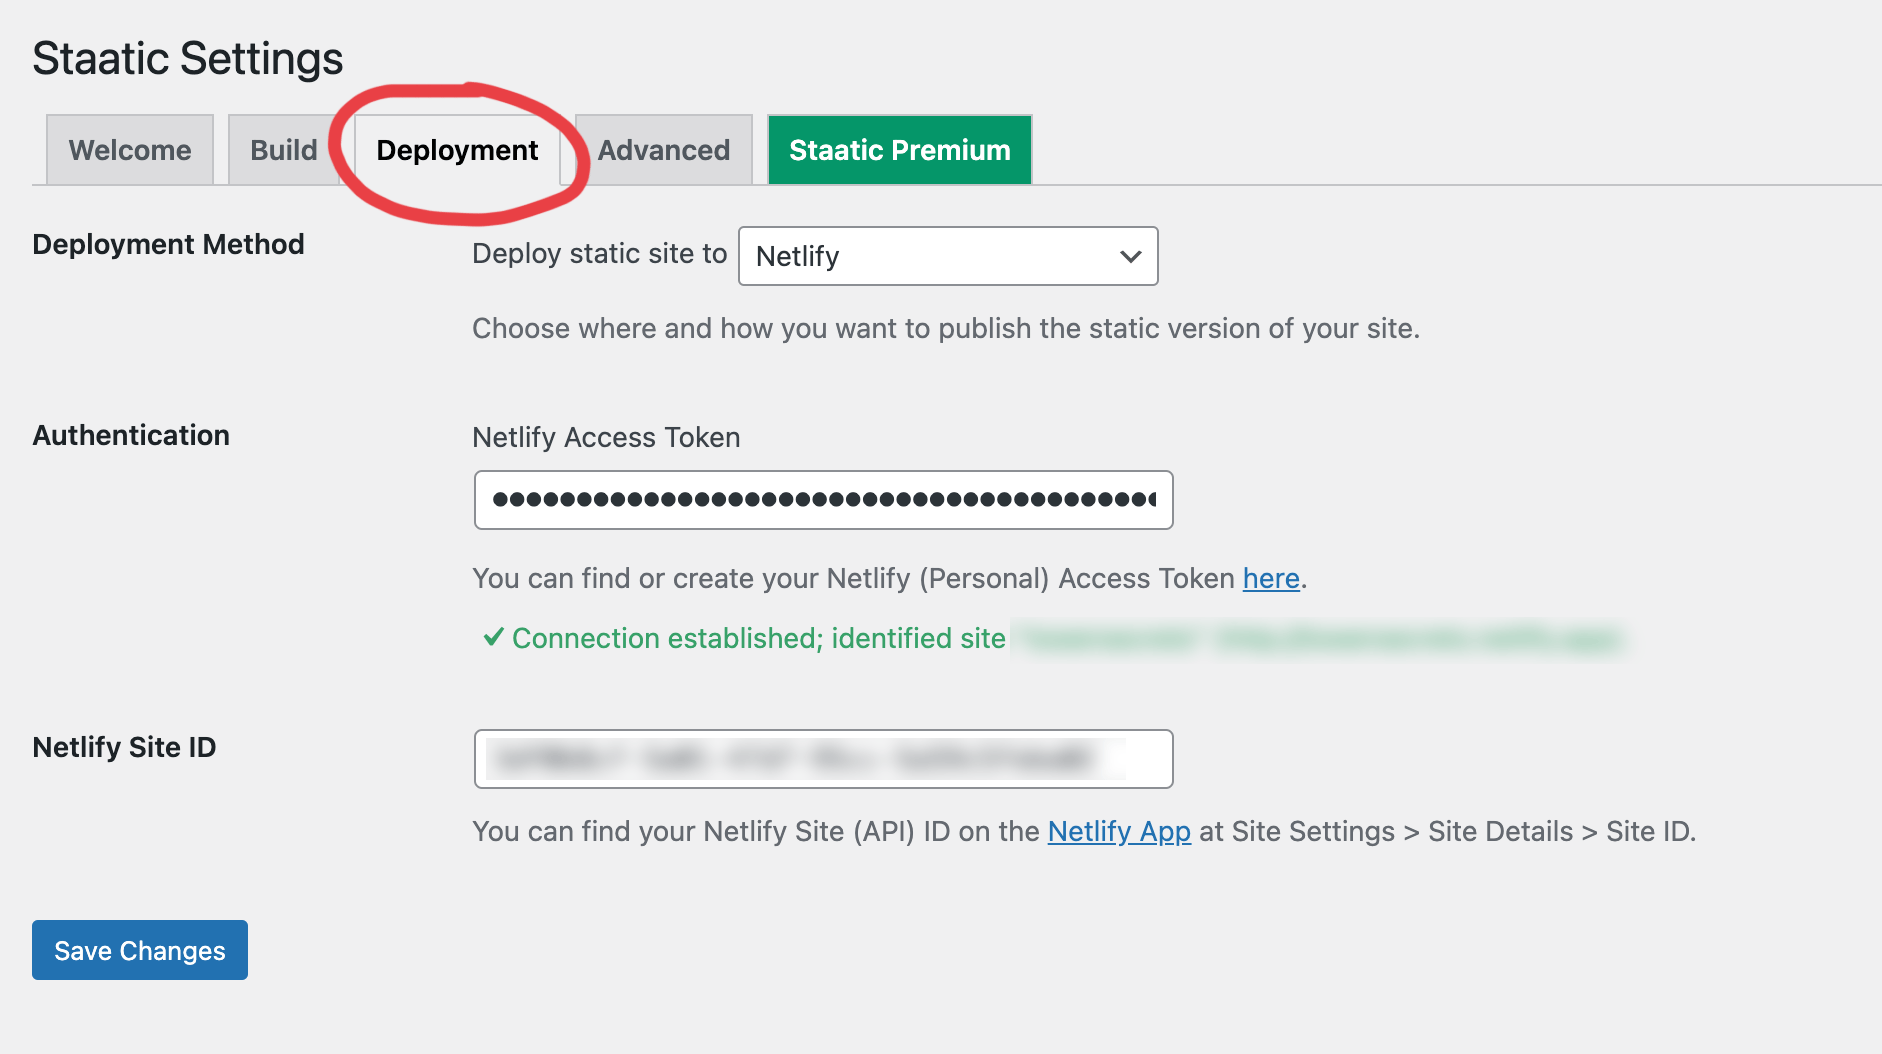
Go back to Local, load up yoursite.local, and install the Staatic plugin. Once installed and activated, open the Deployment tab and fill in your Netlify Access Token and Netlify Site ID (and don’t mix them up). Save changes.
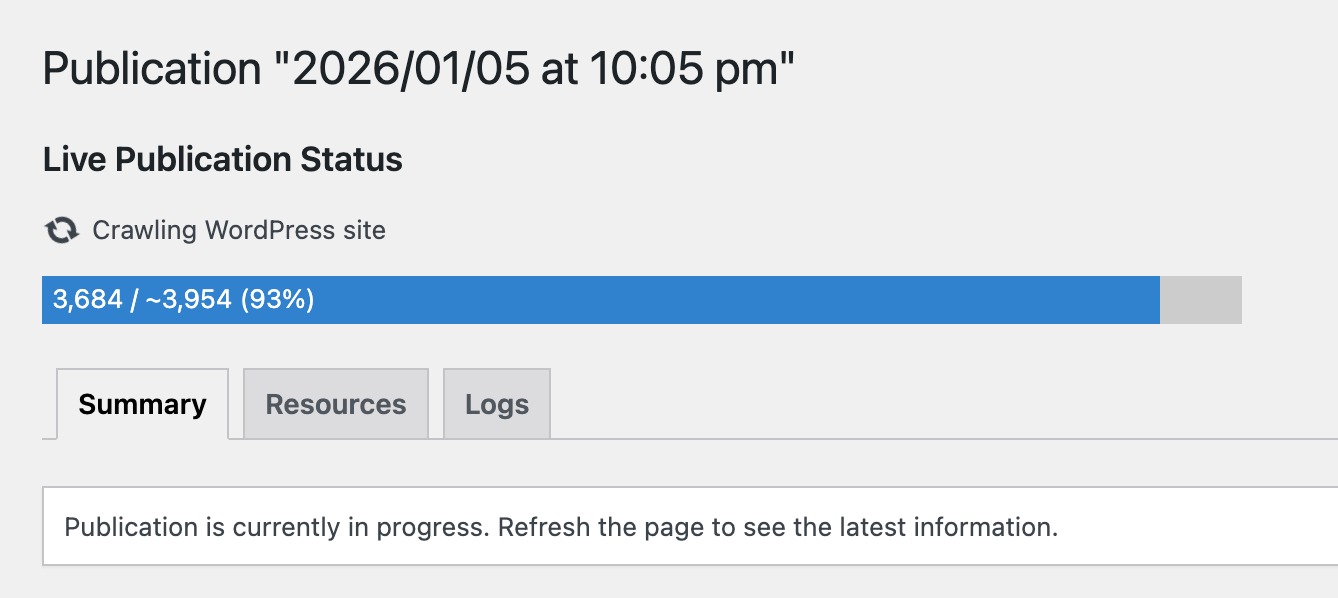
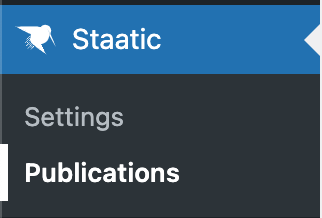
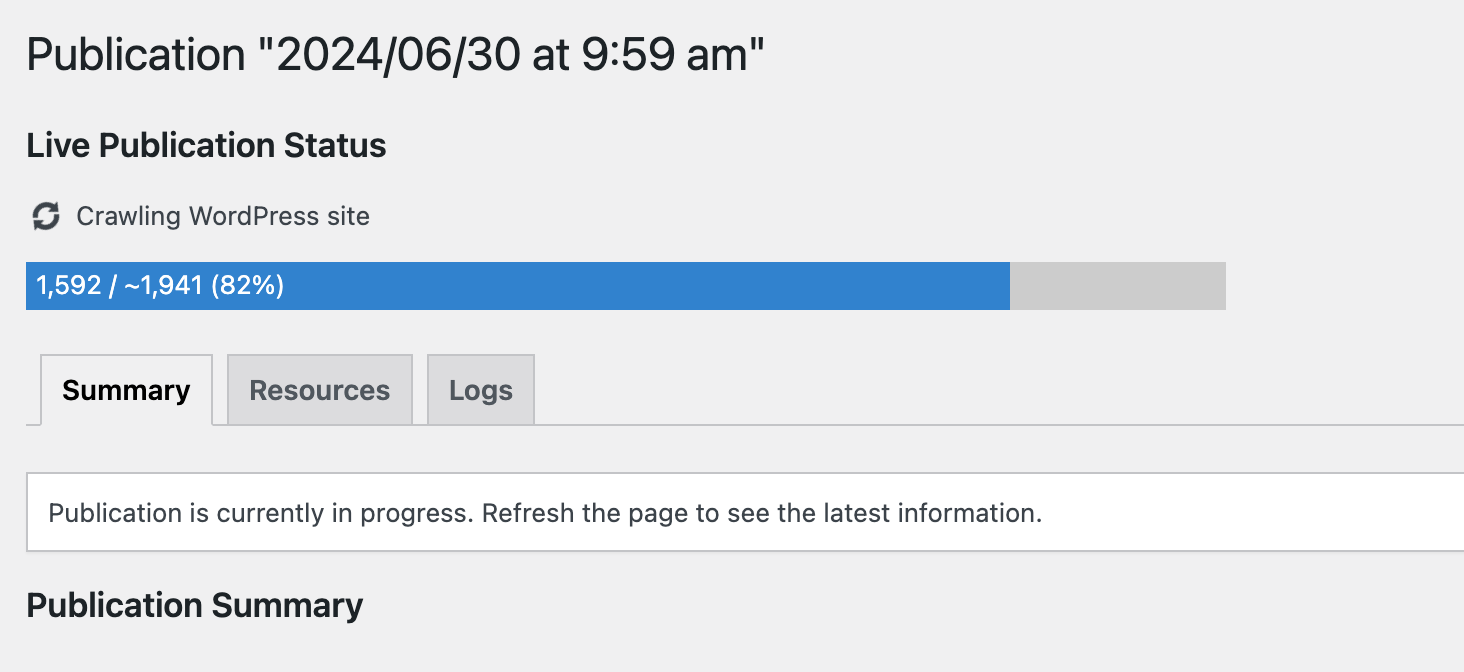
Go to Staatic -> Publications and attempt to publish to Netlify.
The publish step is, unfortunately, where I usually spend most of my time.
This one’s easy – go into Staatic’s advanced tab and check the “Downgrade HTTPS to HTTP while crawling site” checkbox.
cURL error 28
"Crawling entry URL 'https://yoursite.local' failed: cURL error 28: Operation timed out after 60002 milliseconds with 0 bytes received (see https://curl.haxx.se/libcurl/c/libcurl-errors.html) for http://yoursite.local/
I usually get rid of this one by disabling all the plugins I won’t need once it’s a static site, such as Akismet and W3 Total Cache (and similar). I haven’t bothered to narrow it down further (and it may be multiple plugins causing it) but it’s probably whichever plugin(s) prevent a robot from crawling a site.
Another solution if you’ve already tried the above: restart the site in Local and try again.
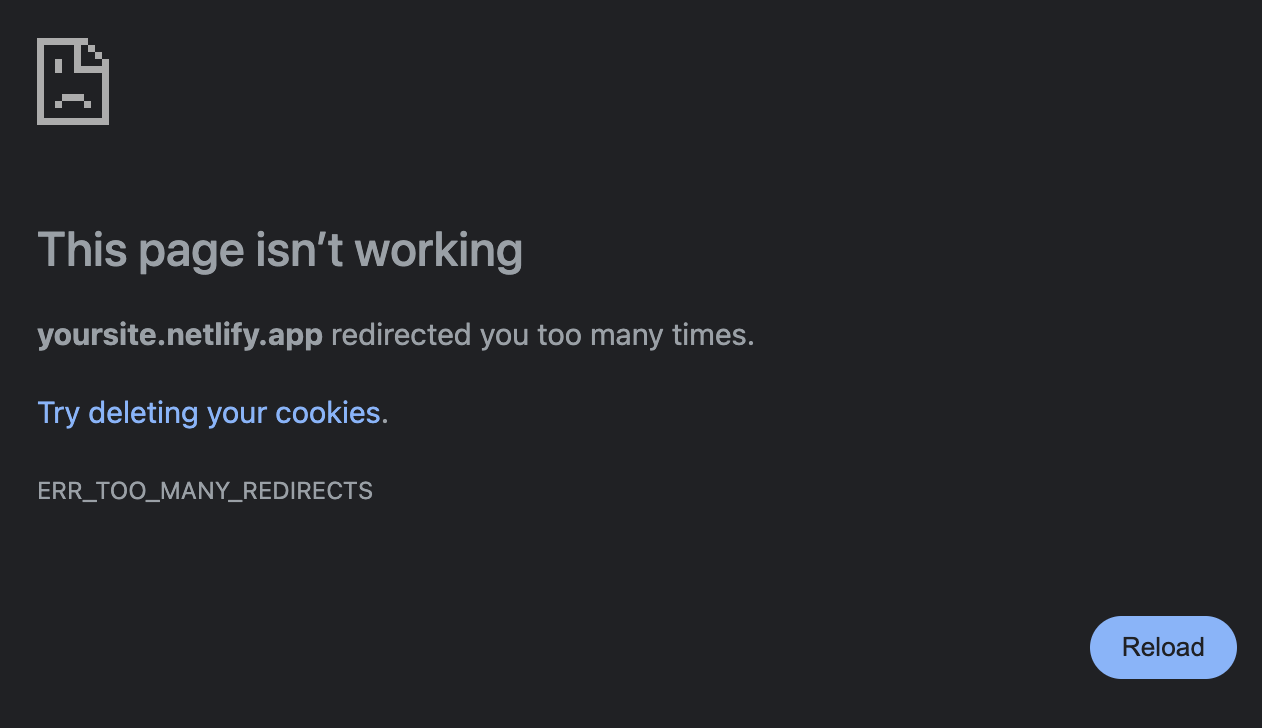
“Too many redirects” on Netlify after deploying
One of my sites gave me a lot of trouble: the publish was a success, the deploy appeared to be a success, but visiting the deployed page on Netlify gave me this “ERR_TOO_MANY_REDIRECTS” page.
Reader, I spent hours on this problem. It wasn’t any of these things:
❌ uninstalling W3 Cache and other plugins ❌ reinstalling the Staatic plugin ❌ cleaning up all the URLs that were creating a redirect entry in the Resources tab
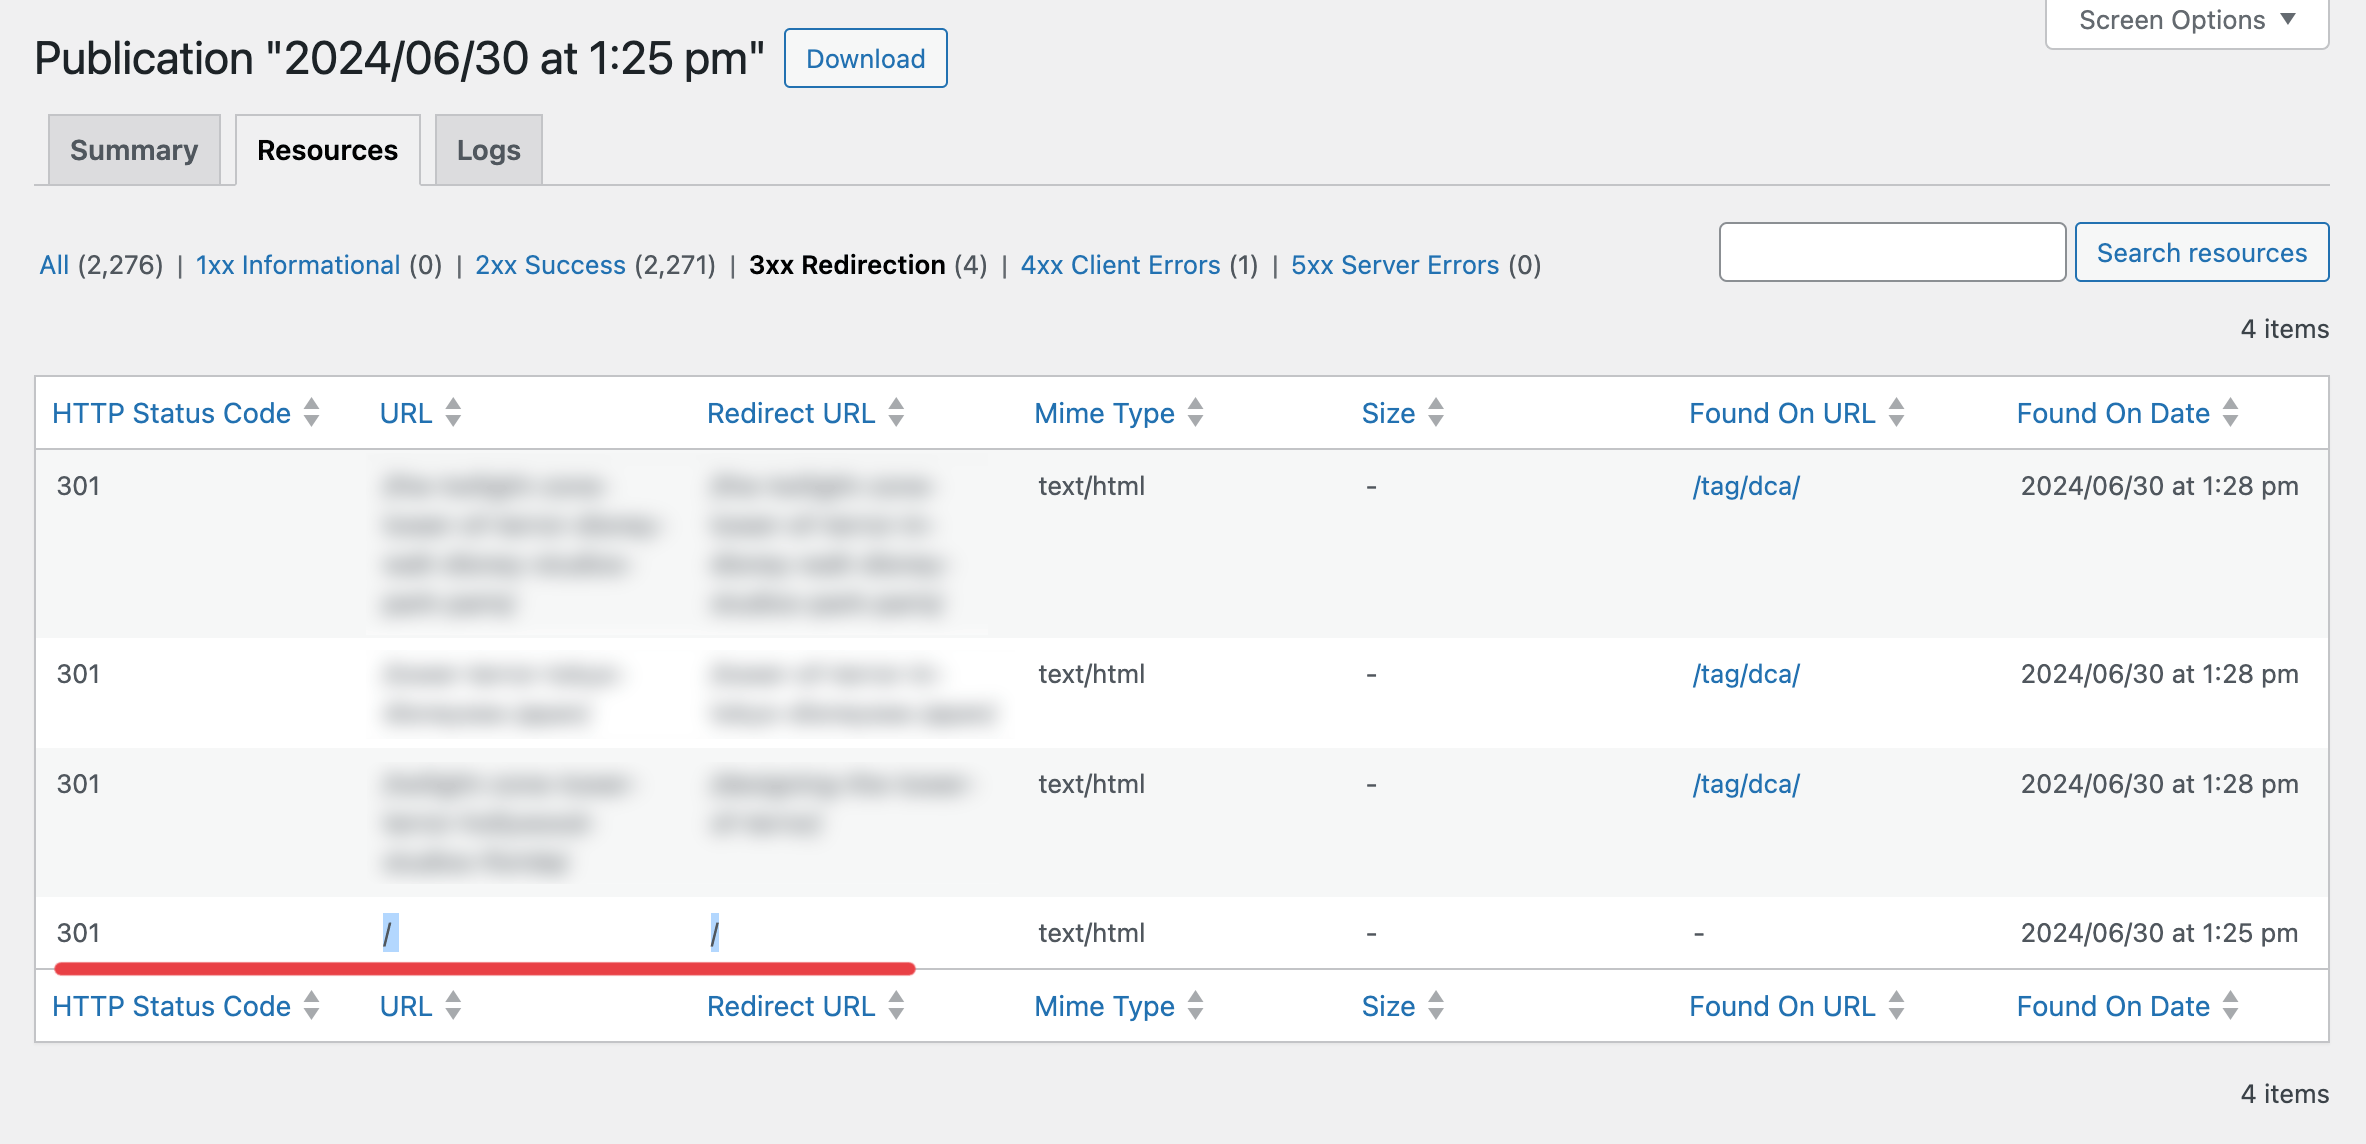
And there’s some evidence of it here in the Publication’s own “Resources” tab – where is it coming from? What is it??
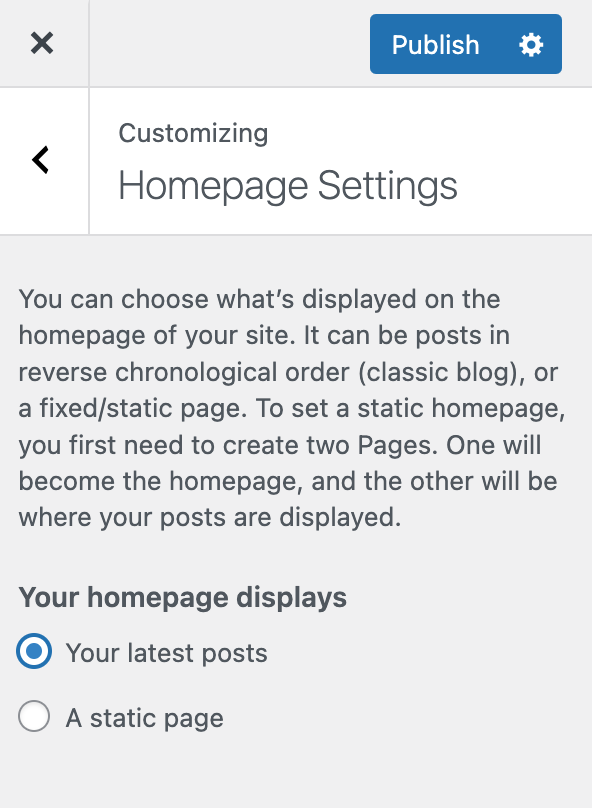
✅ I fixed it by going into WordPress’s Customize page menu and making my homepage NOT a static page. Choose “your latest posts” and publish again.
I honestly think this is a bug with Staatic. ????
If your WordPress site is using a Page as its homepage, Staatic inserts a redirect from “/” to “/” into the netlify.toml file like this:
[[redirects]]
  from = "/"
  to = "/"
  status = 301
  force = true
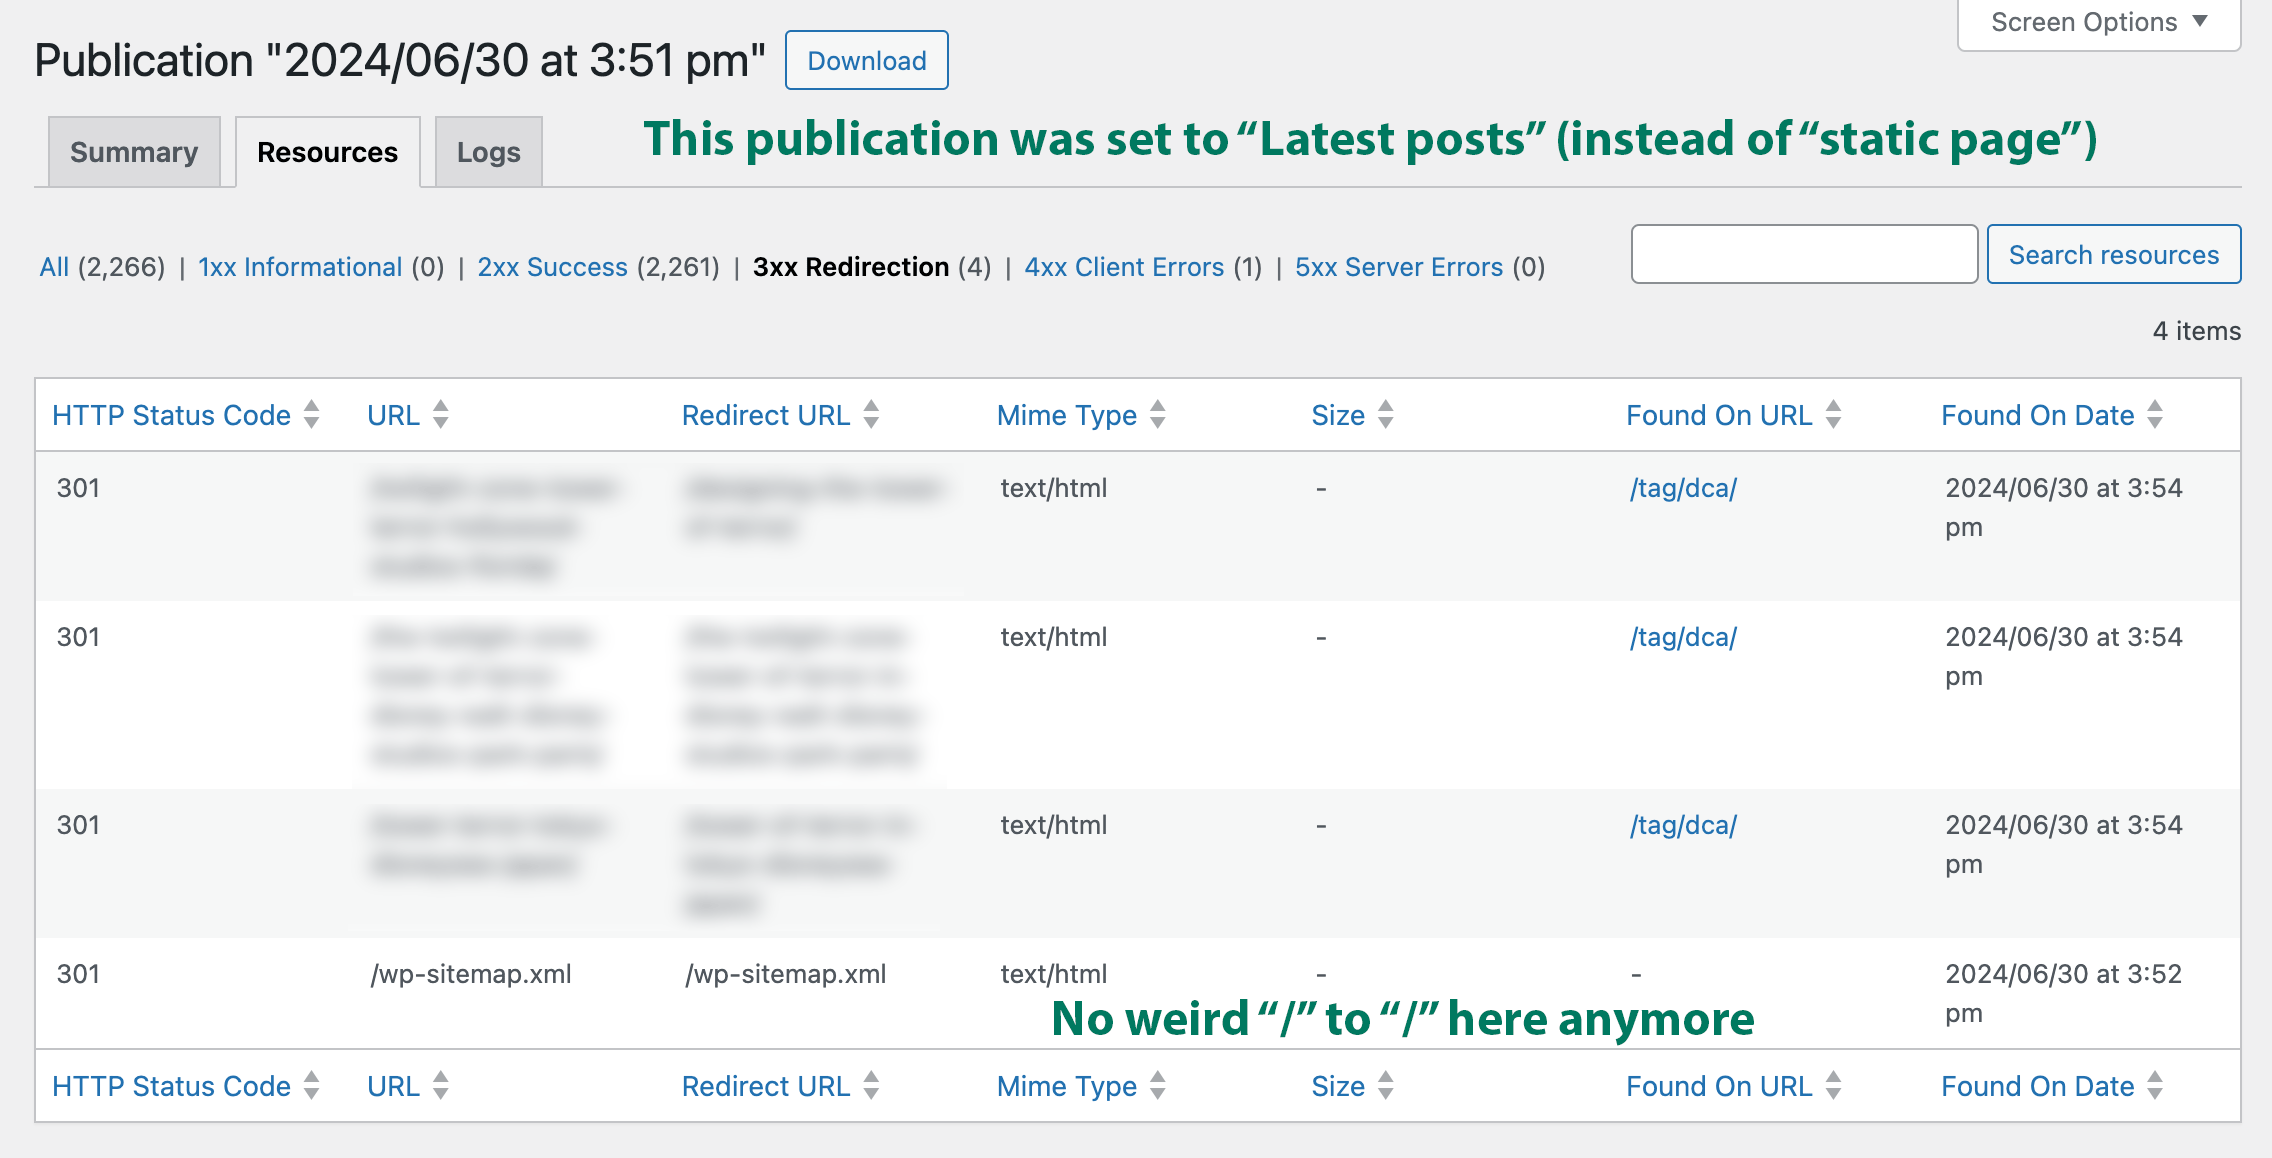
This redirect is not present if you choose “Latest posts” for your homepage. A website published with “Latest posts” also does not include that weird redirect in the Publication’s “Resources” tab.
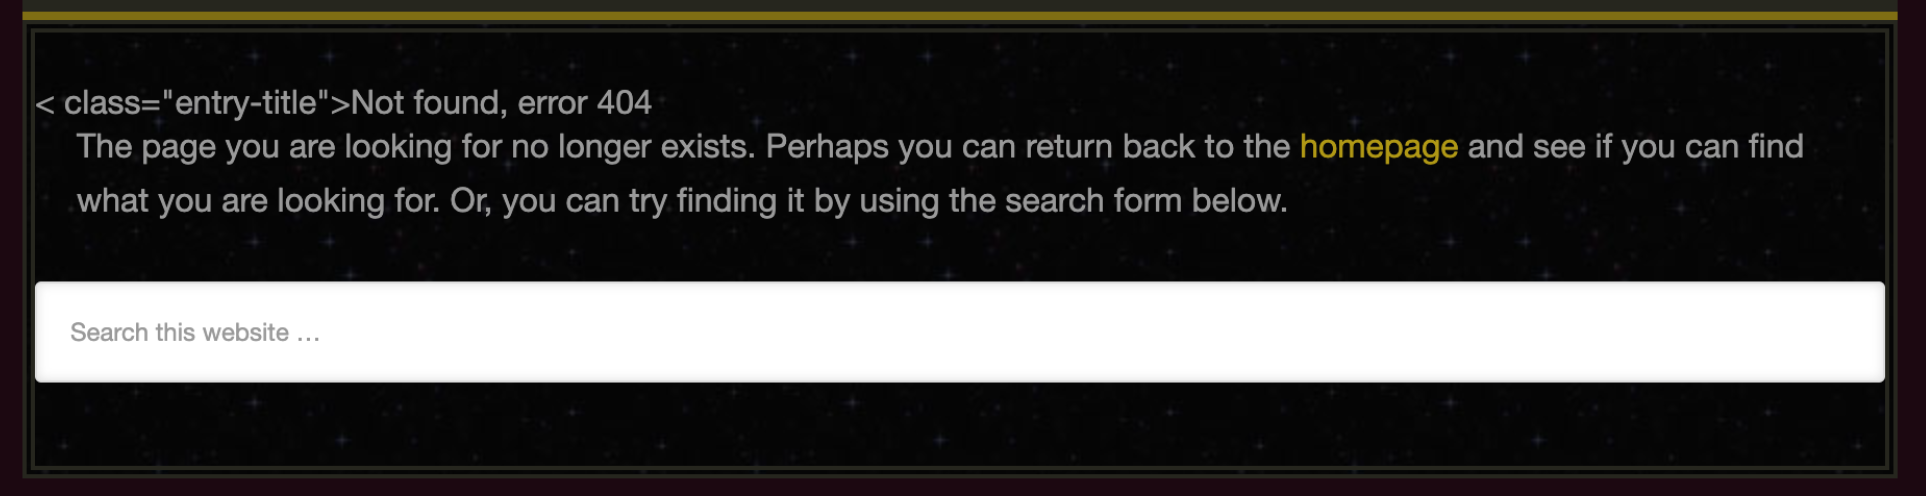
I only discovered this because I had the idea to download the entire site from Netlify (it’s in their UI somewhere), remove the from = “/” to = “/” redirect, reupload, and see if the site looked any different. It did – I could see my site! But instead of my homepage, I had this embedded 404.
That gave me the idea to adjust the content of my homepage, which WordPress surfaces in Appearance -> Customize -> Homepage Settings. I spent some time toggling between “Static Page” and “Latest Posts”, publishing, and observing the .toml file each time.
TL;DR – Using a static page for your homepage will cause Staatic to insert an endless redirect. If you have a redirect loop on your static WordPress site, try it with “latest posts” as your homepage instead.
I guess that’s what you get from a free plugin. (Hope this helps someone)
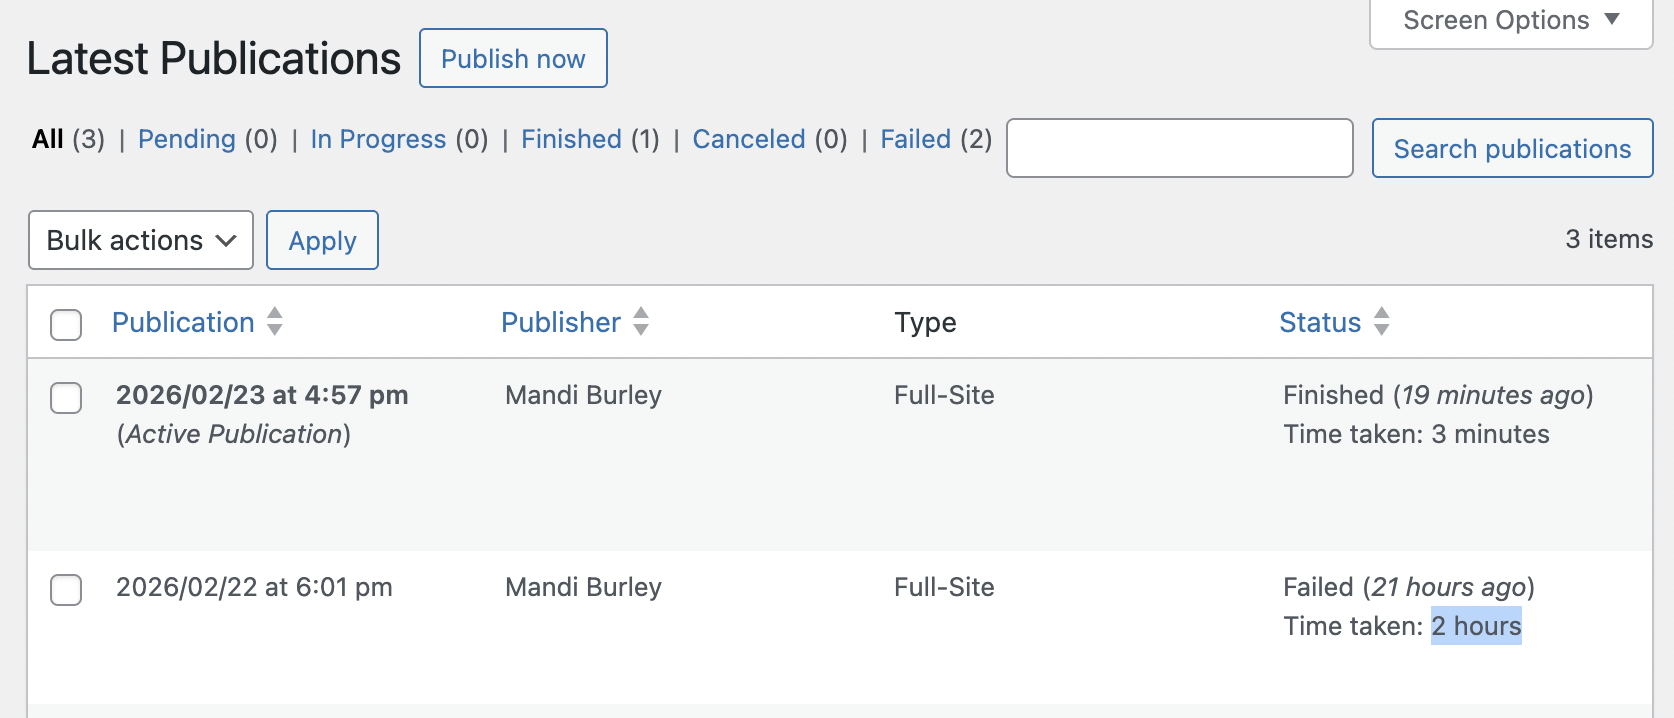
Crawl succeeds but publish takes forever
Try it again without changing anything – I swear that fixes it 90% of the time.
For the rest of the times it takes forever to publish, go to the Staatic Settings page and look in the Advanced tab.
Logging: if you have it on Extensive, try Detailed or lower
Find all the Timeout values and double them
(don’t forget to save)
Step 5: Change your domain’s nameservers
This section updated January 2026.
In this step we are going to make yoursite.com point at your Netlify deploy.
Confirm that you are happy with what’s been deployed to https://yoursite.netlify.app because this step will hook your domain up to the Netlify deploy and start sending visitors to your static site.
Compared to what came before, this step is easy.
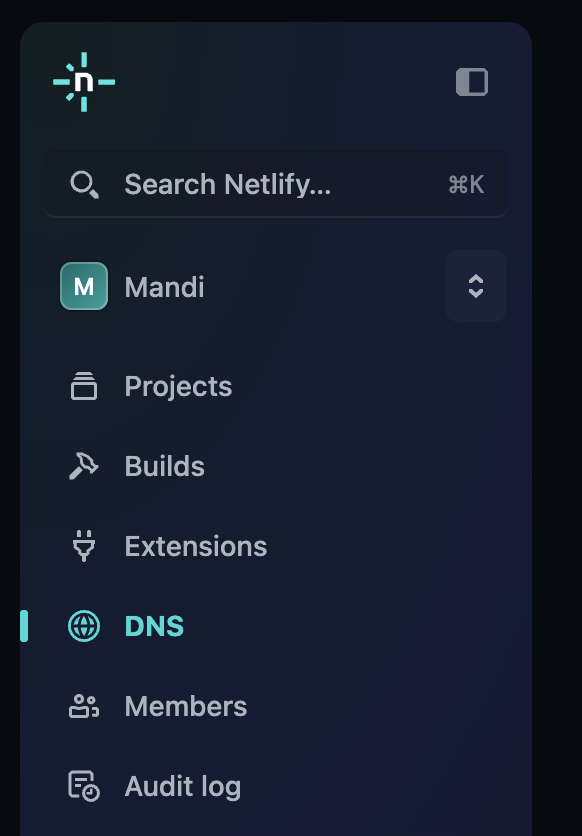
In Netlify, click “DNS” in the side panel.
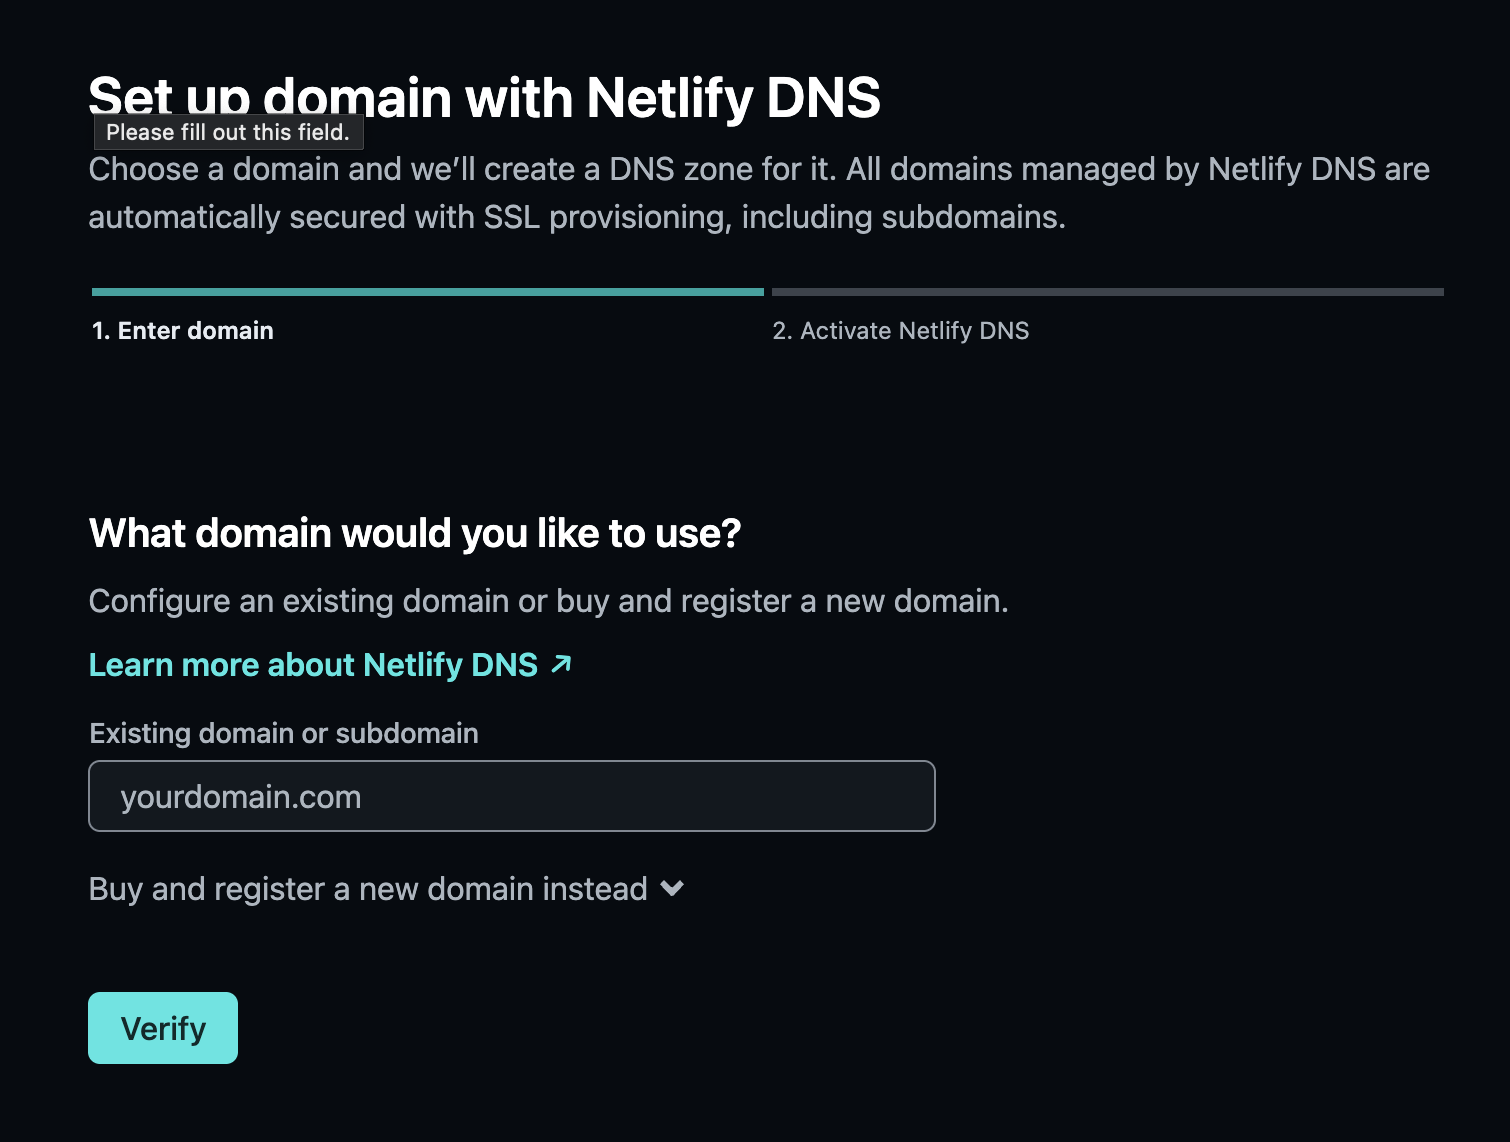
On the right, click “Use Netlify DNS”
I already own the domain I want to use, so I enter it here and click “Verify”:
Now it gives me the nameservers to use, which I go over to Dynadot (my registrar) and apply.
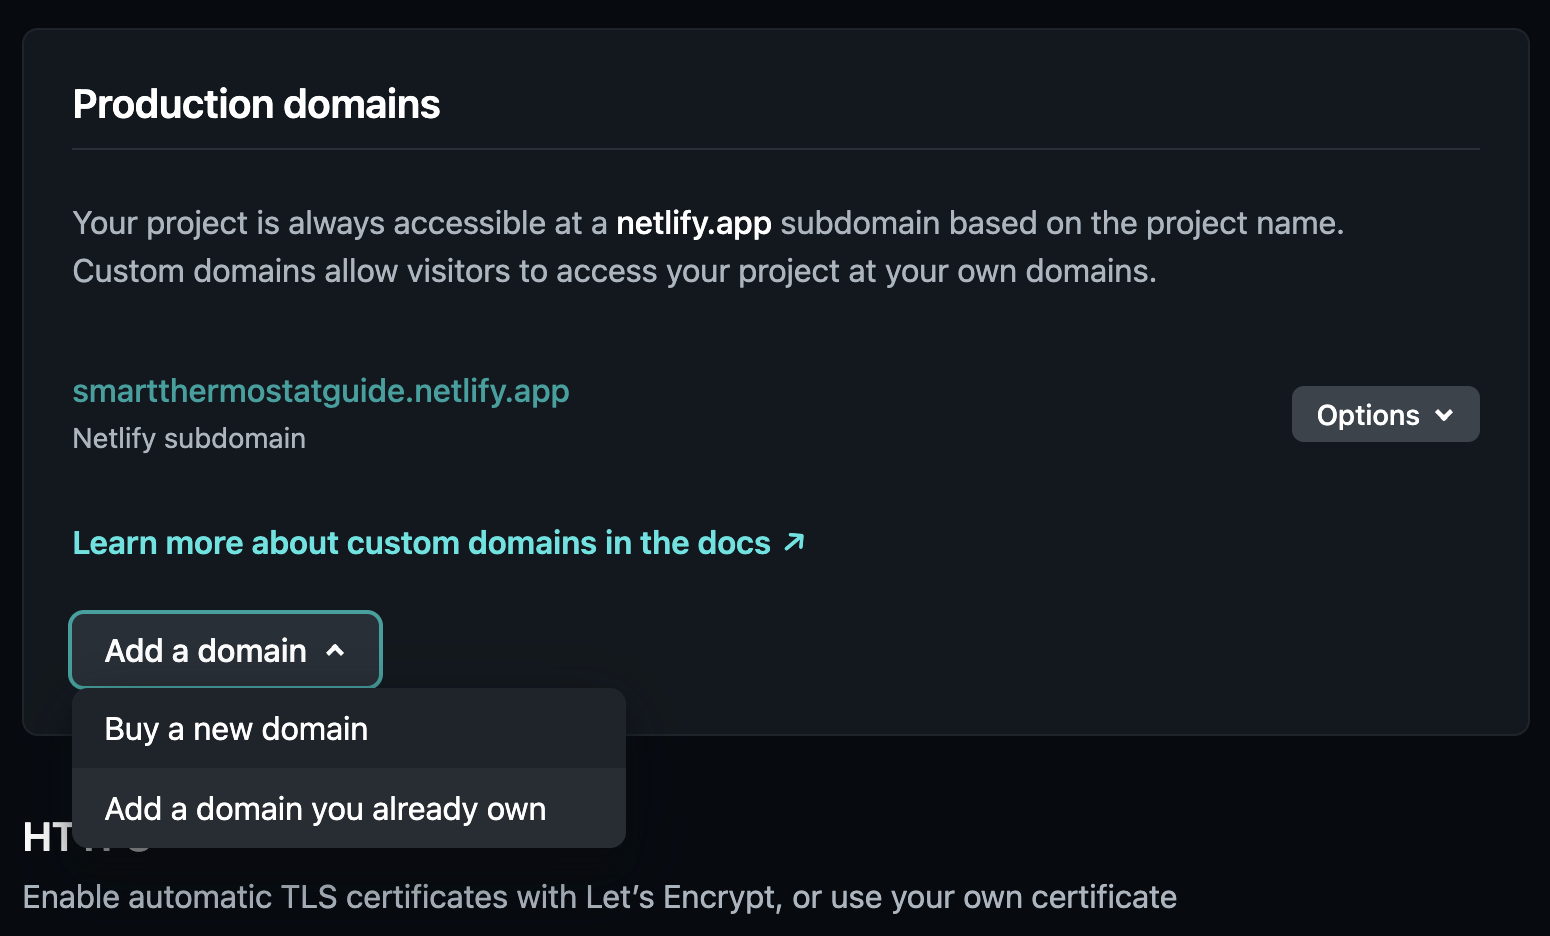
Return to the project and add it as a production domain (come to think of it, we probably could’ve just added the domain from here instead of going in through “DNS” on the left)
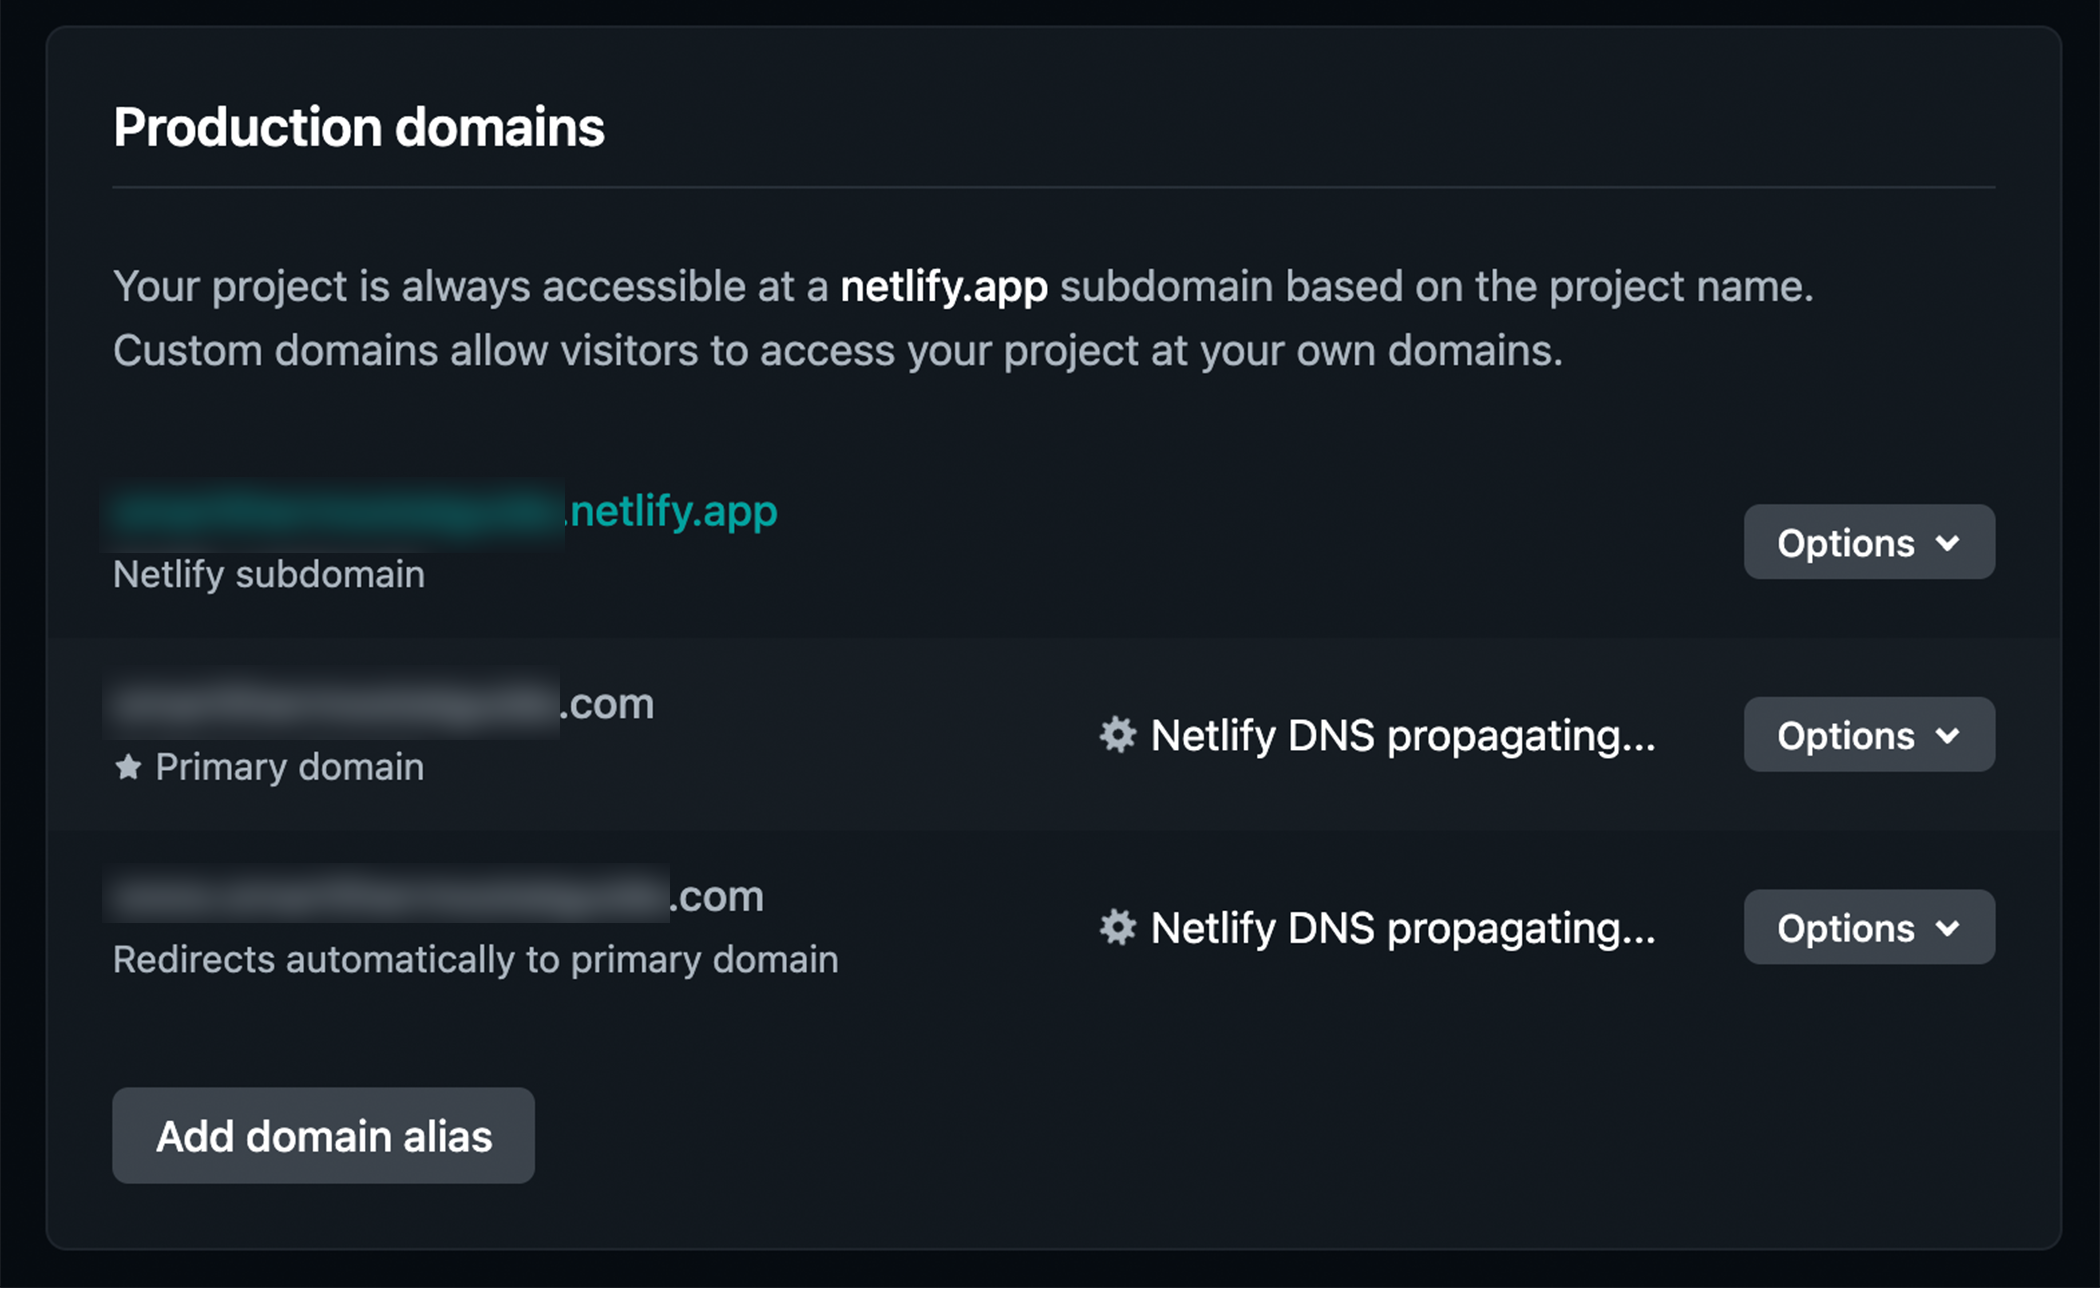
In any case, it should now be available to add through this menu and you should soon see “Netlify DNS propagating”
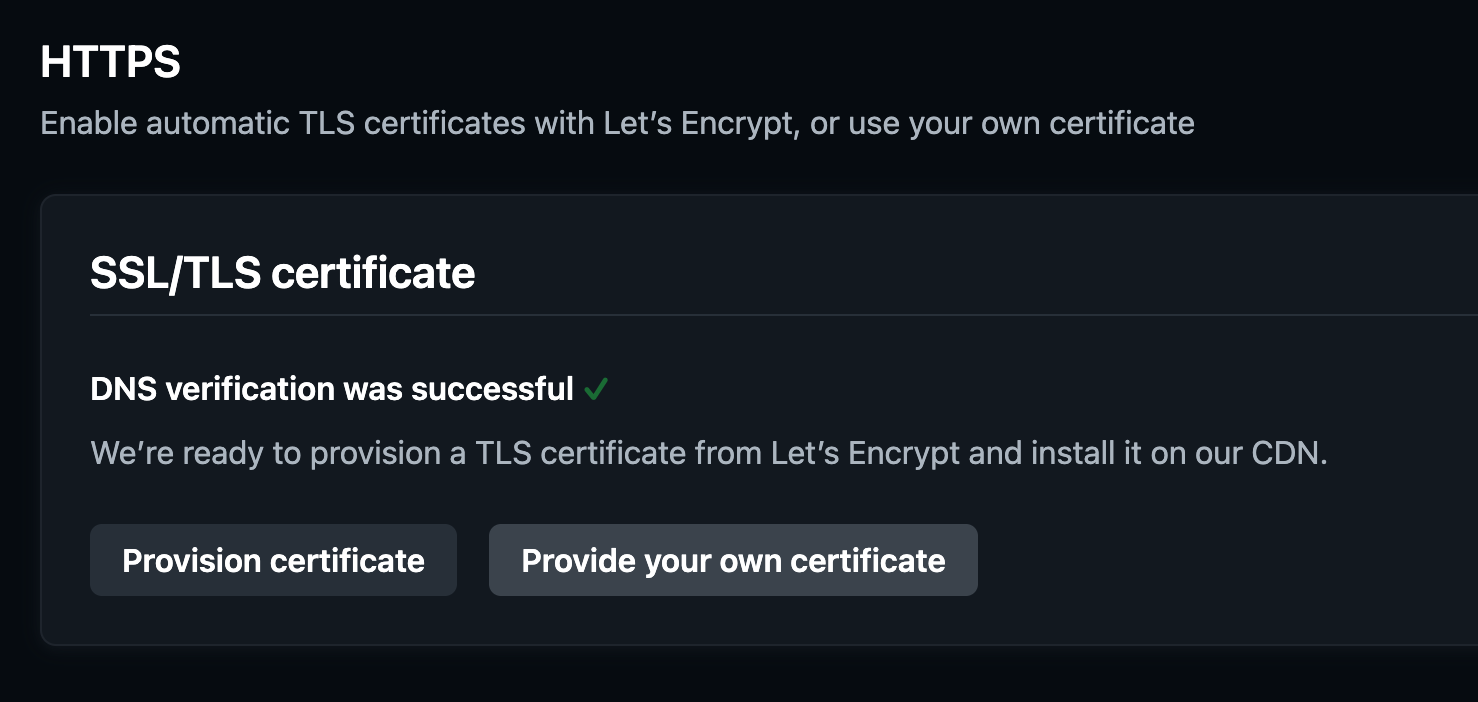
Step 6: Wait for DNS and add a Let’s Encrypt! certificate
In my experience it takes about 10 minutes for the domain change to propagate. When it’s ready, add a security certificate. (Bottom of the “Domain management” section).
Here’s what success looks like – if it fails, it might be that the propagation hasn’t finished yet.
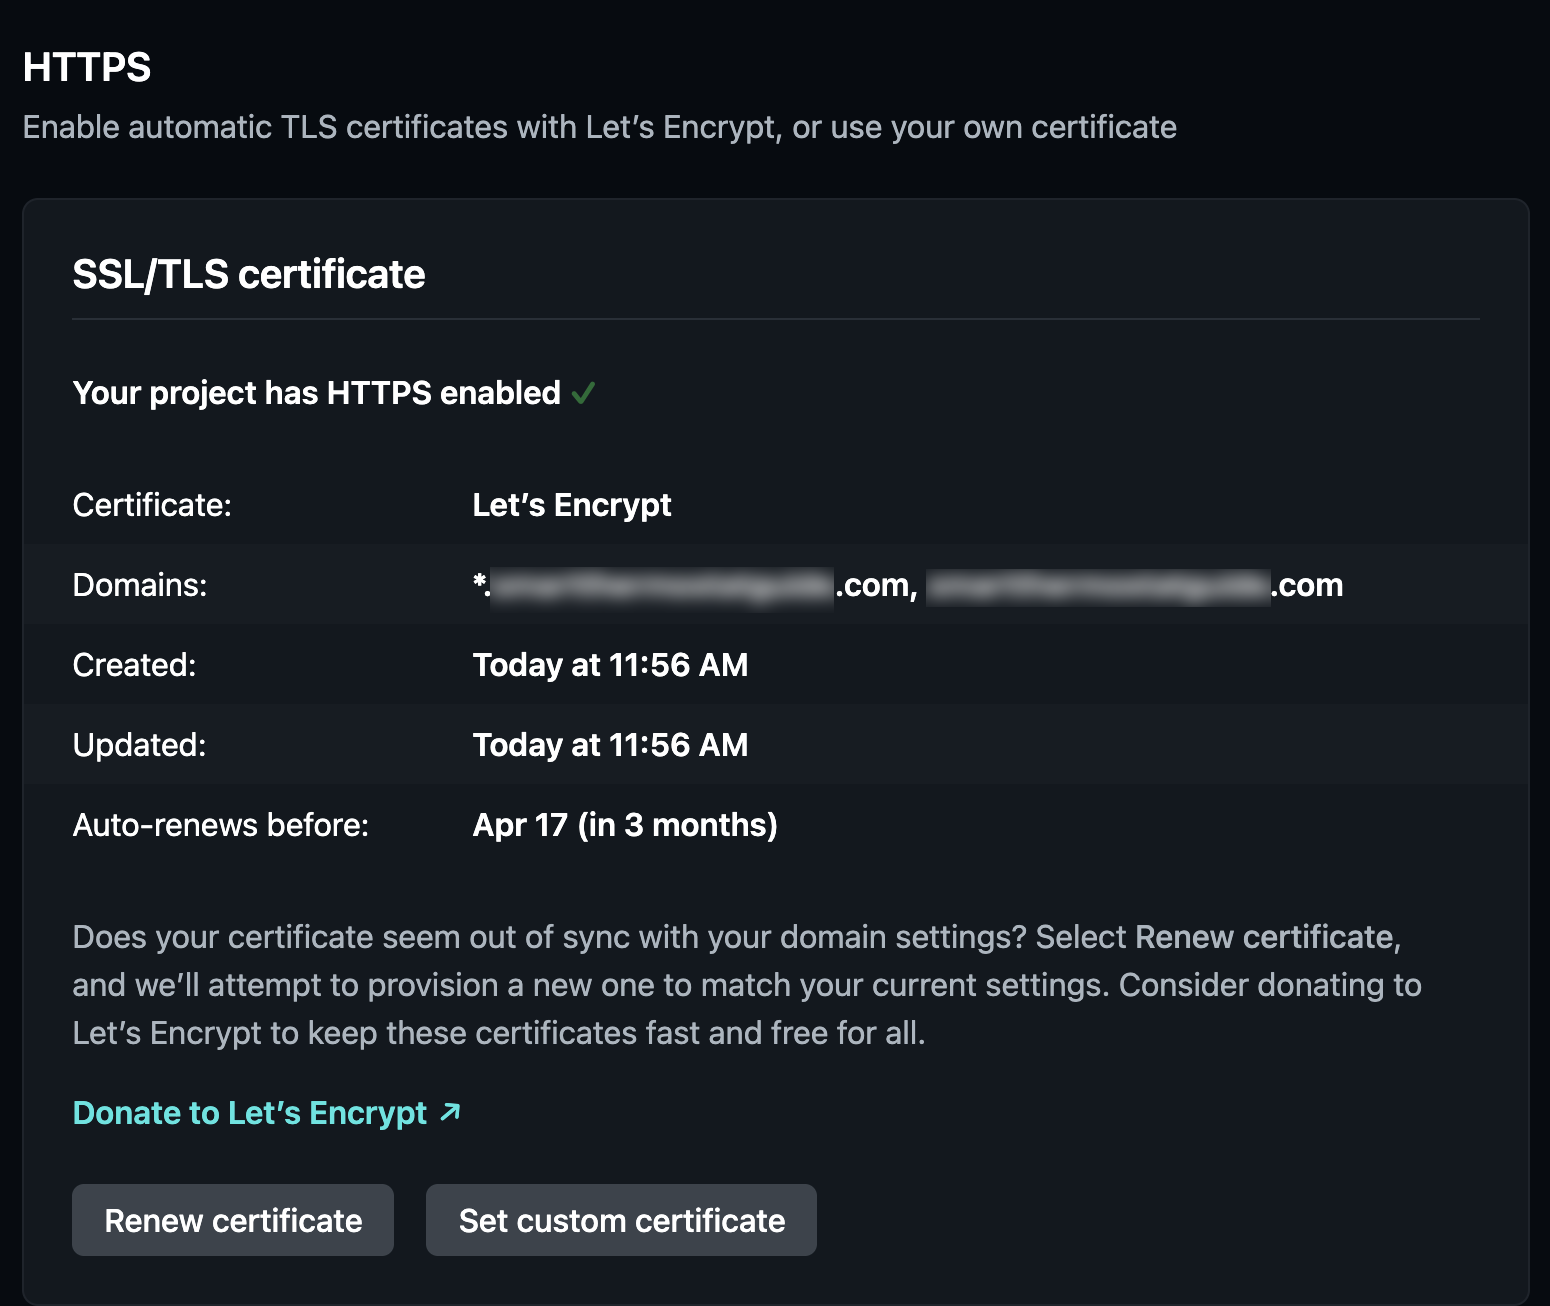
You’re done with this step when it looks like this. (If it’s been 10+ mins you might have to just reload the Netlify page)
Confirm your site looks good at yoursite.com and then deactivate the version hosted on your prior host (and then check it again for good measure before you delete anything).
Step 7: Other things you might want to do (or know about)
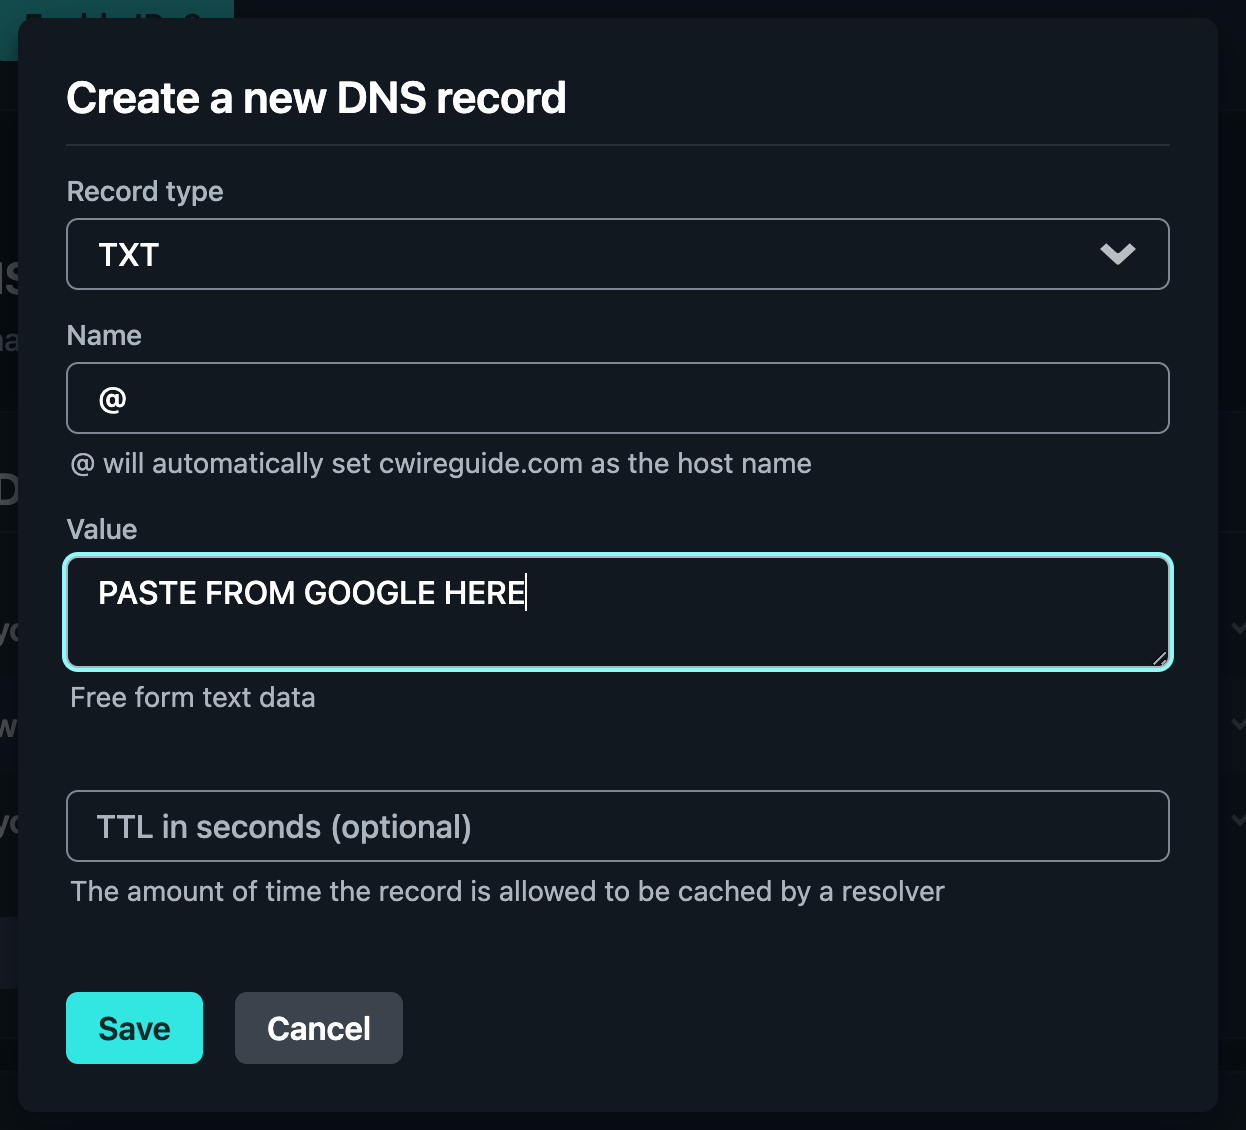
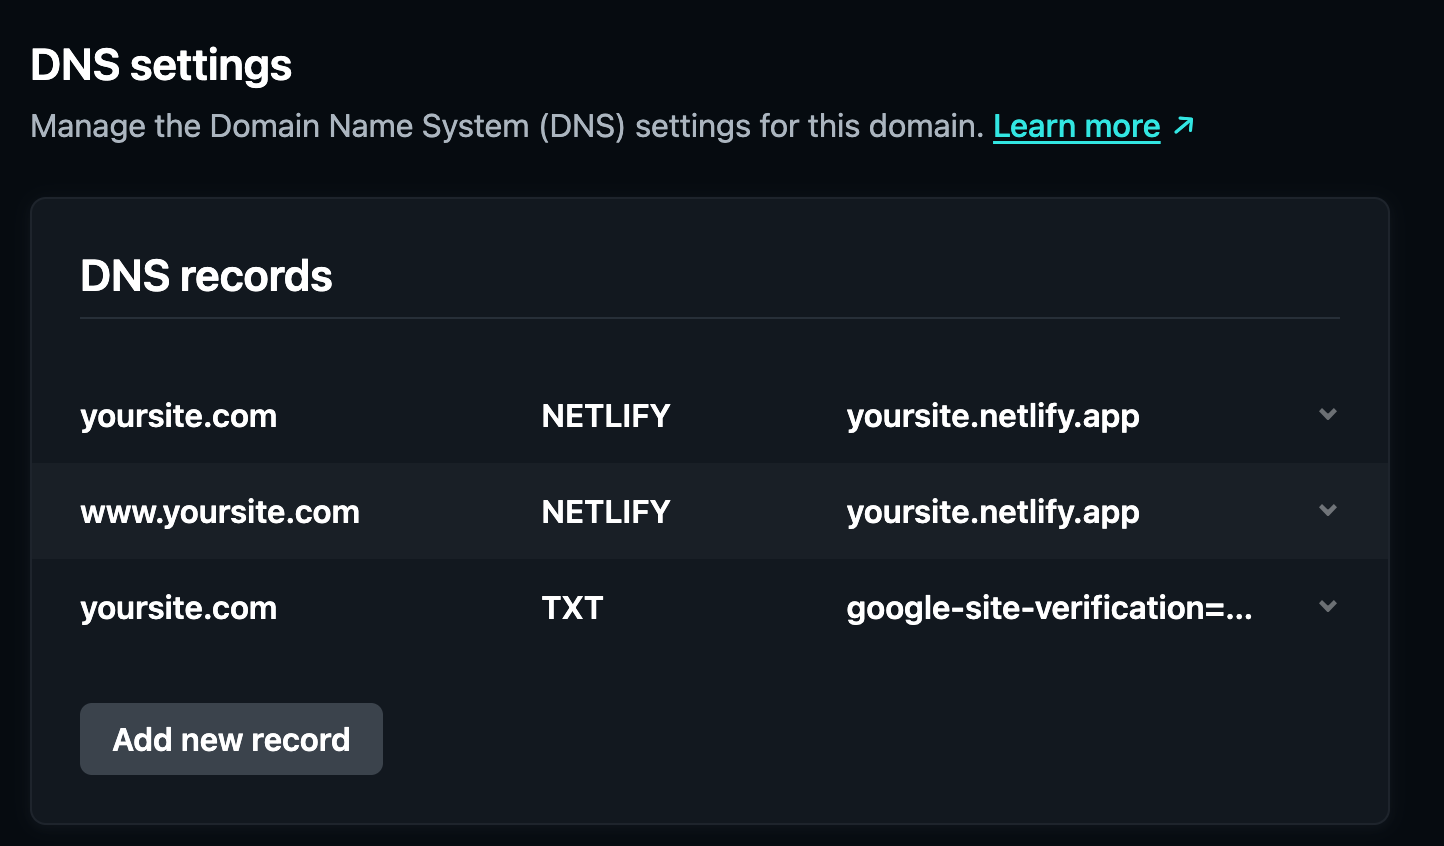
Google Search Console: Since you moved hosts, you will probably have to redo your verification with Google Search Console.
Log into Search Console, and add or update your site. Get the TXT code and add it to your site in Netlify as a DNS record of type “TXT”.
Backups: Your static site can’t run an automated backup plugin, so you’ll want to do it yourself from your local machine. I use Updraft and I publish the backups to Google Drive. Since the blogs I turned into static sites don’t get updated very often (if at all), I don’t mind running the backup manually after I make a change.
All your plugins and your WordPress install are no longer going to automatically updateon their own. Your static site is like a “render” or an “export” – it doesn’t have all the plugins running 24/7 doing automated backups. You’ll have to open Local, run your site, and update plugins/WP yourself.
You have: a string that looks like this 'rgb(255, 0, 255)'
You want: the hex code for it '#ff00ff' as a string
You must use: Lodash
constrgbToHex=(rgb:string)=>{constnums=_.words(rgb,/[0-9]+/g);// remove leading "rgb" and parensconsthex=_.map(nums,(num:string)=>{constas16=_.parseInt(num).toString(16);return`${_.size(as16)===1?'0':''}${as16}`;});return`#${hex.join('')}`;};
I wrote this but ended up not needing it and didn’t have the heart to just delete it.
Six-word summary: excellent tech-agnostic introduction to CI/CD Quick rating: 5/5
Wow – even though I’m not a complete newbie to CI/CD, I think I learned something new every few pages. Or improved my understanding of something. Or questioned an assumption I’ve held for years.
Christie Wilson’s writing is conversational and pleasant, but that doesn’t mean the book is for kiddies – the 370 pages cover much more than just the basics. There’s loads of vocabulary, concepts, and fictional scenarios designed to highlight the incredible value each “step” of a CI/CD pipeline brings to a team.
I particularly enjoyed the “human element” woven throughout this book. Techniques and tools are introduced as solutions to specific problems familiar to developers and customers: painful middle-of-the-night calls, crunch around release, lengthy release cycles, long waits for features/bug fixes, and more. It’s not just a presentation of technologies, it’s a presentation of solutions.
Before reading this book, I would have described my understanding of CI/CD as “enough to get by on”.
I knew the gist of it as a result of working on teams using CI/CD: push a change, then the tests run on the build machine, and depending on the outcome, either merge the change into the codebase or fix what broke. The idea was to keep the codebase in an always-usable state. (Which was a huge step up from places I worked in the 00s, which were a mixed bag of manually kicking off builds, few automated tests, and a whole lot of “well it worked on my machine”.)
But I still felt like I only had a vague idea of how it all fit together. I wanted a better understanding of the underlying philosophies and goals. I also wanted to nail down some of the correct terminology for things (turns out it’s not “Jenkins is busted again”).
What’s inside
Length: 13 chapters, ~370 pages, lots of pics
Time to read: About 2 weeks of casual reading (a chapter every day or two)
Subjects covered: continuous integration/delivery/deployment, best practices, testing philosophies (unit vs integration vs e2e), “config-as-code”, typical pipeline structure, adding CI/CD to existing projects, dealing with flaky tests, test “noise”, some tech-specific stuff near the end (a quick tour of modern-day CD systems and version control systems), incremental feature development, dependency versioning, rollbacks, code coverage, shell scripting, parallelization…. and lots, lots more
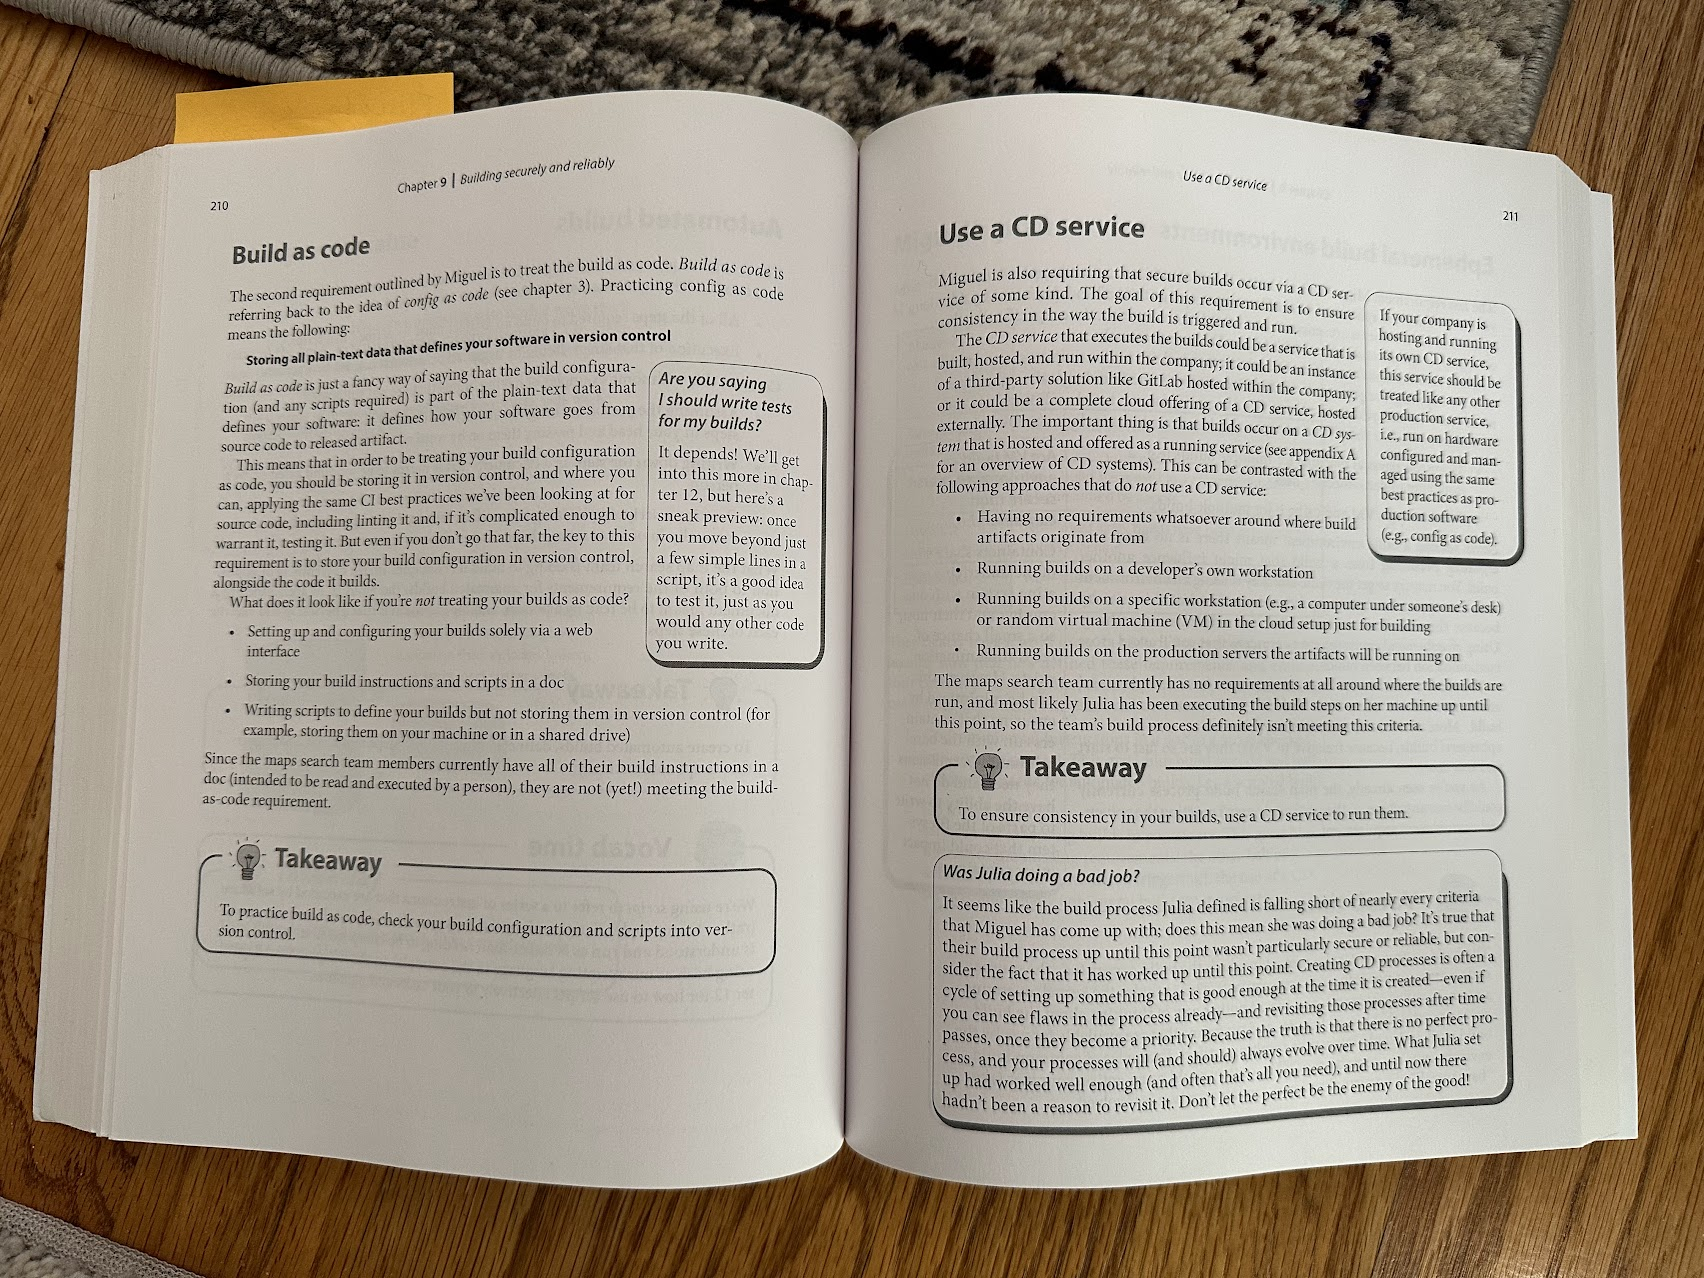
I found the book surprisingly readable – this isn’t a dry tome of configuration or theory. The chapters flow nicely and build on previous ones. The diagrams, takeaway sections, and illustrations grabbed my attention in a way that just kinda pulled me through the pages.
Another peek inside the book.
What I’ve learned
A lot.
The most surprising thing I “learned” was how many of my assumptions about releasing software were laid bare and challenged by this book.
If releasing is painful, you should release more often.
An ideal deployment frequency is multiple times a day.
You don’t need to wait ’til the next new project to get started with CI/CD. Even if you can’t move all of a project to CI/CD, you can move parts of it – and doing so is valuable.
Feature work can (and should) be merged into develop incrementally. (Not to sound clickbait-y but this one really shocked me. I’m more familiar with mega-PRs that contain the entirety of a new feature and about a thousand merge conflicts.)
I think it helped, also, that I recognized so many of my “real life” work teams in this book. I have definitely been on teams that do some combination of the following:
tests that pass or fail randomly so we disable them
tests that take way too long to run so we run them sparingly
rolling out new features to everyone only to discover it’s broken and have to quickly unroll it out
deployments that are done manually by some poor sucker
processes/configs that live in someone’s head instead of in the codebase
delaying a release because we’re scared of what’s in it
merge a new feature only when it’s complete and includes 50+ changed files full of surprises and things that have to be updated and adapted to other in-progress work
more stuff I’ve tried to forget
I wish I could send this book back in time to those teams ????
Who this book is for
If you’re already working in DevOps or you’ve set up some pipelines yourself, then you probably know most of the stuff this book covers. There are some general references to real-life technologies in this book, but this book is more about the concepts and goals of CI/CD, not a tutorial you can follow (although after reading it, I felt like I was ready to dig into the tutorials and docs).
If you are early in your career or your company is just starting to talk about CI/CD and all you know is the acronym, then this book will be an excellent introduction to continuous delivery.
If you have a few years of experience and know of CI/CD (and maybe you’ve worked on a team that uses it) then you’re probably going to get a lot out of this book. A few topics will probably be familiar, but the rest of it will expand your CI/CD knowledge and give you a much broader and more organized understanding of a wide variety of continuous delivery topics.
I could also see this book as being really useful to product owners, managers, and other people in roles that work adjacent to software engineers. You don’t need to know any programming languages to understand this book.
Why read a book? The docs are free!
This is just my personal preference, but I like being spoon-fed information by someone who has already organized their thinking on a topic. I didn’t know what docs to read, or in what order, and I wanted some understanding of the concepts before I tried to do anything myself.
Now I feel ready to dive into the docs and tools.
PS: If you buy the textbook, you also get access to ebook versions for free
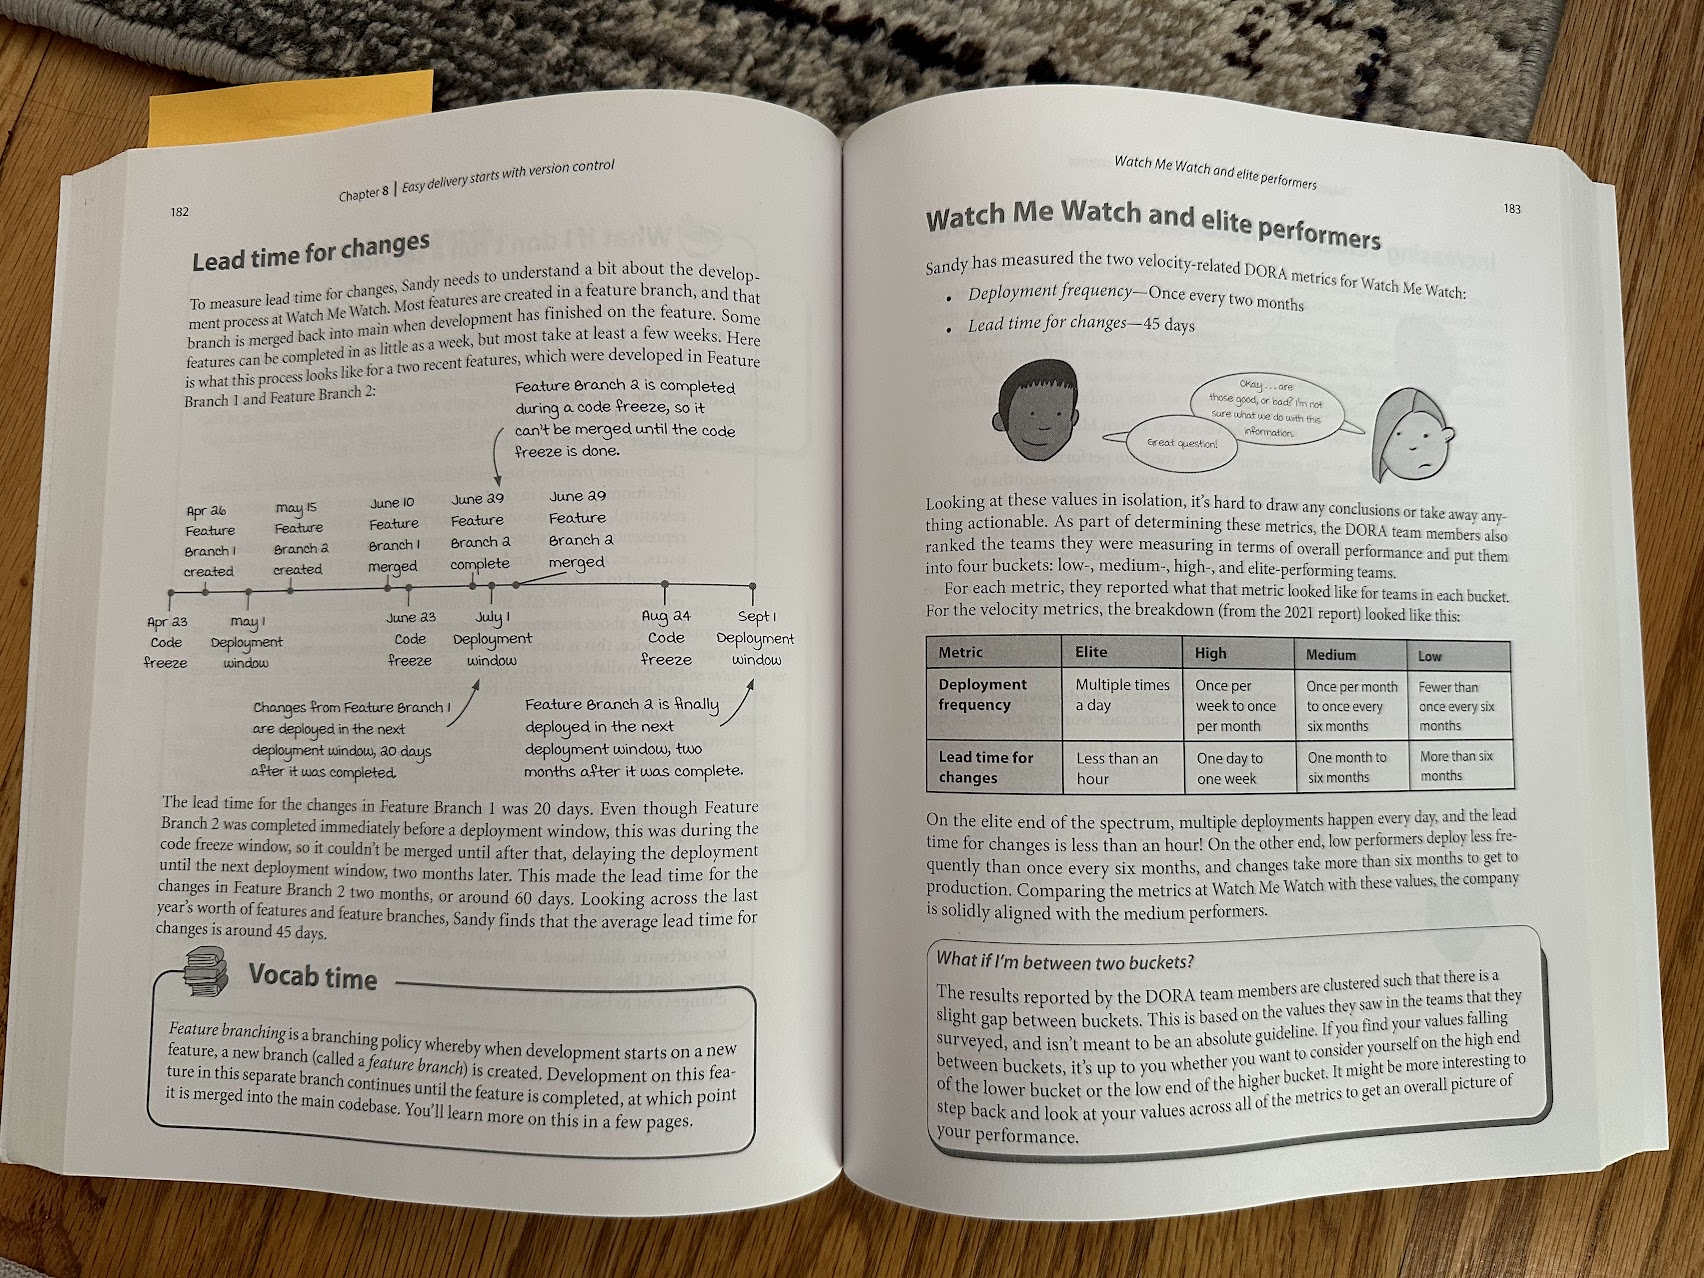
I’m kind of a “dead tree” book person myself (they don’t compete for screen space, and I spend enough time looking at screens as it is), but the ebook version of Grokking Continuous Delivery was a pleasant surprise – there’s a nice table of contents on the left, it’s searchable, and the pics are all in color.
Book is available as pdf, epub, kindle, and liveBookHere’s what the liveBook version looks like in Chrome – the table of contents down the left side is particularly pleasant.
The ebook came in handy for deciphering the one error I found in the book – on page 204, the “Top Dog Maps” architecture diagram overlaps some of the text.
On the left: the diagram overlaps a line of text in the book. On the right: the publisher has corrected the problem in the ebook and future print editions will contain the correction.
And that’s it – thanks for reading! And if you enjoyed this book (or want to recommend a similarly awesome one) please leave a comment!
This summer I took a break from side projects and gave LeetCode a try. It’s been nearly 3 years since my data structures and algorithms course with OSU, so I wanted to give myself a refresher on solving these kinds of problems.
This particular problem, “Generate Parenthesis“, was challenging for me at first but I revisited it a couple times over the summer and on the most recent try, I developed a solution that I think is fairly simple to understand, so I wanted to share it here. (I admit it’s not the most performant solution, but it passes.)
The premise
Given n pairs of parentheses, write a function to generate all combinations of well-formed parentheses.
Example 1:
Input: n = 3
Output: ["((()))","(()())","(())()","()(())","()()()"]
Example 2:
Input: n = 1
Output: ["()"]
Constraints:
1 <= n <= 8
My solution
I started this problem by writing out what would be generated when n =1, when n = 2, when n = 3, and when n = 4. This step helped me see what I needed to generate and it gave me an opportunity to spot patterns.
When n = 0 result = [""]
When n = 1 result = ["()"]
When n = 2 result = ["()(), (())"]
When n = 3 result = ["()()()","((()))","()(())","(())()"]
When n = 4 result = ["()()()()","(((())))","(()(()))","((())())","()((()))","((()))()","()()(())","()(())()","(())()()"]
The pattern:
I noticed that every time I generated a new result, I was building on the previous n value’s result array.
Specifically, the steps are:
Take each result in the previous n value’s array and wrap it in parentheses. Each of those “wrapped” results becomes part of the new n value’s results array.
Take each result in the previous n value’s results array and insert a new “()” at each possible location in the string. Each of those “inserted” results becomes part of the new n value’s results array.
You might realize at this point that some duplicate results will be generated during this process. This is why I put the results into a Set (so that duplicates are ignored).
Here is this approach, written in TypeScript:
function generateParenthesis(n: number): string[] {
    if (n === 1) { return ["()"]; }

    let result = new Set<string>();
    let previousCombos = generateParenthesis(n-1);

    for (let i in previousCombos) {
        let combo = previousCombos[i];

        // now step through each one and embed a new paren at each possible position
        for (let i = 0; i < combo.length; i++) {
            result.add(combo.substring(0,i) + '()' + combo.substring(i));
        }
    }

    return [...result];
};
Honestly, I don’t fully understand the runtime on this one, since it’s recursive and since each subsequent step draws from a growing list of “previous step” solutions. It “feels” exponential, but it’s not quite – or at least, the quantity of results in the sets that I worked out by hand is not increasing exponentially.
Pressed to come up with something, I’d say it’s O(2n) because:
We have to “handle” every 1…n (that’s the first n)
And every time we “handle” an n, we have to produce n * x results, where x is the length of the previous n’s results and that length grows (considerably) with each step.
From this article, “The growth curve of an O(2n) function is exponential – starting off very shallow, then rising meteorically.”
Hey, that sounds like this problem… right?
(If you know how to figure this one out with greater accuracy I’d love to hear it in the comments.)
Performance
[Update] 1 year later: a dynamic programming solution
November 2022 – I showed this blog to a friend and he developed a neat solution that builds a 2D array where each index holds all of the previous step’s calculations. What’s clever about this solution is that it does not generate duplicates the way my Set-based solution above does.
function nextPermutation(previousPermutations: string[][]): string[] {
    const nextPermutationsLength = previousPermutations.length;
    let nextPermutations = [];
    for (let i = 0; i < nextPermutationsLength; i++) {
        // each of the previous permutations becomes our "inner" permutations (array)
        const innerPermutations = previousPermutations[i];

        // calculate how many outer permutations we need based on where we are in the loop
        const outerPermutationsLength = nextPermutationsLength - 1 - i;

        // grab from that position to get "outer permutations"
        const outerPermutations = previousPermutations[outerPermutationsLength];

        //  now that we have the outer permutations, step through them...
        let newPermutations = outerPermutations.flatMap(outer => innerPermutations.map(inner => `(${inner})${outer}`));
        newPermutations.forEach((newPerm) => {
            nextPermutations.push(newPerm);
        })
    }

    return nextPermutations;
}

function generateParenthesis(n: number): string[] {
    let result = [[""]];

    for (let i = 1; i < n+1; i++) {
        // push the array of new permutations into the result array
        result.push(nextPermutation(result));
    }

    // result[n] now holds the array we need...
    return result[n];
};
In a social group, there are n people, with unique integer ids from 0 to n-1.
We have a list of logs, where each logs[i] = [timestamp, id_A, id_B] contains a non-negative integer timestamp, and the ids of two different people.
Each log represents the time in which two different people became friends. Friendship is symmetric: if A is friends with B, then B is friends with A.
Let’s say that person A is acquainted with person B if A is friends with B, or A is a friend of someone acquainted with B.
Return the earliest time for which every person became acquainted with every other person. Return -1 if there is no such earliest time.
Example test case:
Input: logs = [[20190101,0,1],[20190104,3,4],[20190107,2,3],[20190211,1,5],[20190224,2,4],[20190301,0,3],[20190312,1,2],[20190322,4,5]], n = 6
Output: 20190301
My solution, in Typescript:
function earliestAcq(logs: number[][], n: number): number {

    // sort the logs by timestamp (earliest first)
    logs.sort((a:number[], b:number[]) => {
       return (a[0] - b[0]);
    });

    // this map is going to serve as a container for all the sets
    let mapOfSets = new Map();

    // put every friend ID into its own individual set
    for (let i = 0; i < n; i++) {
        let individualSet = new Set();
        individualSet.add(i);
        mapOfSets.set(i, individualSet);
    }

    // now every friend is its own set in the map
    // console.log(mapOfSets);

    // step through the logs and join the sets as matches are encountered
    for (let i = 0; i < logs.length; i++) {
        let friendA = logs[i][1];
        let friendB = logs[i][2];

        // friendA and friendB have "met" - get their sets

        let setA = mapOfSets.get(friendA);
        let setB = mapOfSets.get(friendB);

        // and if their sets are not equal...
        if (setA != setB) {
            // join the two sets by adding all of the friends from setB to setA
            for (let friend of setB) {
                // add all the friends from setB to setA
                setA.add(friend);

                // update map of sets such that setA is pointed at by each friend originally from B
                mapOfSets.set(friend, setA);
            }

            if (setA.size === n) {
                // every friend is now accounted for in set A
                // return the timestamp where this was achieved
                return logs[i][0];
            }
        }
    }

    return -1;
};
Sort all the inputs by timestamp so the earliest ones are first
Create a new map and fill it with sets representing the currently known friendships. The keys will be the friend “ID numbers”, and the values will be the sets representing who that friend is friends with. In the beginning, a friend is only friends with themselves. mapOfSets = {0:{0}, 1:{1}, 2:{2}, 3:{3}, 4:{4}, 5:{5}}
Now, step through the logs and grab each friend pair (friendA and friendB) from that log.
Get the set associated with friendA, and the set associated with friendB, and see if they’re identical
If the sets are not identical, copy all the friends from setB to setA and for each of those relocated friends, update their own value in the mapOfSets to point at setA
If setA becomes equal in size to n (the number of friends), then this is the moment where “everyone knows everyone else” and we can return the timestamp of the current log
Runtime analysis:
O(n log n) due to the sorting
Performance:
Ehh, I doubt this was the absolute best way to do this – it’s just because so few other Typescript submissions exist.
This post is part of my “Building a Flutter App” dev journal, which begins here.
In this post: I develop a feature that allows a user to manually re-order a shopping list. Taking inspiration from the way Spotify lets users re-order a playlist, Grocery Go’s users should be able to put the items in any order they like.
This gif demonstrates the feature. The user re-orders items in a list and changes which “store” is active to set different item orders for different stores.
Getting set up – where we’re starting from
When I started work on this feature, the user could already create a shopping list and populate it with items, like so:
However, there is no way to sort or re-order those items.
As a user, I think it’d be useful if the items could be re-ordered to match the order I actually pick them up in when I’m at the store.
But which store? I shop at many different stores, and they’re all laid out differently, so in addition to creating a default order I also want to be able to create variations on the default order and “save” those variations to each store that this list applies to.
Planning the work: UI inspiration
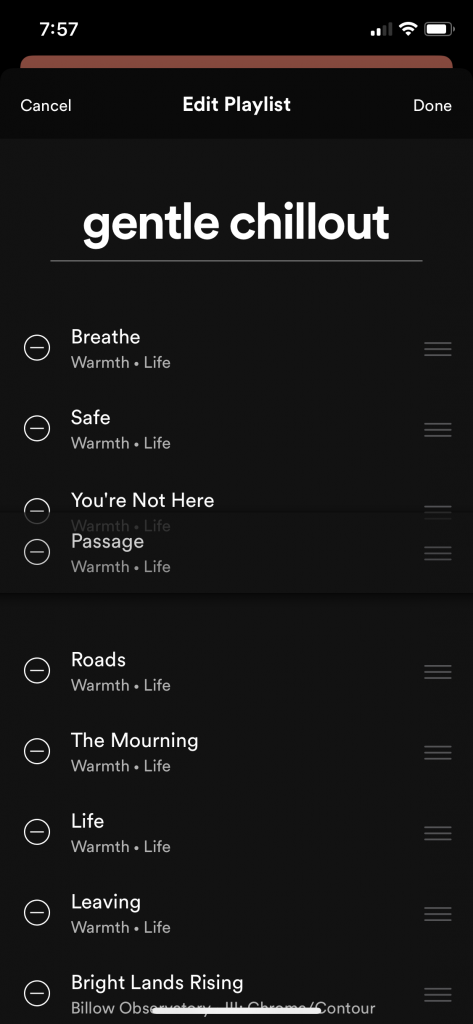
For inspiration, I looked at how Spotify’s phone app (or at least iOS app) gives the user the ability to reorder items in a list.
To change the order of items in this playlist, the user taps the “three dots” adjacent to the “down arrow” above the “add songs” button.
A separate screen pops up and offers the option to “Edit” the playlist:
Tapping “Edit” opens up a modal in which the individual songs can be pressed on and dragged up and down in the list.
In this screenshot, I am dragging the song named “Passage” up in the list. It follows my finger as long as I keep pressing the screen.
Feature list
Every shopping list has a “default” order
Every shopping list can be linked with 1 or more stores, and each of those store links has its own item order (initially copied from ‘default’)
The user can re-order items in the “default” list and the store-specific lists
The user can change which store list is being displayed via the shopping list view
Creating a brand new item adds it to the end of the “default” list as well as to the end of all store-specific lists
Modeling the data
The user can store different item sequences for different stores, like so:
Default – items are, by default, shown in the order they were created for this list. The user can re-order this list, though. Newly created items are added to the bottom (end) of this list.
Party size bag of M&Ms
Bread
Bananas
Milk
Eggs
Safeway – the user wants to see the items in this order when they are at Safeway. Newly created items are added at the bottom of this list.
Bananas
Bread
Milk
Eggs
Party size bag of M&Ms
In the Firebase data structure, I imagined each item would have a map of key/value pairs where the key is the store’s ID and the value is the position in that store’s list.
This worked well and I duplicated this structure for the shopping lists themselves, allowing the shopping lists to be re-ordered on the main screen in addition to the items in each list.
Trouble with “orderBy” and Streams
Initially, I tried to get the items in order (for whatever store list was selected) like this:
I thought this was a very clever and the “quite obvious” approach, but the more I tested it, the more apparent it became that using “orderBy” made it so the widget(s) displaying the contents of that stream wouldn’t redraw in the UI, even if coming back from another route. It also broke the ability to cross off items: they would appear in the active and inactive lists at the same time, or they would appear in neither list, until the user reloaded that page of the app.
I went down a lot of different roads trying to fix this, but ultimately all I did was stop using .orderBy and sorted everything on the front-end (in-widget) instead. I don’t know if that’ll end up being a bad idea, but it was the only way I could get both streams and data ordered by some criteria to work together.
Sorting the Stream results
The stream-getting methods in database_manager.dart return a Stream of QuerySnapshots, like so:
And then over here in main_shopping_list.dart, I set a state variable (activeItemsStream) to the return value of that “get stream” call:
void initState() {
    super.initState();
    getSharedPrefs().then((storeIDFromPrefs) {
      activeItemsStream = db.getActiveItemsStream(widget.list.id, storeIDFromPrefs); // should get selectedStoreID from state
      inactiveItemsStream = db.getInactiveItemsStream(widget.list.id, storeIDFromPrefs);
    }); // sets selectedStoreID
  }
To display it, I used a custom widget that I made myself called ItemListStream that takes that state variable as a parameter (called dbStream, first one in the list) and a sortBy parameter.
That widget file is actually pretty short, here is item_list_stream.dart in its entirety. Notice the sort performed on the list items, this takes the place of “orderBy” on the database call.
I tap the “three dots in a row” in the blue “Items” bar, then I drag “Bag of potatoes” up one spot. The change is reflected on the previous screen and in Firebase.
Check out reorderable_list.dart to see how this works.
Finally, the user needed a way to change which store was selected. Here’s what I built:
I built this using a Cupertino Action Sheet. Look in main_shopping_list.dart for the full code. Changing the selected store calls _setSelectedStore, which updates the selectedStoreID state variable and “re-gets” the active items and inactive items streams with that updated ID.
This post is part of my “Building a Flutter App” dev journal, which begins here.
In this post: I develop a feature that allows the user to “link” stores and shopping lists to each other. This link is managed on the “edit store” and “edit shopping list” pages. A link is bidirectional: adding a store to a shopping list also adds that shopping list to the store.
First, the final product
The user can toggle every one of their stores on/off for each shopping list.
Feature description and purpose
This feature has a few purposes:
allow items from multiple shopping lists to appear in one store (so when you’re at, for example, “Fred Meyer”, you can see items for “groceries” and “home improvement”)
allow the user to save different item orders for different stores (this work was documented in this article)
make it easier for the user to know which store they need to go sooner to based on which items they need
Deciding how to represent the store/list links in the database
First, I consulted Firebase’s docs on structuring data to see what they had to say about representing this kind of many-to-many relationship. Their “users and groups” example is very close to what I want to build here.
They recommend using an index of groups, like so:
// An index to track Ada's memberships
{
  "users": {
    "alovelace": {
      "name": "Ada Lovelace",
      // Index Ada's groups in her profile
      "groups": {
         // the value here doesn't matter, just that the key exists
         "techpioneers": true,
         "womentechmakers": true
      }
    },
    ...
  },
  "groups": {
    "techpioneers": {
      "name": "Historical Tech Pioneers",
      "members": {
        "alovelace": true,
        "ghopper": true,
        "eclarke": true
      }
    },
    ...
  }
}
Now I have a clear goal to work towards, but this should be straightforward to implement. I will have to update/maintain the link data in two places, so my Database Manager functions will account for that.
Inserting the data into the database by hand
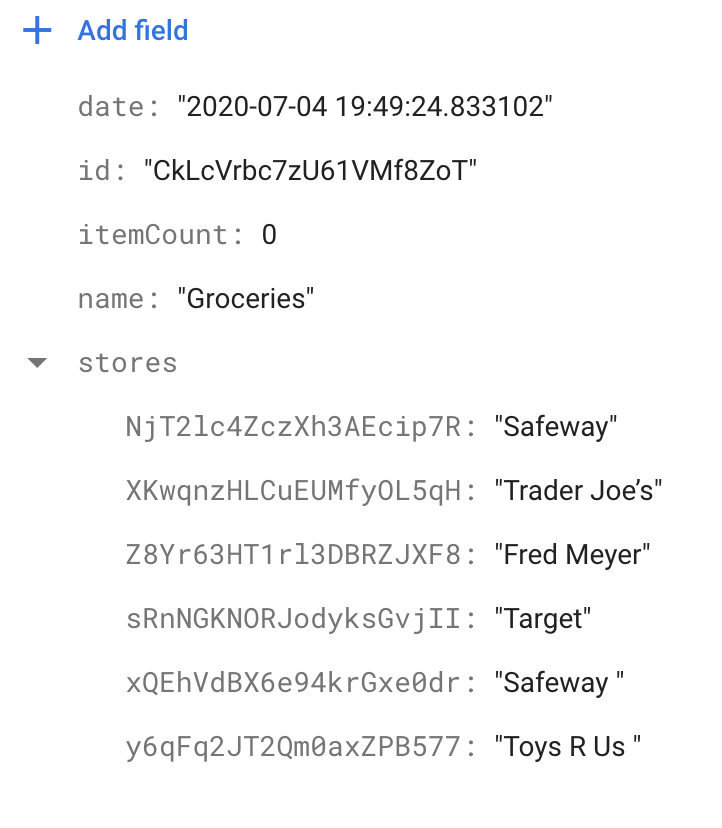
My data differs from Firebase’s sample data in that I use the auto-generated IDs to identify my records, but I don’t show the user those IDs, I show them the name instead. I decided to change my mock data to look like this, instead:
Now the store ID are the key and store name is the value.
The next step was to put this data into my Firebase document by hand. Here is my “Back to school stuff” shopping list with two stores associated with it.
Now I’ll have something to display in the UI (and later edit).
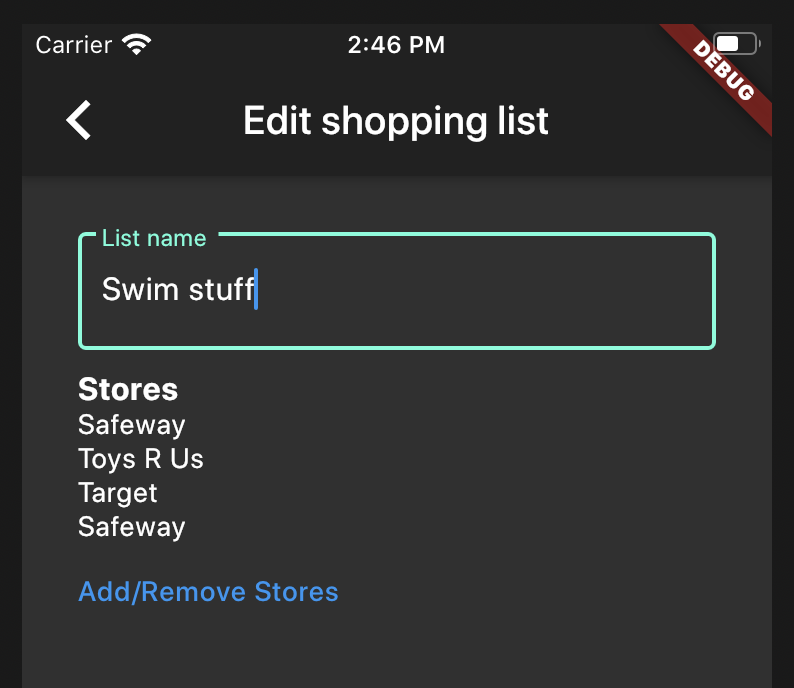
Building the store/list linking UI
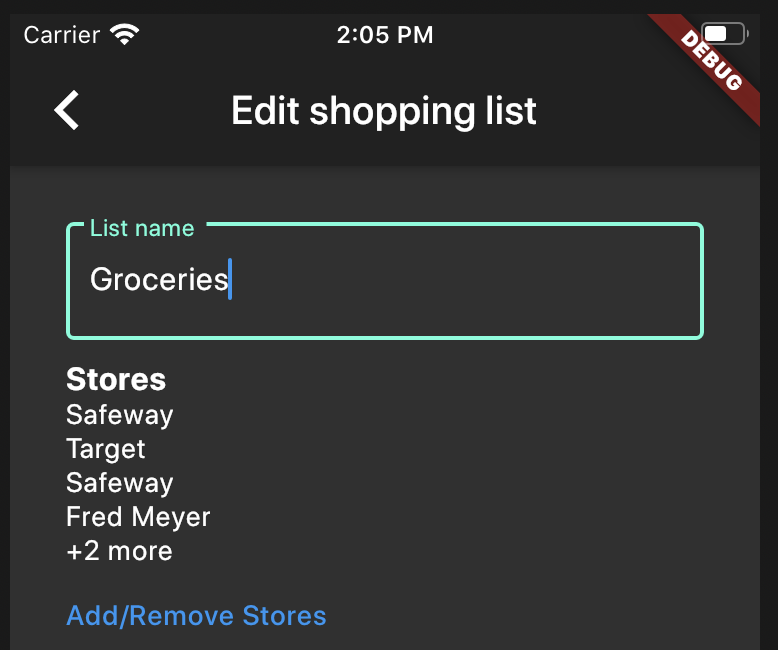
The first page I worked on was the “Edit shopping list” page. I considered doing a list of toggle switches under the “List name” field, but that list could potentially be very long and I didn’t want to push the “Save” button off screen.
Instead, I decided to show a short (truncated) list of linked stores on this page and provide a link that opens up a new view full of toggle switches that represent each possible store link.
Note: I knew that whatever UI I built for this feature would also be used by the “Edit Store” page, so I built everything using (reusable) components and named them generically.
shopping_list_form.dart now contains an internally-used method titled _formFields. This method builds a List of widgets and includes _nameField() in it by default. Whether you’re editing or creating a new shopping list, you’ll always get _nameField.
If the shopping list id is not null, then we can also show the “linked entities”.
 _formFields() {
    List<Widget> fields = [_nameField()];
    // if we're editing an existing shopping list, add the linked stores
    if (widget.shoppingList?.id != null) {
      fields.add(_linkedEntities());
    }

    return Container(
      child: Column(
        crossAxisAlignment: CrossAxisAlignment.start,
        children: fields,
      ),
    );
  }
_linkedEntities is a separate method that returns another widget, LinkedEntitiesList.
linked_entities_list.dart is shown here in its entirety from the final version of the feature branch. The thing that’s interesting here is the use of the spread operator to build an “entity list” out of some unknown number of list elements. This turned out to be a good technique for adding a variable number of children to a column’s children array.
import 'package:flutter/material.dart';
import 'package:grocery_go/views/manage_links.dart';
import '../../db/database_manager.dart';

class LinkedEntitiesList extends StatelessWidget {
  final String parentID;
  final String parentName;
  final String listType;
  final Map linkedEntities;
  final String entities;

  LinkedEntitiesList(this.parentID, this.listType, this.parentName, this.linkedEntities, this.entities);

  final DatabaseManager db = DatabaseManager();

  @override
  Widget build(BuildContext context) {

    _goToManageLinks() {
      var stream;
      if (listType == "shopping list") {
        stream = db.getStoresStream();
      } else if (listType == "store") {
        stream = db.getShoppingListStream();
      } else {
        print("Error: unrecognized list type in linked_entities_list.dart");
      }

      Navigator.pushNamed(context, ManageLinks.routeName, arguments: ManageLinksArguments(dbStream: stream, linkedEntities: linkedEntities, parentID: parentID, parentName: parentName, parentType: listType));
    }

    var _list = linkedEntities != null ? linkedEntities.values.toList() : [];

    return Container(
      height:300,
      child: Column(
        crossAxisAlignment: CrossAxisAlignment.start,
        children: <Widget>[
          _listTitle(),
          ..._entityList(_list),
          _manageLinksButton(_goToManageLinks),
        ],
      ));
    }

  _listTitle() {
    return Text("$entities", style: TextStyle(fontSize:16, fontWeight: FontWeight.bold));
  }

  _entityList(list) {
    const MAX_LIST_LEN = 4;

    if (list == null || list?.length == 0) {
      return [Text("This $listType is not attached to any $entities yet.")];
    } else {
      var listLen = list.length > MAX_LIST_LEN ? MAX_LIST_LEN : list.length;
      var entityList = List();
      for (var i = 0; i < listLen; i++) {
        entityList.add(Text(list[i].toString()));
      }
      if (list.length > MAX_LIST_LEN) {
        entityList.add(Text('+${list.length - MAX_LIST_LEN} more'));
      }
      return entityList;
    }
  }

  _manageLinksButton(onPressedAction) {

    return FlatButton(
      onPressed: () => onPressedAction(),
      child: Text("Add/Remove $entities"),
      textColor:Colors.blue,
      padding: EdgeInsets.all(0),
    );
  }
}
Notes:
I called them “entities” here because these widgets work for stores or shopping lists
I had to make a similar set of changes to the store_form.dart component
Getting a Column widget to have different children based on some condition was a new challenge. The best solution I could come up with was to use a List, called “fields” in this example, to hold the widgets that should be the column’s children. If a condition is met (in my case, shopping list id is not null), then a widget is pushed to the fields List (otherwise, it is not pushed). That approach seemed to be a good way to make the Columns children vary as needed.
user2875289‘s answer in this Stack Overflow question (method 2 and method 3 to be exact) helped me figure out how to iterate through a list to create Text widgets and how to include another Text widget child in that same array of children.
Firebase updates: adding a new store (or shopping list) to the map
Every Shopping List is going to have a map of Stores, like this:
storeRef.updateData(data, SetOptions(merge: true)); // also does not work
I kept digging and found this thread on the issue, which was last updated less than two months ago and says that merge and mergeFields are coming to the FlutterFire plugin set (which includes the cloud firestore plugin) in this update. Specifically, here are the “patch notes” for the upcoming changes to cloud firestore, which are still in review as of this writing (July 2020).
Ahh, so it seems there’s a big update coming soon that will fix this, but “merge true” is a lost cause at this point in time. If you’re reading this in the future, perhaps you have the updated cloud firestore package and none of this is a problem, but for those of us using it as it is now, I thought I’d see if I could find a workaround.
I started to wonder if I could just access shoppingLists with dot notation and gave this a try:
// working example of how to update one field in an existing map without deleting the others

Future updateShoppingListLink(String parentStoreID, String entityID, bool val) async {
    DocumentReference storeRef =  stores.document(parentStoreID);
    storeRef.updateData({'shoppingLists.$entityID': val});
  }
Yay, it worked!
This technique makes it possible to add a new field to the map without deleting the existing ones in the process.
Perhaps I didn’t need “merge true” in the first place, but I’ll leave my notes up in case they’re helpful to anyone else trying to update one entry in a map in a Firebase document.
TL;DR: “dot notation” was a good way to update specific field in a map contained within a Firebase document.
And then I changed the toggleItem method in toggle_list.dart to pass the name instead of the value:
class _ToggleListState extends State<ToggleList> {

  final DatabaseManager db = DatabaseManager();

  toggleItem(entityID, entityName) {
    print(widget.parentType);
    if (widget.parentType == "shopping list") {
      db.updateStoreLink(widget.parentID, entityID, entityName);
    } else if (widget.parentType == "store") {
      db.updateShoppingListLink(widget.parentID, entityID, entityName);
    }
  }

  @override
  Widget build(BuildContext context) {

    return ListView.builder(
        shrinkWrap: true, // gives it a size
        itemCount: widget.list.length,
        itemBuilder: (BuildContext context, int index) {
          var item = LinkedEntity(widget.list[index]);

          return SwitchListTile(
            title: Text(item.name),
            value: widget.linkedEntities?.containsKey(item.id) ?? false,
            onChanged: (bool value) => toggleItem(item.id, item.name),
          );
        }
    );
  }
}
This works – hooray! – but it reveals a new problem: what happens when the user changes the shopping list’s name?
Thoughts on what happens when a shoppingList (or Store) gets renamed:
Firebase doesn’t seem to shy away from redundant data, and the alternative seems to be to store the IDs alone and then perform a “what name goes with this ID?” look up every time the user views or manages the linked lists (or stores).
In my app, it’s probably way more common to view/manage the links than it is to rename a shopping list or store, and I don’t anticipate users having more than about 5-10 of each, so I am going to (cautiously) proceed with the idea that it’s better to update the name in multiple places if the name changes vs. the idea that the name should be looked up every time the user views a list.
I’ll revisit what happens when a shopping list or store is renamed later on in this article.
Removing an existing link from the map
Everything I’ve done so far is for creating a link.
The user can also remove a link (by toggling it to “false” in the list), which I imagined would have a database equivalent of removing the item from the map entirely. What I don’t want to do is make a copy of the entire linkings map, remove the single entry that’s going away, and then push the entire updated map.
As usual, I began with a bit of research and found that the “dot notation” that served me so well for adding a field to a map can also be used with FieldValue.delete().
Here, I’ve written a ternary that looks at the value of val. If true, it updates the ‘stores’ or ‘shoppingLists’ map with the entity’s ID and name. If false, it removes the given entity ID from ‘stores’ or ‘shoppingLists’.
In toggle_list.dart I had to make a few changes to the toggleItem method. If widget.linkedEntities is null, it creates an empty new Map(). Without this, a store (or shopping list) that doesn’t have anything in its linked shoppingLists (or stores) map will be interpreted as ‘null’, causing .containsKey to throw an exception.
Here is toggle_list.dart in its entirety.
import 'package:flutter/material.dart';
import 'package:cloud_firestore/cloud_firestore.dart';
import 'package:grocery_go/db/database_manager.dart';

class LinkedEntity {
  String id;
  String name;

  LinkedEntity(DocumentSnapshot document) {
    this.id = document['id'];
    this.name = document['name'];
  }
}

class ToggleList extends StatefulWidget {

  final String parentType;
  final String parentID;
  final List list;
  Map linkedEntities;

  ToggleList({Key key, @required this.parentType, @required this.parentID, @required this.list, @required this.linkedEntities});

  @override
  _ToggleListState createState() => _ToggleListState();
}

class _ToggleListState extends State<ToggleList> {

  final DatabaseManager db = DatabaseManager();

  toggleItem(entityID, entityName, value) {

    if (widget.linkedEntities == null) {
        widget.linkedEntities = Map();
    }

    // update "locally"
    if (widget.linkedEntities.containsKey(entityID)) {
      setState(() {
        widget.linkedEntities.remove(entityID);
      });
    } else {
      setState(() {
        widget.linkedEntities[entityID] = entityName;
      });
    }
    // update in database
    if (widget.parentType == "shopping list") {
      db.updateStoreLink(widget.parentID, entityID, entityName, value);
    } else if (widget.parentType == "store") {
      db.updateShoppingListLink(widget.parentID, entityID, entityName, value);
    }
  }

  @override
  Widget build(BuildContext context) {

    return ListView.builder(
        shrinkWrap: true, // gives it a size
        itemCount: widget.list.length,
        itemBuilder: (BuildContext context, int index) {
          var item = LinkedEntity(widget.list[index]);

          return SwitchListTile(
            title: Text(item.name),
            value: widget.linkedEntities?.containsKey(item.id) ?? false,
            onChanged: (bool value) => toggleItem(item.id, item.name, value),
          );
        }
    );
  }
}
Here’s where we’re at now:
Stores and Shopping Lists have a map of their “linked entities” (stores keep track of their linked shopping lists, shopping lists keep track of their linked stores)
Linked entities can be linked/unlinked using a toggle switch
The data is changed in the database as the user toggles a link on/off
Making the link a two-way link
If the user adds the “swim stuff” list to the “Toys R Us” store, then “swim stuff” list should also get an association with the “Toys R Us” store. In other words, adding or removing a store from a shopping list should also add or remove that same shopping list from that same store.
Each existing method basically had to repeat the code of the other – once I wrote this out, I realized I could combine them into one method.
Future updateStoreLink(String shoppingListID, String storeID, String name, bool val) async {
    // add a store to the specified shopping list
    DocumentReference shoppingListRef = shoppingLists.document(shoppingListID);
    val == true ? shoppingListRef.updateData({'stores.$storeID': name}) : shoppingListRef.updateData({'stores.$storeID': FieldValue.delete()});

    // do the opposite - add this shopping list to the specified store
    DocumentReference storeRef =  stores.document(storeID);
    val == true ? storeRef.updateData({'shoppingLists.$shoppingListID': 'temp'}) : storeRef.updateData({'shoppingLists.$shoppingListID': FieldValue.delete()});
  }

  Future updateShoppingListLink(String storeID, String shoppingListID, String name, bool val) async {
    // add a shopping list to the specified store
    DocumentReference storeRef =  stores.document(storeID);
    val == true ? storeRef.updateData({'shoppingLists.$shoppingListID': name}) : storeRef.updateData({'shoppingLists.$shoppingListID': FieldValue.delete()});

    // do the opposite - add this store to the specified shopping list
    DocumentReference shoppingListRef = shoppingLists.document(shoppingListID);
    val == true ? shoppingListRef.updateData({'stores.$storeID': 'temp'}) : shoppingListRef.updateData({'stores.$storeID': FieldValue.delete()});
  }
Here they are refactored into one method, with a change made to the signature to take both the shopping list name and store name.
Future updateStoreShoppingListLink(String shoppingListID, String storeID, String shoppingListName, String storeName, bool val) async {
  // add this store to the specified shopping list
  DocumentReference shoppingListRef = shoppingLists.document(shoppingListID);
  val == true ? shoppingListRef.updateData({'stores.$storeID': storeName}) : shoppingListRef.updateData({'stores.$storeID': FieldValue.delete()});

  // and add this shopping list to the specified store
  DocumentReference storeRef =  stores.document(storeID);
  val == true ? storeRef.updateData({'shoppingLists.$shoppingListID': shoppingListName}) : storeRef.updateData({'shoppingLists.$shoppingListID': FieldValue.delete()});
}
Back in toggle_list.dart, I still have to call db.updateStoreShoppingListLink(...); in two different places because the concept of ‘parentID’ and ‘entityID’ are variable based on whether the user came in from the “edit store” flow or the “edit shopping list” flow.
When the user came in from “edit shopping list”, the parentID is a shoppingList’s ID. When the user comes in from “edit store”, the parentID is a store’s ID.
The updateStoreShoppingListLink method always expects the params in this order:
… so we change the order of widget.parentID and entityID as dictated by the list type.
// update in database
// method params: (shoppingListID, storeID, shoppingListName, storeName, value)

if (widget.parentType == "shopping list") {
  // if we're editing a shopping list then the parent ID is the list ID and the entity is the store
  db.updateStoreShoppingListLink(widget.parentID, entityID, widget.parentName, entityName, value);
} else if (widget.parentType == "store") {
  // if we're editing a store, then the parent ID is the store ID and the entity is the shopping list
  db.updateStoreShoppingListLink(entityID, widget.parentID, entityName, widget.parentName, value);
}
In this demo, toggling the “Swim stuff” list on for the “Toys R Us” store also adds the “Toys R Us” store to the “swim stuff” list.
All of these use cases work now:
Add a shopping list to a store adds that same store to that shopping list
Remove a shopping list from a store removes that same store from the shopping list
Add a store to a shopping list adds that same shopping list to that store
Remove a store from a shopping list removes that same shopping list from the store
User can remove all the shopping lists from a store
User can remove all the stores from a shopping list
Create a new store and add/remove shopping lists to it
Create a new shopping list and/remove stores to it
Handling long lists of linked entities
It’s possible that a user will add lots of stores to a shopping list (or lots of shopping lists to a store), so the list has to truncate after a to-be-determined number of items.
Already, we’re seeing some overflow after just three linked entities are present:
Currently, the logic that creates this list looks like so:
  _entityList(list) {
    var shortList = List();
    shortList.add(Text("This $listType is not attached to any $entities yet."));
    // if 'list' is empty, default to shortList which is guaranteed to have something
    return list?.map((item) => Text(item.toString(), style: TextStyle(height: 1.6)))?.toList() ?? shortList;
  }
The refactor needs to do the following:
display up to N (probably 4 or 5) items
append a Text widget showing count of how many items remain, ie: “+ 2 more”
still return a Text widget that says “This listType is not attached to any $entities yet” when the list is empty
Here’s what I ended up with. (There are probably more succinct ways to write this, but hopefully it’s clear what it’s doing.)
  _entityList(list) {
    const MAX_LIST_LEN = 4;

    if (list == null || list?.length == 0) {
      return [Text("This $listType is not attached to any $entities yet.")];
    } else {
      var listLen = list.length > MAX_LIST_LEN ? MAX_LIST_LEN : list.length;
      var entityList = List();
      for (var i = 0; i < listLen; i++) {
        entityList.add(Text(list[i].toString()));
      }
      if (list.length > MAX_LIST_LEN) {
        entityList.add(Text('+${list.length - MAX_LIST_LEN} more'));
      }
      return entityList;
    }
  }
The result:
Adding “store address” anywhere store names are displayed (store list, toggle list)
When I built the ToggleList and the linked entities list, I overlooked the (common) use case of the user having multiple stores with the same name. Without each store’s address on display, it’s hard to tell identically named stores apart.
However, I have a bit of a conundrum: “entities” (as they are), are just persisted to the database as a string representing the store (or shopping list’s) name. There’s no address field, nor do I really want to add one at this point.
I decided the simplest course of action would be appending the location information to the name right before it’s pushed into the database, like so: “Safeway (Kirkland)” and see how far that carries me. Is this hacky? Maybe ;) But it feels good enough for now.
In toggle_list.dart, the full list of shopping lists or stores is passed in as a Map, known as this.list:
Around line 72, each of these list items (which can be stores or shopping lists) are turned into LinkedEntity instances:
var item = LinkedEntity(widget.list[index]);
Both stores and shopping lists become instances of LinkedEntity, and they can share this “base class” because the only things used are their id and name. But now they have a third field: address. If there is an address it’s saved to the address field, but if there is no address (ie: shopping lists), it’ll just set address to be empty.
Now it’s much easier to tell same-name stores apart in the toggle list:
The same address treatment would be useful on the form page, too:
This page is trickier, because this list is taken from the saved “stores” data in the database. I considered a few different solutions, all of which felt cumbersome (on top of some already-cumbersome-feeling logic), until it dawned on me that I could just persist the “StoreName (Address)” string to the database.
It ended up being a one-line (one word, really) change in toggle_list.dart:
Now when toggleItem is called, the same “StoreName (Address)” string is passed to the database.
I’ll go with this approach for now, which seems “good enough” for the sake of this project. (I toggled each store on/off to update it to the new StoreName (Address) format.)
Two more changes…
Before moving on, I had to make two more (small) changes to the code that runs when an existing shopping list or store is updated (renamed) or when a new shopping list or store is created.
If the store already exists (it’s not null), then copy its shoppingLists into storeFields.shoppingLists and send them along to db.updateStore(...).
If the store is null, then it’s a new one being created, so create a new Map() for storeFields.shoppingLists and send that along to the db. Without this, a new shopping list has “null” for its shoppingLists map and the code that adds a new shopping list ID to it fails.
I made a similar set of changes to shopping_list_form.dart.
Updating renaming shopping lists and renaming stores to also update any saved links
The last major piece of work on this feature is making it so that updating a shopping list’s name (or a store’s name) is properly propagated to all of the documents that have it stored.
As far as I can tell, having redundancies like this (such as storing a store’s name or shopping list in multiple places) is oftentimes the preferred way of storing records in Firebase.
Per my own logic, it’s fairly uncommon to change the name of a list or a store but very common to view a store or a list in multiple places. It seemed better to take on the burden of having to update multiple records with a name change once in a rare while vs. the burden of looking up the name for every store and shopping list, by ID, every time the user viewed a list of them.
This piece of work needs to achieve the following:
When the user changes the name of a Store, step through each existing Shopping List and look for that store.id in each Shopping List’s “stores” map. If any match is found, update the name saved for that store entry.
When the user changes the name of a Shopping List, step through each existing Store and look for that shoppingList.id in each Store’s “shoppingList” map. If any match is found, update the name saved for that shopping list entry.
I started my work with renaming stores first, because stores are more complicated. Stores record their name separate from their location (also called “address” in the code), but their name and location are concatenated together when saving them into a shopping list’s list of stores.
In database_manager.dart, I confirmed that the name and address are accessible on the store DTO with a couple of print statements:
Then passed them along to a new method called updateLinkedShoppingLists:
  Future updateStore(String id, StoreDTO store) async {
    if (id != null && id.length > 0) {
      DocumentReference docRef = stores.document(id);
      Firestore.instance.runTransaction((transaction) async {
        await transaction.update(docRef, store.toJson());
      }).catchError((e) {
        print(e.toString());
      });
      updateLinkedShoppingLists(store.id, store.name + " (" + store.address + ")");
    } else {
      print("ID is null/has no length");
    }
  }

    Future updateLinkedShoppingLists(storeID, newName) async {
    // update all the shopping lists's "stores" maps to use the new store name
    await shoppingLists
        .getDocuments()
        .then((querySnapshot) => {
          querySnapshot.documents.forEach((doc) => {
            if (doc.data['stores'][storeID] != null) { // can't use ['stores.$storeID']
              doc.reference.updateData({'stores.$storeID': newName})
            }
          })
        });
  }
updateLinkedShoppingLists gets all the shopping list documents from the shoppingLists collection then iterates through them. On each one, it checks if doc.data['stores'][storeID] is not null, and if it’s not null, it updates the stores entry to have the new name.
The hardest part of this process was figuring out how to only updates the stores {"storeID": "storeName"} entry for shopping lists that actually had this store in their store map. Without this logic check, every shopping list gets the store added, whether it had it before or not, but figuring out how to limit the updateData call to just the documents that had that particular store ID in its store map was a challenge. The docs didn’t really cover this scenario, and the stores.$storeID syntax didn’t work.
In other words, I couldn’t do this:
if (doc.data['stores.$storeID'] != null) { // doesn't work
It seems the handy-dandy store.$storeID lookup is only for use in the updateData({...}) call. For checking if a Firebase document had a particular entry in a map, this was the syntax that worked:
if (doc.data['stores'][storeID] != null) { ...
Perhaps because it doesn’t know the structure of ‘stores’ so it can’t use the dot notation. Either way, here is the “rename everywhere” feature working for Stores:
And getting it working for renaming shopping lists was as easy as writing the same thing again, but for shopping lists and their linked stores:
  Future updateShoppingList(String id, ShoppingListDTO shoppingList) async {
    if (id != null && id.length > 0) {
      DocumentReference docRef = shoppingLists.document(id);
      Firestore.instance.runTransaction((transaction) async {
        await transaction.update(docRef, shoppingList.toJson());
      }).catchError((e) {
        print(e.toString());
      });
      updateLinkedStores(shoppingList.id, shoppingList.name); // call new method
    } else {
      print("ID is null/has no length");
    }
  }

  Future updateLinkedStores(shoppingListID, newName) async {
    // update all the stores' "shopping lists" maps to use the new shopping list name
    await stores
        .getDocuments()
        .then((querySnapshot) => {
      querySnapshot.documents.forEach((doc) => {
        if (doc.data['shoppingLists'][shoppingListID] != null) {
          doc.reference.updateData({'shoppingLists.$shoppingListID': newName})
        }
      })
    });
  }
Added a new view that lets the user toggle stores “on/off” for shopping lists (and shopping lists “on/off” for stores)
Wrote new Database Manager methods to create/delete a two-way link between stores and shopping lists whenever one is added or removed
Added a map to the store documents (and a map to the shopping list documents) that tracks the IDs and names of any linked entities
Made it so that changing the name of a store or shopping list also updates its name in any documents that have it in their linked entities map
Updated the store form and shopping list forms to display a list of linked entities, with special handling for cases where there are more than 4 linked entities
This post is part of my “Building a Flutter App” dev journal, which begins here.
In this post: I add a settings drawer and a “Dark Mode” toggle to my app. The app saves this setting locally so that the setting persists through app restarts.
First, the final product
The user toggles between dark mode and light mode in a settings drawer.
Material UI’s built in “dark” theme
First, I wanted to see what kind of “dark theme” was already supported in Flutter/Material UI. I changed the theme property to ThemeData.dark(), like so:
Now there’s a drawer with a “Dark Mode” toggle but it doesn’t do anything yet.
Toggling between light/dark mode
Still in main.dart, the next thing I did was make the theme conditional on the darkTheme variable. But wait, darkTheme isn’t available up here where MaterialApp is called. Hmm.
I decided to fix by changing the GroceryGoApp class into a StatefulWidget so I could lift the darkTheme variable up into it and check its value to determine if the theme should be ThemeData.dark() or ThemeData.light().
Then, instead of passing a title string into MainPage (which wasn’t doing anything anyway), I instead pass darkTheme and toggleTheme as parameters.
Next, in MainPage, I updated its parameters to take darkTheme and toggleTheme as passed in from GroceryGoApp. Here’s the entirety of the MainPage stateful widget and its state so you can see how the darkTheme and toggleTheme parameters come into MainPage and get passed to _MainPageState and used by the SwitchListTile.
Success! Well, sort of – the little toggle switch isn’t “toggling”. What’s up with that?
Fixing the SwitchListTile switch not toggling
As it turned out, this seemingly-small thing ended up occupying quite a bit of my time. The fix was to actually stop passing darkTheme and toggleTheme into _MainPageState the way I had been.
Instead, I just run an empty constructor and then, when I need to refer to darkTheme and toggleTheme, I address them as widget.darkTheme and widget.toggleTheme. (More on why after the code sample.)
This kinda blew my mind – I thought you had to explicitly pass parameters into the State object, but it turns out that’s not the case. In fact, you’re not supposed to pass them in via the constructor, and you should access them using widget.fieldName like I did here.
(Furthermore, any parameters that are passed to the State object through the constructor will never get updated. Lesson learned! I may have to update some of my other State objects.)
Persisting the user’s dark theme/light theme choice through app reload
Currently, the app defaults to “light mode” every time you reload the app. I’d like to persist the user’s preference, but I want to store it locally (on the device) instead of pushing it to the database.
Shared Preferences is one common solution – it’s a Flutter package that makes it easy to store key/value pairs locally on the device.
I followed this guide and made the following changes to my project’s code:
(Android Studio prompted me to update after I added this line, but you can also do the update manually via the Terminal with flutter pub get).
main.dart
import 'package:shared_preferences/shared_preferences.dart';

/* GroceryGoApp now expects a 'preferences' parameter
   I pass it an instance of SharedPreferences. */

void main() async {
  runApp(GroceryGoApp(preferences: await SharedPreferences.getInstance()));
}

// Here's GroceryGoApp receiving its instance of SharedPreferences in its constructor

class GroceryGoApp extends StatefulWidget {
  final SharedPreferences preferences;
  GroceryGoApp({Key key, @required this.preferences}) : super(key: key);

  @override
  _GroceryGoAppState createState() => _GroceryGoAppState();
}

/*
Hey look, a chance to use my new "widget." trick -
I don't explicitly pass preferences into State, I get them via widget.preferences...
I also replaced 'darkTheme' with a const because I like to YELL_AT_MY_CODE
(really, I just wanted to define the key name in one place in case I end up changing it, because calling it 'darktheme' in some places and 'dark mode' in others is already starting to bother me) */

class _GroceryGoAppState extends State<GroceryGoApp> {
  static const DARK_THEME_KEY = 'darkTheme';
  bool get darkTheme => widget.preferences.getBool(DARK_THEME_KEY) ?? false;

  void toggleTheme(bool value) {
    setState(() {
      widget.preferences.setBool(DARK_THEME_KEY, !darkTheme);
    });
  }

  @override
  Widget build(BuildContext context) {
The first rebuild after installing SharedPreferences was pretty slow, but when it was done – ta-dah!
Oh, no, what’s this? A bunch of error output:
Launching lib/main.dart on iPhone SE (2nd generation) in debug mode...
Running Xcode build...
Xcode build done.                                           22.9s
	path: satisfied (Path is satisfied), interface: en0
Configuring the default Firebase app...
Configured the default Firebase app __FIRAPP_DEFAULT.
	path: satisfied (Path is satisfied), interface: en0
	path: satisfied (Path is satisfied), interface: en0
[VERBOSE-2:ui_dart_state.cc(157)] Unhandled Exception: ServicesBinding.defaultBinaryMessenger was accessed before the binding was initialized.
If you're running an application and need to access the binary messenger before `runApp()` has been called (for example, during plugin initialization), then you need to explicitly call the `WidgetsFlutterBinding.ensureInitialized()` first.
If you're running a test, you can call the `TestWidgetsFlutterBinding.ensureInitialized()` as the first line in your test's `main()` method to initialize the binding.
#0      defaultBinaryMessenger.<anonymous closure> (package:flutter/src/services/binary_messenger.dart:76:7)
#1      defaultBinaryMessenger (package:flutter/src/services/binary_messenger.dart:89:4)
#2      MethodChannel.binaryMessenger (package:flutter/src/services/platform_channel.dart:140:62)
#3      MethodChannel.invokeMethod (package:flutter/src/services/platform_channel.dart:314:35)
#4      MethodChannel.invokeMapMethod (package:flutter/src/services/platfo<…>
Debug service listening on ws://127.0.0.1:64936/RkSpLN3ICpY=/ws
Syncing files to device iPhone SE (2nd generation)...
This seems to happen because the app is waiting on main to do something (main is now async, so that makes sense), and the fix is to add WidgetsFlutterBinding.ensureInitialized() to the first line of main.
With SharedPreferences in place, I can now toggle the app to “dark mode”, close the simulator, re-build, and the app is still in “dark mode” when I reopen the app. Yay!