This post is part of my “Building a Flutter App” dev journal, which begins here.
In this post: I built the “cross off” feature to my “Grocery Go” shopping list management app.
First, the final product
Watch as items move between the top list (the “active” list) and the bottom list (the “crossed off” list).
Feature list
Here are all the things that should happen when this feature is considered done:
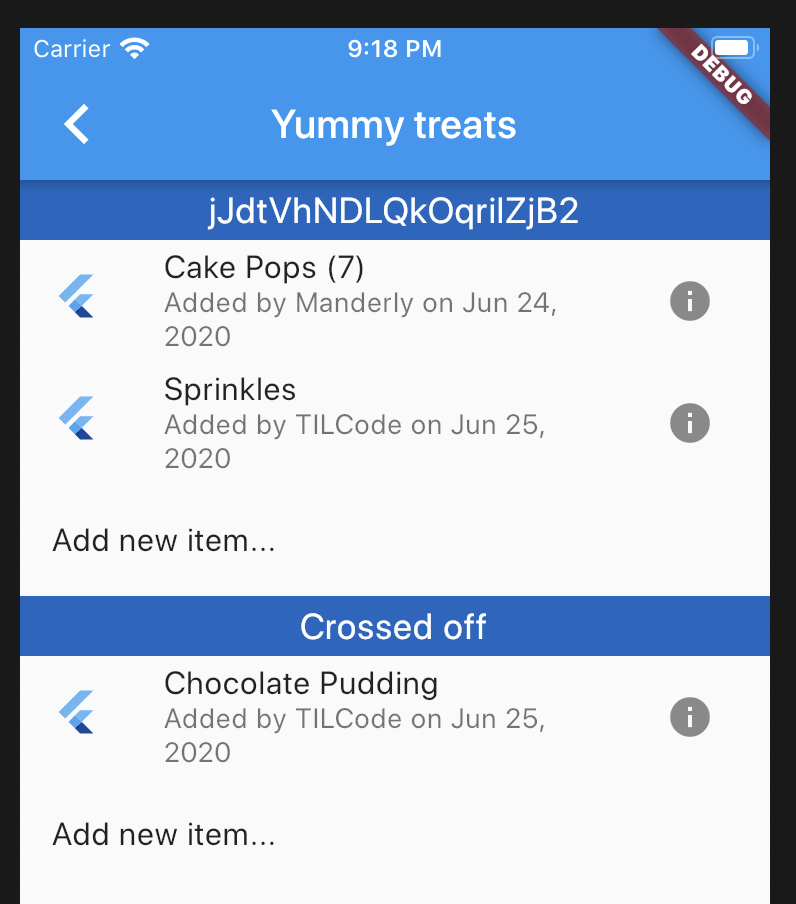
When the user taps the item, it is visibly removed from the shopping list and added to the “Crossed off” list below the shopping list
The parent shopping list itemCount is decreased by one
A “crossed off” item appears at the top of the crossed off items list
The time/date of this action is saved to the item so we know when it was crossed off [dateLastMoved]
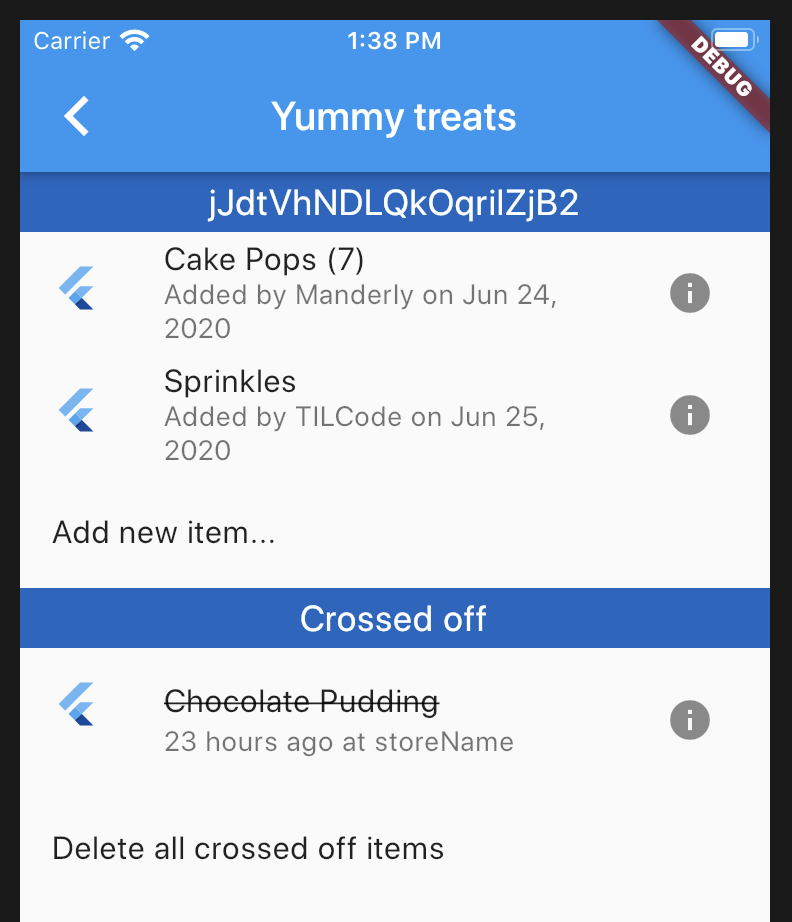
If the user taps a “crossed off” item, it returns to the shopping list and the itemCount is increased by one
The time/date of this action is saved to the item so we know when it was added to the list [dateLastMoved]
Shopping Lists maintain their own lists of Crossed Off items, so that the user doesn’t see a crossed off item from their “home improvement” list in their “groceries” list – add CrossedOff subcollection to Shopping List
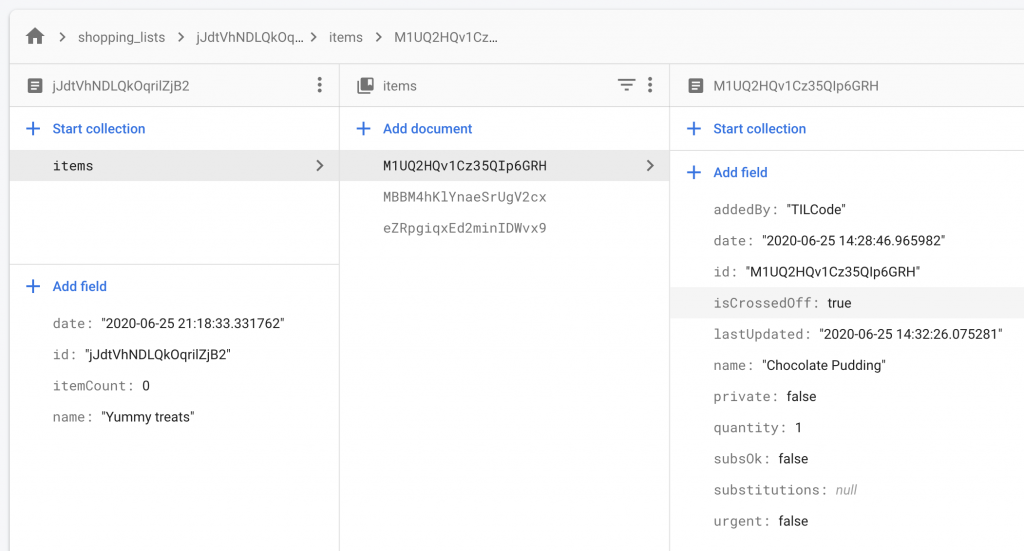
Adding the isCrossedOff property to Item
I thought it might be simple to just have each item track whether it is “active” or “crossed off”. isCrossedOff will be a boolean value on Item instances, so it had to be added to any code that models Item’s data.
To avoid having to delete my existing items and re-create them through the form just now, I also went into their Firebase documents and added isCrossedOff to my three test items:
Filtering the item stream by isCrossedOff’s value
Next up: adding a second “get item stream” method to database_manager.dart.
Originally, getItemsStream() returned all the items. Now, I want it to only return items where isCrossedOff is set to false, like so:
Now the items are being filtered by their isCrossedOff value:
Once I saw it working and was satisfied that I could filter the items this way, I decided to do a quick refactor to turn getItemsStream() in database_manager.dart into one method that takes a second parameter indicating whether I want the active items or the crossed off items.
Moving items between the “active” list and the “crossed off” list
In main_shopping_list.dart, there are two methods that get passed all the way down to the Item instances:
  _crossOff(Item item) {
    print("Remove this id from this list: " + item.id);
  }

  _addToList(Item item) {
    print("Moving this item back to the list: " + item.id);
  }
They are fed into the ItemListStream as onTap: methods. Items that are ‘active’ get the _crossOff method:
Note: I initially set out to use the “ItemDTO” for this update, but I couldn’t figure out how to use it “partially” – ie, the only parts of the item I want to update are the lastUpdated and isCrossedOff fields, but the ItemDTO requires all of the fields to be present. I could copy the entire item into it, but I wonder if there’s just some better way to do this in general…
Welcome to Part 6 of my Flutter app dev journal. Now that the Firebase connection is working, it’s time to add some “create”, “read”, and “update” functionality.
Full disclosure: I’m saving “delete” for later. This is just the “CRU” part of “CRUD”.
Seeding the database with the first bit of data
I decided to start with “shopping lists”, so the first collection I created in Firebase was shopping_lists and I gave it one document. Now there’s something to get from the database, and a collection to add to when new ones are made.
Note: I made an id field and copied the document’s ID into it so that the ID would be easily accessible on the record’s object.
Creating a database manager class
The DatabaseManager class is a singleton that’ll get imported into any file that needs to interact with the database. In my project, it is located in lib/db/database_manager.dart
This is the absolute simplest thing I could think of – all this does is get the shopping list records as a stream. I modeled it (loosely) on the examples found in this helpful tutorial.
database_manager.dart
import 'package:cloud_firestore/cloud_firestore.dart';

class DatabaseManager {

  final CollectionReference shoppingLists = Firestore.instance.collection('shopping_lists');

  Stream<QuerySnapshot> getShoppingListStream() {
    return shoppingLists.snapshots();
  }
}
Using the database manager to get records from the Firebase database
I went back to main.dart and imported the DatabaseManager.
import './db/database_manager.dart';
Then, in the “return”, I added reference to a _shoppingLists widget:
return SingleChildScrollView(
            child: Column(
              mainAxisSize: MainAxisSize.min,
              mainAxisAlignment: MainAxisAlignment.start,
              children: <Widget>[
                ItemListHeader(text: headerShoppingLists),
                _shoppingLists(context),  <--- this is what's new
And then I created the new _shoppingLists widget, still in main.dart. It uses the StreamBuilder to get records (which may come in piecemeal from the database) and either display them as an ItemList or display an error.
This is when my database permissions error became obvious, as no data was actually coming in from the db even though I was ready to display it in the Flutter app.
Troubleshooting Firebase access denied (“ConnectionState.waiting” always being true)
When I tried to get my data from the db, I got a “Missing or insufficient permissions” error.
I checked the value of snapshot.connectionState and found that it was equal to ConnectionState.waiting all the time.
  Widget _shoppingLists(BuildContext context) {
    return StreamBuilder(
        stream: db.getShoppingListStream(),
        builder: (context, snapshot) {
          if (snapshot.hasError) {
            return Text('Error: ${snapshot.error}');
          }

          if (snapshot.connectionState == ConnectionState.waiting) {
            return Text("waiting is true!");
          }
      ...
The quick fix is to make read/write open to anyone.
By default, the rules are:
rules_version = '2';
service cloud.firestore {
  match /databases/{database}/documents {
    match /{document=**} {
      allow read, write: if false;
    }
  }
}
I changed them to:
rules_version = '2';
service cloud.firestore {
  match /databases/{database}/documents {
    match /{document=**} {
      allow read, write: if true;
    }
  }
}
This is obviously a bad idea in the long term, but I should be able to change the rules to allow registered, authorized users access to their own records (and deny everyone else) and I plan to build that soon, so for now this is acceptable.
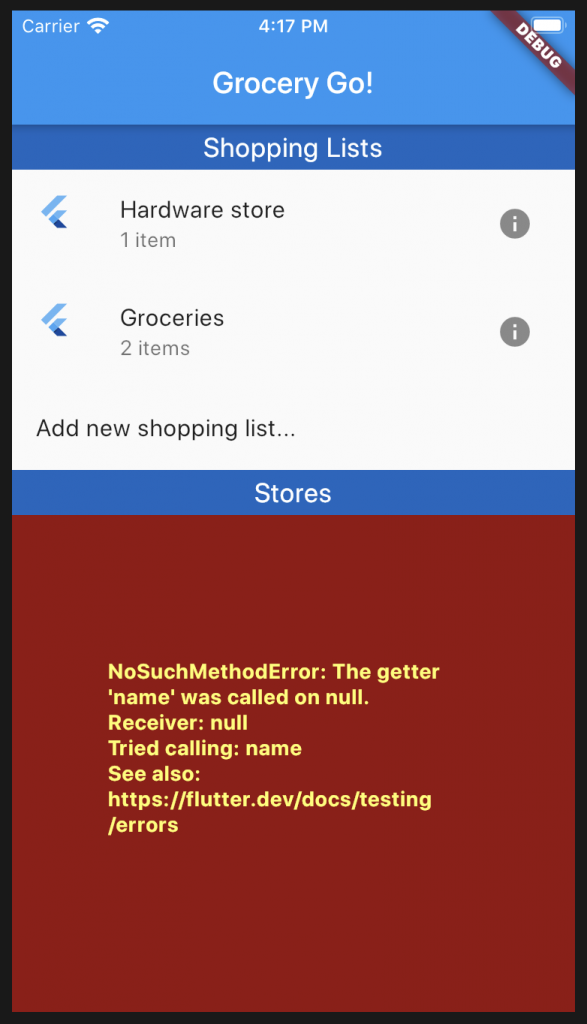
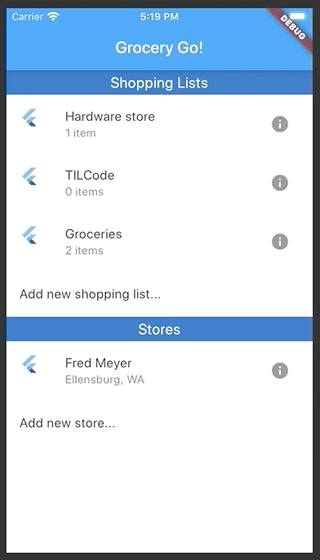
Here’s where we’re at now:
“Hardware store” and “Groceries” are from the database, so this is forward progress even if we lost the “Stores” list in the process.
“Stores” broke because the ItemList widget expects to be fed a document snapshot, and I am going to fix that next.
This is mostly a repeat of the steps I just did to make shopping_lists. First, I added a stores collection and populated it with one store…
And then I added a way to retrieve the store record(s) in database_manager.dart:
import 'package:cloud_firestore/cloud_firestore.dart';

class DatabaseManager {

  final CollectionReference shoppingLists = Firestore.instance.collection('shopping_lists');
  final CollectionReference stores = Firestore.instance.collection('stores');

  Stream<QuerySnapshot> getShoppingListStream() {
    return shoppingLists.snapshots();
  }

  Stream<QuerySnapshot> getStoresStream() {
    return stores.snapshots();
  }
}
And finally, create a _stores widget in main.dart that does the same thing _shoppingLists does:
Now we have stores coming in from the database, too. Yay!
Adding new shopping lists and stores via the in-app forms
Creating the data manually in Firestore’s database dashboard is no fun, so it’s time to hook up the in-app forms to the real database.
I am going to begin by adding the “create a new shopping list” feature.
Data transfer object
For interactions with the database I like to use what’s called a “data transfer object”, it’s just a way of making sure the data sent to the db confirms to a certain structure. I created a new file, shopping_list_dto.dart and built it out as so:
The “toJson” method will be useful when we need to format the data for insertion into the database.
Next, I modified new_shopping_list.dart:
import 'package:flutter/material.dart';
import 'package:grocery_go/db/database_manager.dart';
import 'package:grocery_go/db/shopping_list_dto.dart';

class NewShoppingList extends StatefulWidget {

  static const routeName = '/newShoppingList';

  NewShoppingList({Key key});

  @override
  _NewShoppingListState createState() => _NewShoppingListState();
}

class _NewShoppingListState extends State<NewShoppingList> {
  @override
  Widget build(BuildContext context) {
    return Scaffold(
      appBar: AppBar(
        title: Text("Add new shopping list"),
      ),
      body: Center(
        child: Padding(
          padding: EdgeInsets.all(20),
          child: AddShoppingListForm(),
        ),
      ),
    );
  }
}

class AddShoppingListForm extends StatefulWidget {
  @override
  _AddShoppingListFormState createState() => _AddShoppingListFormState();
}

class _AddShoppingListFormState extends State<AddShoppingListForm> {
  final formKey = GlobalKey<FormState>();

  final DatabaseManager db = DatabaseManager();

  final newShoppingListFields = ShoppingListDTO();

  String validateStringInput(String value) {
    if (value.isEmpty) {
      return 'Please enter a name';
    } else return null;
  }

  void saveNewList(BuildContext context) {
    final formState = formKey.currentState;
    if (formState.validate()) {
      // save the form
      formKey.currentState.save();
      // this data is auto-generated when a new list is made
      newShoppingListFields.date = DateTime.now().toString();
      newShoppingListFields.itemIDs = new List<String>();
      // put this stuff in the db
      db.addShoppingList(newShoppingListFields);
      // confirm with a snack bar
      Scaffold.of(context).showSnackBar(
          SnackBar(content: Text('New list created: ' + newShoppingListFields.name))
      );
      // go back to main view
      Navigator.of(context).pop();
    }
  }

  @override
  Widget build(BuildContext context) {
    return Form(
      key: formKey,
      child: Column(
        children: [
          TextFormField(
              autofocus: true,
              decoration: InputDecoration(
                  labelText: 'Shopping list name',
                  border: OutlineInputBorder()
              ),
              validator: (value) => validateStringInput(value),
              onSaved: (value) {
                newShoppingListFields.name = value;
              }
          ),
          RaisedButton(
            onPressed: () => saveNewList(context),
            child: Text('Save'),
          ),
        ],
      ),
    );
  }
}
What’s new:
Changed the “form” into an actual Form widget so it can behave like a proper Flutter form
Instantiates an instance of ShoppingListDTO called newShoppingListFields and fills it out using form data
Added a form key (which is how Flutter distinguishes forms from each other)
Added validator property to TextFormField and created a simple validation method (all it does is check that there’s any input at all)
Added onSaved property to TextFormField so it knows what to do when the form is saved
Added saveNewList method that runs validation and, if valid, sends this form data off to the db and returns the user to the main screen
Changed the way the date is generated, it’s now converted to a string before it goes to the db
Getting this all working took a bit of trial and error. I experimented with Timestamp and DateTime objects before settling on pushing the date to the db as a string. I also had to try a few things before I figured out how to push the empty itemIDs array into the db in a way that would be recognized (on retrieval) as having a length.
Here it is! Now the user can create a new list and see it on the main screen.
And here it is in the database:
Just one thing is missing: the form-created shopping list needs to have its “id” field filled in after the record is created, so that’s next up.
Grabbing the new record’s ID and saving it to the record
I’d like every document (so every item, every shopping list, every store, etc.) to store its own ID in a data field. This should be useful for editing entries later on.
I wasn’t completely sure how to approach this at first – there is no ID until the document is created, so I have to created something in order to get that ID back.
This lets me grab ID that comes back and immediately update the document to have that ID, like so (in new_shopping_list.dart):
void saveNewList(BuildContext context) async {
  final formState = formKey.currentState;
  if (formState.validate()) {
    // save the form
    formKey.currentState.save();

    // this data is auto-generated when a new list is made
    newShoppingListFields.date = DateTime.now().toString();
    newShoppingListFields.itemIDs = new List<String>();

    // put this stuff in the db and get the ID that was created
    DocumentReference docRef = await db.addShoppingList(newShoppingListFields);

    // update the record to have the ID that was generated
    newShoppingListFields.id = docRef.documentID;
    db.updateShoppingList(docRef.documentID, newShoppingListFields);

    // confirm it with a snack bar
    Scaffold.of(context).showSnackBar(
        SnackBar(content: Text('New list created: ' + newShoppingListFields.name))
    );

    // go back to main view
    Navigator.of(context).pop();
  }
}
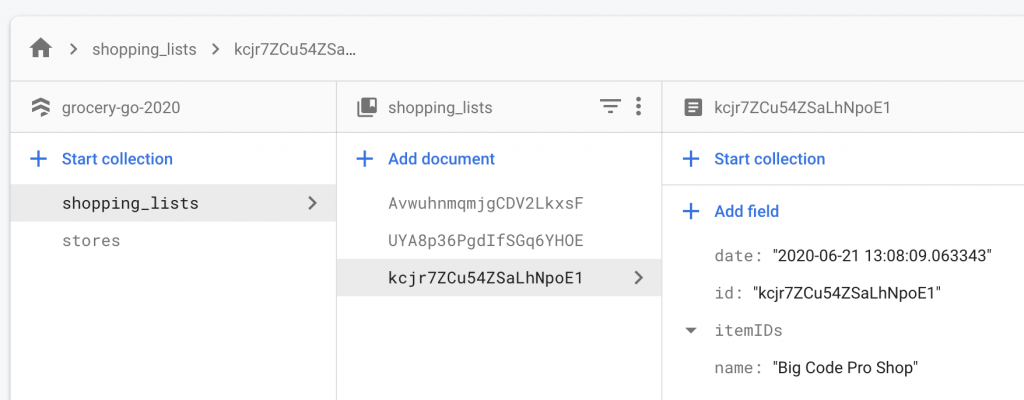
Now the document’s ID is duplicated into a field on that document:
Refactoring it a bit…
This works, but I don’t like that my DatabaseManager is basically foisting this work onto whatever code is calling it. We’re never going to create a document and then not immediately turn around and slap the ID into it, so I wanted to see if I could put encapsulate this work within database_manager.dart
Initially, I ran into trouble trying to create a DocumentReference – a Future<DocumentReference> is not a DocumentReference, it seems.
This might be a job for async/await, which I’ve used in JavaScript/TypeScript but have not yet attempted in Flutter/Dart, so here we go – now it’s async/awaited and returning that DocumentReference.
And then over here in new_shopping_list.dart, I removed the “update the ID” code:
void saveNewList(BuildContext context) async {
  final formState = formKey.currentState;
  if (formState.validate()) {
    // save the form
    formKey.currentState.save();

    // this data is auto-generated when a new list is made
    newShoppingListFields.date = DateTime.now().toString();
    newShoppingListFields.itemIDs = new List<String>();

    // put this stuff in the db
    var docRef = await db.addShoppingList(newShoppingListFields);
    print("Created record: " + docRef.documentID);

    // confirm it with a snack bar
    Scaffold.of(context).showSnackBar(
        SnackBar(content: Text('New list created: ' + newShoppingListFields.name))
    );

    // go back to main view
    Navigator.of(context).pop();
  }
}
(I later cleaned it up by removing var docRef = and the print statement, I just wanted those to confirm that everything was working the way I expected.)
And there we have it – now the work of updating the ID is done by the DatabaseManager, which I think is just a better design for this particular use case.
All of the code pertaining to hooking up to Firebase and getting creation and retrieval working can be found in this pull request. (Hey, we’re halfway to a CRUD app!)
Sorting the shopping lists by name (alphabetically) as they come in from Firebase
Before we move on and Firebase-ify the rest of the app, I want to fix the way shopping lists appear in a seemingly random (or at least unpredictable) order.
In the long run, it’d be nice if the user could re-order these lists, but for now, I think I’ll sort them alphabetically.
Firebase has .orderBy, but it took me a bit of trial and error to realize I had to apply it to the collectionReference, not the part where we get that reference in the first place (so not the Firestore.instance.collection("collectionName") part.
Like this:
class DatabaseManager {

  final CollectionReference shoppingLists = Firestore.instance.collection('shopping_lists');
  final CollectionReference stores = Firestore.instance.collection('stores');

  Stream<QuerySnapshot> getShoppingListStream() {
    return shoppingLists.orderBy("name").snapshots();
  }

  Stream<QuerySnapshot> getStoresStream() {
    return stores.orderBy("name").snapshots();
  }

  ...
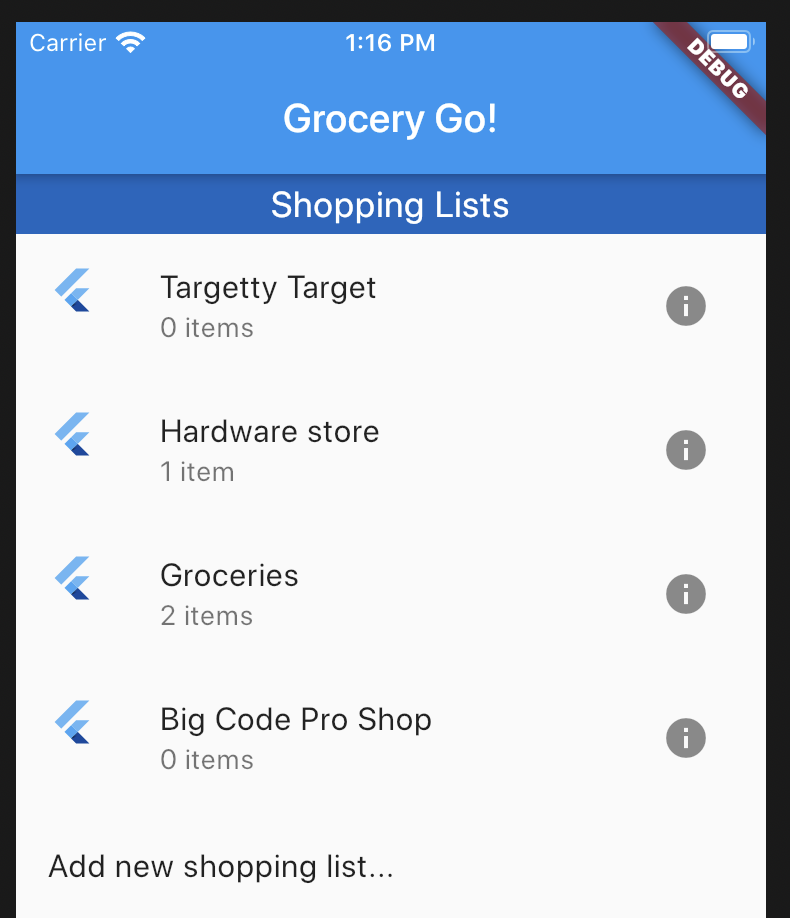
Which results in the shopping lists being sorted by name:
Minor thing, but it was bothering me the way new ones didn’t seem to have any rhyme or reason to where they ended up in the list.
Hooking up the rest of the app to the database
Making the rest of the app work with Firebase was a decent amount of work, and most of it was a re-hash of what was already done above, but I still broke the major steps into individual pull requests for anyone interested in seeing them.
Working with Items (items being things like “eggs”, “bread”, etc.) made it apparent that they should be stored as a subcollection of a Shopping List, rather than have their IDs saved in an array on shopping list and retrieved separately.
Firebase seems to prefer you just stick the child document(s) inside their parent documents, rather than maintain a list of child document IDs the way I’m used to doing with MySQL databases.
In Firebase, the shopping list’s ‘items’ subcollection looks like this:
To create an item and add it to the subcollection, database_manager.dart now has the following method:
Gets the parent shopping list document by its ID and updates “itemCount” (since we don’t have the itemIDs array to get the length of anymore)
Gets the parent shopping list document by its ID, gets the collection of ‘items’ within, and adds the new Item (as JSON) to that subcollection of items
Immediately gives that new Item its own ID as a field called ‘id’
The app now uses real data from the Firebase db for its shopping lists, items, and stores!
At this point the app has the most basic “create”, “read”, and “update” support for shopping lists, stores, and items, but the app needs a whole bunch of feature love to feel more polished.
Join me in Part 7 [Coming soon] as I add a bunch of new features.
In this article: my review of Oregon State University’s online post-bacc CS degree program, which I attended for 3.5 years, starting in September 2016 and finishing in June 2020, completing 15 courses with a 3.9 GPA and graduating with my second bachelor’s degree, a Bachelor of Science in Computer Science.
Yay! Being done is a great feeling. Pictured: my new diploma surrounded by the books, notes, and worksheets that were my BFFs during this program.
First, I’ll answer the most frequently asked questions I was asked while in the program:
Yes, the program is completely online – the coursework is unlocked weekly in the online portal known as “Canvas”, you take tests online with a proctor supervising you over webcam the whole time, you submit coursework and get your grades online
No, it is not self-paced – quarters are 10 weeks long, deadlines are firm barring exceptional circumstances (I never pursued an extension but they exist for those who can justify the need for one)
But you can vary your pace through the program, such as taking 1 class a quarter to go at a slower pace and leave more time for the rest of your life, or taking 2-3 classes a quarter to get through the program faster (more thoughts on class pairings later in this article)
You can take quarters off – I took a few quarters off here and there for things such as moving cross country and having a baby
Yes, you have to already have a bachelor’s in some unrelated field – it’s a “post-bacc” program, so your first degree entitles you to skip all the gen-ed classes you’d normally need to do
It’s still a normal bachelor’s degree on paper and the degree does not call out the “online” nature of the program in any way (you can see the diploma I received at the top of this article)
Yes, there is a decent degree of “self teaching” in the program – at a high level, the courses give you problems to solve and they usually provide lectures and readings to guide your learning, but you’ll be on YouTube, Stack Overflow, experimenting in your own codebase, etc. to find answers and a deeper understanding than the course materials alone give you.
Yes, it was still challenging (and I learned a lot) even with prior industry experience. I came into this degree with about 2.5 years of web development experience and prior to that, a bootcamp, and I still learned a ton from most classes. Previous experience will give you a small advantage, but there’s still a ton of work to do and problems to solve that take time and effort.
Yes, it requires sacrifice – there are many things I missed out on during the last four years because I was busy with school, which dominated evenings and weekends.
Yes, it was an excellent experience – I learned so much and rounded out my CS knowledge in ways that my bootcamp and industry experience had not.
Computers have been my passion since I was a child, and completing this degree meant a lot to me. It formalized something I’ve explored via hobby projects, game mods, my own little websites, etc. since I was a kid.
My favorite resource for learning more about the program is r/OSUOnlineCS. I lurked here for nearly a year before I applied, and visited frequently while in the program.
About me (and some encouragement for other “non-traditional” students)
I want to write briefly about being a “non-traditional” student because that’s basically who this program is for: students who already have an established life and commitments outside of school.
Returning students usually have at least a couple reasons why they think they can’t go back to school – they’re “old” (over 30, or 40, or whatever), they have children, they have a full-time job, etc.
I check all of those boxes – I’m almost 37, I had two babies while I was in the program, I worked full-time for part of it, I relocated cross-country, blah blah. If this is you, with all these existing demands on your time, I just want to say: it is possible! It is hard but it is possible.
I met quite a few other parents with full-time jobs on my journey through the program so I don’t think I am unique, just disciplined and willing to work hard. If this is you, too, don’t count yourself out just because you have other things going on in your life.
My path through the program
Here are the classes I took in the order I took them, along with links to my reviews on each class.
OSU regularly updates and revamps the courses, and some of these courses were revamped since I took them.
The most notable (and controversial) change was the switch from C/C++ to Python in the foundational classes. I took the C/C++ versions of 161, 162, and 261.
I think this was a good change. While I appreciate the experience I got with pointers, memory allocation, and a relatively “low-ish level” language, sometimes it felt like debugging C got in the way of learning the higher level concepts the courses were trying to teach.
What to expect from OSU’s online CS program
Pacing and scheduling
Classes follow a strict schedule. Each week, usually on a Sunday, a batch of lectures, worksheets, projects, quizzes, discussions, etc. unlocks. Most classes have a “late work” policy you can invoke (once or twice) if you need an extra day or two, but this is not a self-paced program. Deadlines and exam windows are generally strict.
The workload and time commitment varies a lot between classes. The OSU CS Course Explorer is a tool I made to help students determine which classes to pair and which to take alone. It scrapes its data from the survey hosted on r/OSUonlineCS. You can also search the OSUonlineCS subreddit for tips and advice from other students.
At any given time in the program I was either working full-time with a baby, or caring for two children while working my way through the courses. I frequently alternated between one class a quarter and two classes a quarter.
When I took one class at a time, I felt like I was making glacial progress towards the degree but I also had room to breathe. I could dig into each assignment, do extra credit, work on side projects, or spare a few days for an illness or a short trip somewhere. I even went to Disney World for three days in the midst of CS225! :)
When I took two classes at a time, every week was the time management Olympics with no room for slop. I started assignments the moment they unlocked and made every minute count, but the sheer workload guaranteed the two-class quarters were brutal. I lost my 4.0 GPA the first time I attempted two classes at the same time. It was exhausting, but… faster progress!
Classes to take alone
I realize there are financial aid and “I want to get this over with” reasons to take two (or more) classes at a time, but my personal recommendation is that these classes benefit from being taken alone due to their difficulty, time-consuming nature, and/or overall importance to one’s CS education:
CS162 Intro to Software Engineering II – insane workload and challenging topics, but I took the C version so maybe it’s not quite so unforgiving now
CS325 Algorithms – most challenging course of the program, it dominated my life for 10 weeks
CS261 Data Structures – high workload and challenging, especially when it was taught in C
CS271 Computer Architecture and Assembly – high workload and challenging subject matter
CS467 Capstone – it’s your final project, give it (and your group) the time it deserves
Classes to take with other classes
These classes were lighter weight or just generally not so programming heavy. A coding problem can occupy me up for hours as I investigate and trial-and-error my way through it, but I never get stuck like that when the task is just to write a document or forum replies.
CS225 Discrete Math – challenging but manageable
CS361 Intro to Software Engineering I – mostly a writing class
CS290 Web development – relatively light workload
CS340 Database – a very entry-level look at SQL plus a final project you can do the bare minimum on if you are so inclined
CS3344 Operating Systems – the projects are huge but they’re manageable, topics aren’t exceptionally challenging
Obviously, your mileage may vary – and courses get revamped every so often, too, so my opinions and experiences will become less relevant over time. (This was written summer 2020.)
Exams
Most classes have some sort of big test to take at some point. Some classes split this up as a “midterm” and a “final”, some require it to be proctored (supervised), some allow open book, and a few don’t have any kind of big tests at all. At one end of the grading spectrum are classes that treat exams as the bulk of your final grade, while others weight their exams so lightly you can basically fail them. Every class is a little different in this regard.
Before doing this degree, I was never the kind of person who studied for exams. I usually just winged it and did okay, but the OSU classes demanded it. Flash cards, practice worksheets, practice exams – I did them all, and usually managed a B or better on midterms and finals.
Proctored exams are no fun but they help ensure the quality of the program’s graduates. A proctored exam is taken either at a local test center (if you live near a community college they may offer proctoring services) or online with a service such as ProctorU on your usual computer. The overwhelming majority of students seemed to be using ProctorU.
For the first half of the program I took my exams in person at a community college branded testing site near me. The big advantages with an in-person testing site:
a dedicated testing environment where no one is going to come along and ring your doorbell mid-exam
you get to use scratch paper instead of a whiteboard
ProctorU makes you use a whiteboard, and it’s small so you have to have to wipe it every few problems and can’t easily refer back to previous problems later in the exam. With a stack of scratch paper, you don’t “lose” your work as you work through the exam.
But, after a scheduling snafu with my local test site, I switched to ProctorU and never went back to my local site. ProctorU was half the cost of the test center and way more flexible with the scheduling options (my test center was only open a few days a week and after they lost my reservation and had no proctor present on the last day of the exam window, I was done with them).
As a whole, I would describe the exams in this program as tough but fair. There are a few exceptions, of course – CS290’s final stands out as being particularly bizarre and nonsensical, but it made up for it by being worth just a small portion of the final grade. Most classes seemed to derive around 20-50% of the final grade from tests alone.
Course content and materials
Unfortunately, as a whole, the course lectures are not great. There are some exceptions (CS492 had amazing lectures), but in general, you can find better instruction on virtually every topic covered by this degree program on YouTube, and you should. There are tons of talented people out there who can teach you how to do a summation or how to step through recursion better than the OSU course materials.
Courses get refreshed every 3 years on a rolling basis (so not all at the same time), and you’ll see people in the Slack channels and the subreddit talking about upcoming refreshes and retooling their schedule to get in either before or after a refresh. In my experience, the refreshes tend to be a good thing – you want to get in after a refresh, rather than before.
The most notable refresh that occurred while I was in the program was the switch from C++ to Python in CS161 and CS162 (with the change propagating up to the higher level classes after I graduated). There was also an elective that got split into two separate courses (Mobile & Cloud became Mobile and Cloud). Also, CS372 became an elective, and new electives were added.
I think these are good changes – they are trying to keep the courses relevant to the industry as a whole and useful to students. When I was in it, CS162 was like being punched in the face every week, but in the three quarters since that change occurred I’ve heard much better things about the class.
Feedback and help
You will get little to no feedback on the code you turn in. I never got any kind of “Hey, you know what might make this code read better…” input on any of the code I wrote for this program. Do not enroll in this program hoping to get 1:1 feedback on your code, because it will not happen. (I did get quite a bit of that kind of help at my bootcamp, though.) This was a disappointment for me in the program. I was accustomed to code reviews on everything I wrote at work so just turning in whatever I wanted and never hearing a word about whether the code style or approach was any good was a weird feeling.
Office hours – most courses had a scheduled set of times each week where you could drop into the Slack chat or a meeting room and converse with one or more TAs about the coursework. I rarely attended these – they were almost always at some impossible time (either they overlapped my work hours or they were right in the middle of the dinner hour) or way too late in the week (I was not going to “save” my problems for a Friday TA chat when the thing is due Sunday).
There’s a Slack channel for every class but the usefulness of each one varied widely. Some were great, with active discussion and helpful links and tips being shared. Others were completely dead.
As I was finishing up at OSU they were moving to a system of having official Slack channels for each class but having a teacher and/or TA in the room seemed to kill any interesting discussion beyond simple Q&A about the assignments.
Other student projects on GitHub/blogs – these were a goldmine of help. Usually the assignment had changed in some way since someone posted their code five years back, but having something similar to analyze was extremely valuable to me. Some OSU assignments are identical to assignments given by other universities, too, so if you find yourself stuck on an assignment just searching for the premise of the assignment might uncover something helpful.
Group work
There is a lot of group work in this degree program and for the most part it sucks.
The group work in this program is at its best when it’s things like discussions on Canvas or Piazza, and it’s at its worst when you’re a team of 3+ and one (or more) of your team members isn’t doing anything at all.
The problem with group work in an academic setting is there’s no recourse for problem teammates. In a professional environment, the team usually has avenues for dealing with a non-performing or always-absent teammate. Generally, managers don’t let someone do nothing and collect a paycheck. In a classroom setting, though, these non-performers are your problem.
I cannot sugarcoat it: many group projects in this program will feature one or more students who just don’t give a shit. I had group members who promised to do work and then just never did it, group members who turned in garbage, group members who skipped meetings and acted like it was no big deal if they turned their part in the same day it was due while others in the group were unable to work until that part was done. I had one group member drop a mess into the codebase and then go out to dinnerfor two hours just hours before it was due.
The TAs and teachers don’t want to hear about your team’s turd, so it is best to make peace with it and come up with contingency plans for your group’s non-performers. Try to arrange the workload to minimize dependencies – ie: don’t make it so you can’t start your part until someone else has finished theirs, because that person might wait until the 11th hour to do the part you’re waiting on. I’ve talked with enough other students to know that my experience was not unusual. Expect some dead weight on at least a few of your group projects. The group work is one of the worst parts of the OSU program.
Why I enrolled in OSU’s CS program even though I’m a web dev bootcamp grad who already works in software
My first degree is in fine art and my first career was in designing video games. The industry shift to “free to play” style games left me unhappy with my role. I’d always liked making websites, so in 2014 I quit my video game designer job and completed an 8-week web development bootcamp with Code Fellows in Seattle, WA.
My first engineer role was at Expedia, where I worked on a web app that allowed Expedia’s suppliers (people selling tours and activities) to list their products on the flagship website. This was great – I loved the bootcamp and I loved my job at Expedia, but I felt like my long-term advancement might be held back by the lack of a degree. (Some people even made comments to me to that effect, too.)
With decades of career still ahead of me, I decided to invest in a degree to support it.
I was impressed at how many of the topics I first encountered in my bootcamp resurfaced while working on this degree. Recursion, picking the right data structure for the task, interfacing with an API, CRUD operations, writing tests, and performance considerations were all covered in the bootcamp. Doing this degree made me feel even better about how good my bootcamp was! (Thanks, Code Fellows! You guys are legit!)
To me, this CS degree symbolizes my commitment to my new career and dedication to learning. I was already tooling around with side projects all the time, why not focus them into something tangible?
People argue that you can learn all of this stuff online for free, and that is true – I relied heavily on free online resources for every class in this degree – but the program exposed me to (and pushed me through) to things I’m not even sure I would have found on my own. For example, I don’t think I would have built a shell in C or worked through recursive algorithms on my own. I definitely would not have studied discrete math on my own. And I probably would’ve given up on some of the harder things if it weren’t for needing to pass a class motivating me to work through it.
People say you don’t need a degree once you’re already working, but I was called “just a boot-camper” or “just a front-end dev” enough times to convince me otherwise.
With the degree, now I feel like I can do anything!
Job prospects
I was going to fill out this section with a brief discussion of my post-degree job search, but due to COVID-19 I’m in a holding pattern as I wait for my children’s daycare to reopen and for it to be safe to venture into the outside world again. Many companies seem to be on hiring freeze, too.
I’ll write something useful here when I have something to report.
In conclusion
To some extent, it’s hard to say if the degree is worth it when I’m only a month post-graduation and have barely begun my job search (in the midst of COVID-19, no less).
But I can say this: it was a good 4 years and I’m proud of the work I did.
The degree was no replacement for on-the-job training: the degree didn’t touch 90% of the technologies, techniques, workflows, or complexities of the codebase that I encountered in my professional job. The bootcamp I did in 2014 handled those areas better.
Here’s a diagram that attempts to illustrate how much “overlap” there was in topics and learning between my bootcamp, the OSU degree, and the web developer job I had for the first three years after I finished the bootcamp:
This diagram needs a big fourth circle labeled “tinkering around with stuff on my own”.
Just going by what my other CS-degree having friends have told me about my coursework and projects vs. theirs, the OSU program seems to be roughly on par with what other state schools are offering for on-campus CS. In general, the OSU program seems to be more modern than what some of my friends did for their degrees (circa 2005-2015), though less math-heavy.
Overall, the degree gave me what I wanted: the peace of mind that comes from having put in the hours and the work to earn the same degree so many of my colleagues have. I think the degree will open doors down the road, especially if I ever want to do something besides front-end web dev (which I’m actually very happy in). Hopefully, the degree communicates that I am serious about my career change and dedication to CS!
I’m glad I did it.
Be sure to check out my individual course reviews if you want to know more about the classes in greater detail.
In this post: Adding Firebase to my Flutter app. This is mostly setup (there was a fair amount of it) and the actual coding resumes in Part 6.
At this point, passing around the mock data objects is getting to be more of a nuisance than a help. I don’t want to write code just to support the passing-around of mock data, so it’s time to start putting that data into the db and retrieving it.
But there were still a few places where I felt my experience deviated from the videos/docs or where I just kinda got lost, so I am documenting them here.
Registering the app with iOS
The Firebase instructions assume you’re working in Xcode, but if you’re like me and working with a different IDE (Android Studio) in my case you might be wondering how to get the iOS bundle ID.
Here’s what I did (and as far as I can tell, this step has to be done in Xcode.)
Open Xcode
Go to “File… Open” and open just the iOS directory of my project
3. Click on the “Runner” header in the project structure at left and retrieve the “Bundle identifier” from the information at right (just copy/paste it and leave XCode open because we come back to it in a later step).
4. Give that information to Firebase and click Register App
5. Download the GoogleService-Info.plist file it generates for you
6. Note that they tell you this file belongs in the “root of your Xcode” project. (The Flutter/Firebase video totally skips this step, too!) It took me some trial and error to discover that the right way to “install” this file is to drag it from Finder to the Runner folder in Xcode.
Do not do this operation just in Finder (or via Terminal), you must do this step in Xcode.
Make sure “Copy items if needed” is checked
Make sure “Add to targets Runner” is checked
If it looks like this, you’re done and can close Xcode:
7. Since this file contains things like my API key, I added *.plist to my .gitignore file (so you won’t see it if you browse the project there).
8. Back in Firebase setup, I skipped this step:
9. I also skipped the “Add initialization code” step which is for native projects.
Registering the app for Android
The Flutter/Firebase video covers this, but it happens so fast I had to watch it like 5 times to figure out where, exactly, this file is (and of course, pausing the video brings up a bunch of YouTube links and “related video” junk that covers the code, lol).
Search for and open AndroidManifest.xml:
The line in question is at the top, and the highlighted line is the part you need:
I do not actually have an Android device so for now I just have to hope this works, but I won’t know until later in development. I’ll come back and update this section if I have trouble using Firebase on an Android device.
Creating the Firebase database
After the project was successfully created on Google’s end, I created a new database and went with the default settings for now.
Note: I later had to change the “false” to “true”, because by default the Firebase database doesn’t allow access to anyone.
Now, return to Terminal and run flutter pub get (or if you are in Android Studio it might prompt you to update dependencies as soon as you flip over to another file).
Rebuilding the app
Finally, stop the app if you have it running and rebuild (hit the green “Play” button in Android Studio). Just a heads up, this particular build took a lot longer than they normally do.
Continue on to Part 6 where I write some basic create, read, and update operations for the app.
In this post: Advanced interactions, improvements to the mock data, refactoring repeated code into components.
In the previous post, I built and linked up many of the app’s major routes, but there isn’t much to do on them yet. Changes made on one page aren’t really reflected on another, and a lot of code is repeated.
Now that most pages are represented, I wanted to refine the mock data, improve the way it gets passed around, refactor repeated code into components, and add more interactions such as moving items between lists.
This will be a short post, but this work should be done before moving onto the next step, which is hooking the app up to Firebase.
Refactoring the mock data
The mock data was useful for filling in the UI, but now I’d like to refine it.
Items need to exist independent of any particular list, so that they may appear on multiple lists and be moved between lists with ease
Lists should be more self-contained so that their data isn’t passed as multiple params; this object should contain the lists’s ID, name, and an array of item IDs
Default to local storage and pass data around, syncing with server whenever possible, but don’t prevent usage of the app in “offline” mode
The first thing I did was refactor it so the onTap functions all use a callback method passed in from main.dart or existing_shopping_list.dart. This meant I could finally remove all the “if … else” logic that checked what type of list the item belonged to from list_item.dart. (Sorry you had to see that, that was not my finest code, lol)
Here’s kind of a snippet of how that looks, from main.dart:
And then, over here in item_list.dart, we continue passing the onItemTap and onInfoTap method handles down:
import 'package:flutter/material.dart';

import 'add_new.dart';
import 'delete_all.dart';
import 'list_item.dart';

class ItemList extends StatelessWidget {

  final list;
  final listType;
  final onItemTap;
  final onInfoTap;

  ItemList({Key key, @required this.list, @required this.listType, @required this.onItemTap, @required this.onInfoTap});

  @override
  Widget build(BuildContext context) {

    int getCount(item) {
      if (listType == 'shopping list') {
        return item.itemIDs.length;
      } else {
        return list.length;
      }
    }

    return ListView.builder(
        shrinkWrap: true, // gives it a size
        primary: false, // so the shopping and store lists don't scroll independently
        itemCount: list.length + 1,
        itemBuilder: (BuildContext context, int index) {
          if (index == list.length) {
            if (listType == 'crossedOff') {
              return DeleteAll();
            } else { // store, shopping list
              return AddNew(listType: listType);
            }
          } else {
            return ListItem(item: list[index], listType: listType, count: getCount(list[index]), onTap: onItemTap, onInfoTap: onInfoTap);
          }
        }
    );
  }
}
And then in list_item.dart, the passed-in methods are invoked on onPressed or on onTap, and this is where I pass back the entire item (we’ll see if I regret that decision later, for now passing the whole item makes it easy to pick it apart on the next page for its ID, name, and contents).
At this point, I can either continue building with mock data, passing it around and modifying it locally but really, it’s time to start putting it into/taking it out of a database. On to part 5!
This post is part of an ongoing series recapping my experience in Oregon State University’s eCampus (online) post-baccalaureate Computer Science degree program. You can learn more about the program here.
Six-word summary: One big project, make it count!
You group up with two other students and spend the entire quarter making a project together.
CS467 Review
CS476 is one quarter-long project with a 3-person team of your choosing. If you can’t find groupmates, you can volunteer to be assigned a team. I looked for my groupmates a quarter ahead of time and I think it’s how I ended up with such a high performing group. My team was great.
You can pick one of the instructor-provided projects (which is what my team did) or you can come up with something of your own design, but you’ll have to “sell it” to the instructor or a TA to get approval to make it.
There were a good 20 or so instructor-provided projects to pick from and about half of them seemed to involve developing some kind of mobile app, so if you aren’t keen on developing an app (which some people in the class weren’t) this might rub you the wrong way. I wanted to build a React website and, luckily, there were a couple suitable prompts.
There is very little (if any) instructor/TA feedback on what you make. You won’t get any feedback on your code or what you make, or at least no one on my team did.
Every week you record a 3-4 minute video demonstrating the progress you personally made, and at the end of the quarter someone on your team will put together a poster that summarizes the project.
The class doesn’t really “teach” anything – there’s no lectures or worksheets or tests, it’s just there to make sure you make progress each week. We had to make a presentation poster at the end, but I have no idea who actually saw it (our project showcase was held virtually in the midst of COVID-19 and I couldn’t attend due to my kids’ daycare closing).
If I have any complaint it’s that I had to spend $2000 to just… do a project. I can do that by myself for free. (And I have done that: see OSU Course Explorer, my collection of WordPressplugins, Scene Together, Amazin’ Link Checker). But my group was solid and we made something cool, so it was a positive experience overall.
Time commitment
The class’s instructions tell everyone to spend 10 hours a week on it but they also lay out a list of requirements that, in my opinion, could not be achieved if everyone on the team just shut their laptop at the 10-hour mark. I put in around 20-25 hours each weeks.
Tech stack
Since everyone in the team either already worked in web development (or aspired to), choosing React for the project felt relevant and meaningful.
We used:
React 16.8
TypeScript
Google Firebase and Firestore
Web speech API and Azure Speech Services
Node.js
Heroku
My contributions
Just to give you a feel for what an individual might contribute to a quarter-long project, here’s a list of my major contributions:
Project setup, structure, naming conventions
Early working examples of routes, components, and features to serve as a template/guide for the rest of the project
User account creation and management (using Firebase Authentication API)
User schema in Firebase to hold additional user account data
All of the user-facing forms
Account linking system, whereby one user can “invite” another to follow and that other account either accepts or declines the invitation
Settings page where account links are viewed, deleted, and account profile details are changed
Researching, prototyping, and implementing the “voice to text” feature which required access to the on-device microphone and camera
Prototype work for the “photo reply” feature
“Quality of life” improvements, such as being able to refresh app and stay on the page you were on, the header collapsing into a drawer for mobile users, form validation, supported browser notification text
Responsive app UI works on desktop, iPad, and mobile (in both vertical and horizontal layout)
CSS-based solution to create “envelope” graphic that has open/closed states
Created art assets and icons for the project
App “look and feel”
“Sent” animation
Heroku pipeline owner
Contributed to fixing bugs found by teammates
My teammates had similarly long lists of accomplishments. We arranged the workload such that each of us owned a full “slice” of the app, so they took on the creation, sending, and display of messages between users. Everyone owned the “full stack” of their features, so (hopefully) everyone finished the project feeling like they owned a section of it top to bottom.
What we made
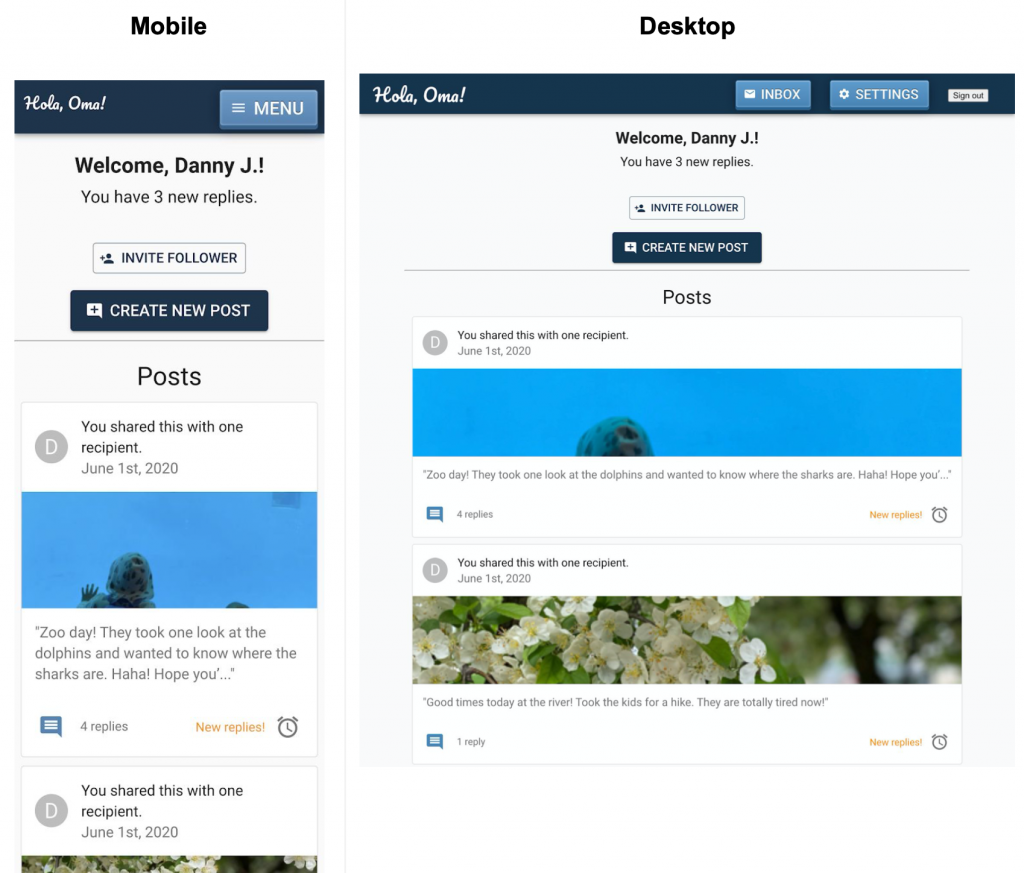
We called our app “Hola, Oma!” and it was based on a prompt provided by the instructor. We built a messaging app wherein the interface is simplified for the “grandparent” user but more complex for the “post creator” user. The user can send text, photos, or videos, and the recipient can respond with text or a selfie. We implemented “voice to text” to make replying with a message simpler for a less tech-savvy user.
Here’s our poster:
Main screen for the “grandparent” user:
User log-in flow and “link up” screen on mobile (for “post creator” type user):
Post-creator type user’s home screen (mobile and desktop):
Post creation (mobile and desktop):
By the end of the quarter the app felt pretty robust! We completed all of the goals we set out to achieve, and even had time for some nice extras. I think it helped a lot that everyone on my team had either an internship or an industry job already, so it was truly a team of professionals.
In Part 2 we left off with a main screen that displays some mock data and can be scrolled, but nothing really goes anywhere or does anything yet. Making the list items interactive is the next step. The ListTile class already supports an onTap property, so adding that is easy.
Here’s some basic “wiring” that causes tapping on any of the list items to trigger a function I added called goToStub.
main_screen_list.dart
...
goToStub(destination) {
  print(destination);
}

@override
Widget build(BuildContext context) {

...

itemBuilder: (BuildContext context, int index) {
  if (index == list.length) {
    return ListTile(
        title: Text("Add new " +  listType  + "..."),
        onTap: () => goToStub("Going to: Add new " + listType),
    );
  } else {
  ...
Be sure to give the onTap an anonymous function structured like this:
onTap: () => goToStub("string here")
instead of a function call this:
onTap: goToStub("string here")
If you do the latter, it’ll cause goToStub(...) to get called immediately on page load. This doesn’t “do” anything yet, it’s just a print statement that proves the wiring works. Now that we know it works, we can build a second page and make it so the onTap takes you there.
It is a stateful widget because the user is going to interact with it and it has a very simple “saveList” method that doesn’t do anything except send the user back to the main screen.
I defined the name of this route near the top, look for static const routeName = 'newShoppingList';
I wrapped everything in a Padding widget because without it, the text field was right up against the screen edges.
There’s a lot more to do to make the form actually work, but I just wanted to build the UI and wire it all together before getting into that stuff
Next, I went back to main.dart and above the MaterialApp return added a routes object. This is the same pattern Flutter’s docs teach.
I pass it listType, which isn’t ideal because it’s just a string that looks like “shopping list”, but for this first pass implementation I didn’t want to do anything more than just what was needed to illustrate how this works. We will refactor this soon.
Here’s what we have now. Note that it doesn’t actually save “New list”, it just sends me back to the main page.
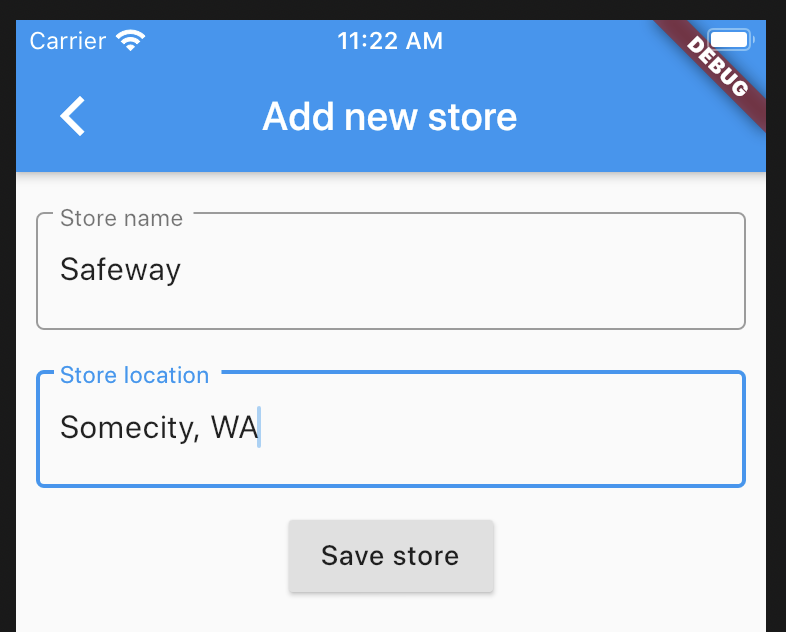
Building the ‘Add new store’ page UI
The ‘add a new store’ page is very similar to the ‘add a new shopping list’ page, so I copied and pasted the contents of new_shopping_list.dart into a newly created file, new_store.dart and built it out from there. I also updated the routes object to contain the new route in main.dart:
You can see all of the code for new_store.dart in this commit.
The result:
We will come back to this page later to hook it up to a mapping API for choosing the store location, but for now this is enough to get the route wired in.
Building the ‘Shopping list’ page
This page is where the user sees what’s on a specific shopping list, adds and removes items to the list, and manages the list itself. Unlike the “create new…” routes I made earlier, this route is going to need some data passed into it when the user navigates to it. The Flutter documentation has a great guide for passing parameters into a route.
My new route takes a listID and a listName. (I may refactor this to be a single list object later on that contains these things as properties but for now I’ll just go with passing in these two things separately.)
views/existing_shopping_list.dart
class ExistingShoppingListArguments {
  final String listID;
  final String listName;
  ExistingShoppingListArguments(this.listID, this.listName);
}

class ExistingShoppingList extends StatelessWidget {

  static const routeName = '/existingShoppingList';

  @override
  Widget build(BuildContext context) {

    final ExistingShoppingListArguments args = ModalRoute.of(context).settings.arguments;

    // now I can do stuff with args.listID, args.listName

    return Scaffold(
      ...
The “existing shopping list” page is similar to the main page in that it’ll be two lists in a column together, where the top list is the “active” part of the list, sorted by category and the bottom list is crossed off items.
Refactor notes: I renamed MainScreenList to ItemList and MainScreenListHeader to ItemListHeader, added an Item model, and expanded the listType handling to vary what is displayed for a single Item based on what kind of item it is.
Here’s where we’re at now, after this code was merged in:
I also added two new libraries to the project for date parsing:
added the intl library for date parsing in item_list.dart [install steps here]
added the timeago library for fuzzy date displays in item_list.dart [install steps here]
These refactors and additions can be found in this pull request. (I’m switching to pull requests instead of individual commits now that the work for each step is getting more complex.)
Building the ‘Store details’ page UI
This is the page where the user edits an existing store.
(Editing a store doesn’t do anything yet, this is just more UI work.)
Now the user can tap around and change what page of the app they are on!
Routes and UI for adding and editing list items
There are just a few major routes left to build:
adding a new list item
editing an existing list item
user account stuff – I’ll save this stuff for later
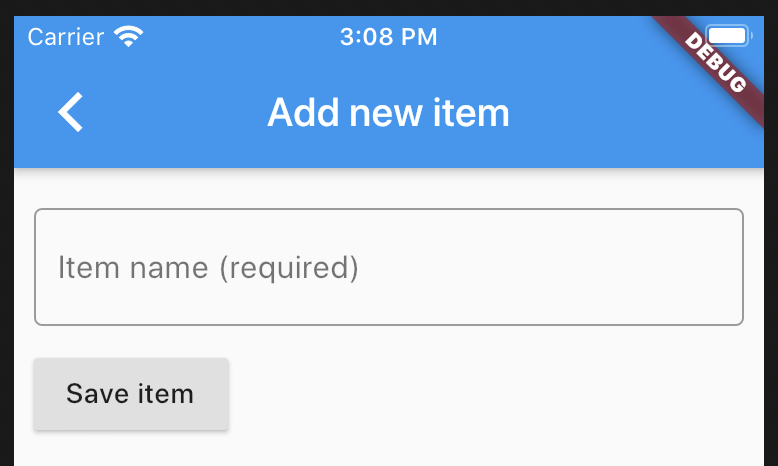
Adding a new item
Items are individual things (“eggs”, “bread”, etc.) on the shopping lists. To keep the adding of new items quick and easy, the user only needs to enter the item’s name to add it to the list.
For now, the new_item.dart page is simple:
Later this will be expanded to running a real-time search on the user’s existing items so the user can quickly pick an existing item with a similar name instead of entering a brand new item every time they want to add “milk” to the list.
Something to note on this route is that the listID is passed as an argument. This is so the newly created item can be assigned a list when it is created. It uses the same “how to pass an argument to a route” pattern described here in the Flutter docs.
Editing an existing item
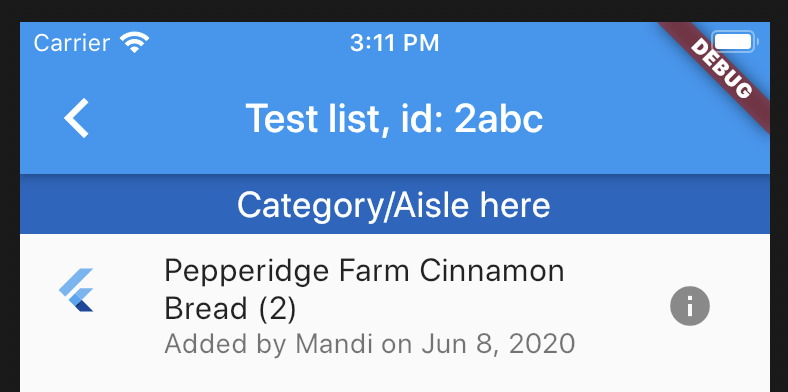
When viewing an item in the list, the little “i” icon on the right can be tapped to open up the item’s details.
(For now, tapping the item name itself will cross the item off the list. I don’t know if I like this particular UX – I keep tapping the item name hoping to edit it, only to remember I need to tap the “info” icon to edit it. This is good enough for now, though.)
Tapping the “i” opens up existing_item.dart where the user can modify any of the item’s properties, including:
name (such as “eggs” or “cut frozen green beans”).
quantity, which is an int for now but may be expanded into a more descriptive set of options later on.
private (boolean), which makes it so this item only shows to the person who added it to the list, so something like “cake for surprise party” isn’t visible to everyone else who has access to this list.
“okay to substitute” (boolean), which flags whether the shopper should attempt to buy a different item instead
a list of suitable substitutes, as well as an option for “any” (or some other way to communicate “not picky”)
urgent (boolean) for marking items as high priority
an item belongs to one user-defined category
an item belongs to at least one list
Most of this data is optional. The intention is that the user will create an item quickly then refine it over time, especially for recurring items. The substitution information is to help people in the same household communicate brand preferences to whoever is actually at the store to help cut down on real-time texting and confirming of item choices.
Now we have this:
Passing the item data into existing_item.dart is handled around line 97 in item_list.dart:
ExistingItem is stateful, so the initial code structure should look familiar by now:
existing_item.dart
class ExistingItemArguments {
  final Item item;
  ExistingItemArguments(this.item);
}

class ExistingItem extends StatefulWidget {
  static const routeName = '/existingItem';
  ExistingItem({Key key});

  @override
  _ExistingItemState createState() => _ExistingItemState();
}

class _ExistingItemState extends State<ExistingItem> {
...
}
The tricky part was getting this stateful widget to use the item parameters that were passed to it.
This page is for editing an existing item, so I want to populate the form fields with its existing data, but I also want the user to be able to edit that data.
The first thing I added was “local” copies of the variables that will come in with the “args”.
class _ExistingItemState extends State<ExistingItem> {

  String _name = 'ERROR: ARGS NOT LOADED!';
  int _quantity = 0;
  bool _subsOk = false;
  bool _urgent = false;
  bool _private = false;
  ExistingItemArguments args;
Then, inside the Widget build(...) stuff, if args is null (they haven’t been loaded in yet), set args equal to the args that came in from the route.
Welcome to part 2 of my Flutter App development journal. In Part 1, I set up Flutter on my MacBook and documented some of the hurdles I encountered. In Part 2, I am going to build the main screen UI and many of the app’s reusable components.
In this post: Putting together the main screen’s UI using ordinary Flutter widgets. Features include: scrollable screen with multiple lists and headers, models for mock data, and displaying mock data.
Running the flutter create app_name command creates a folder with the app_name you give it and fill it with some starter code (called “boilerplate”) that you’ll either use or delete as you build your own app.
I like to build from the boilerplate app code you get from running flutter create, so I started with that.
Where to run flutter create
Run flutter create app_name in the folder where you want your codebase to be created. In other words, if you want it to be in /projects, go to projects and run it inside projects.
❌ Note: Don’t do what I initially did, which was create the project folder, enter it, and run flutter create inside it. That will give you a folder structure like this: /projects/app_name/app_name/ and I assume you don’t want that.
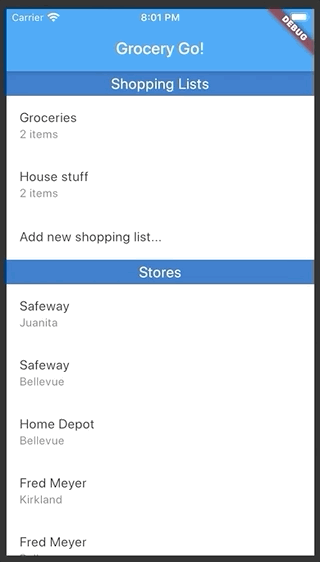
I keep all of my projects inside a folder named projects, so I created my “Grocery Go” app from that directory:
cd projects
flutter create grocery_go
That will give you /projects/grocery_go/
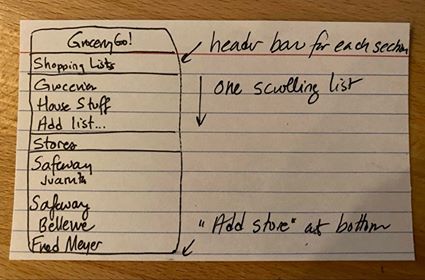
Planning the main screen UI
My favorite mockup tools all seem to have gone to a subscription model, so I’m just gonna sketch my UI plans real quick on this notecard here…
High tech!
The “goals” for this UI are:
Two lists of items, one to represent “Shopping Lists” and one to represent “Stores”.
Each list has a header
Neither list should be scrollable on its own (no “scrolling within scrolling”), but the whole screen should scroll up/down
Creating the “Header” reusable component
This is the part that displays the section title, like “Shopping Lists” or “Stores”, in the scrolling list on the main page.
I know I’m going to use that “Header” bar at least twice, so I made it its own component. I also created a /components directory to hold MainScreenListHeader.
(Perhaps this might be better termed a “widget”, but “component” was ingrained during my years of working as a web developer and it’s the first word I think of when describing reusable pieces of UI).
I use underscores in the filenames and UpperCamelCasing for the class names inside, which is Dart convention.
Inside the file, I create a class called MainScreenListHeader that extends StatelessWidget and give it a constructor that takes this.text, which will serve as the title displayed in the header bar. This component returns a Container with a color, height, and a child Text widget.
I wanted to pick a simple example for the first component, but the next one will be more complicated.
Creating the reusable “ListView” component
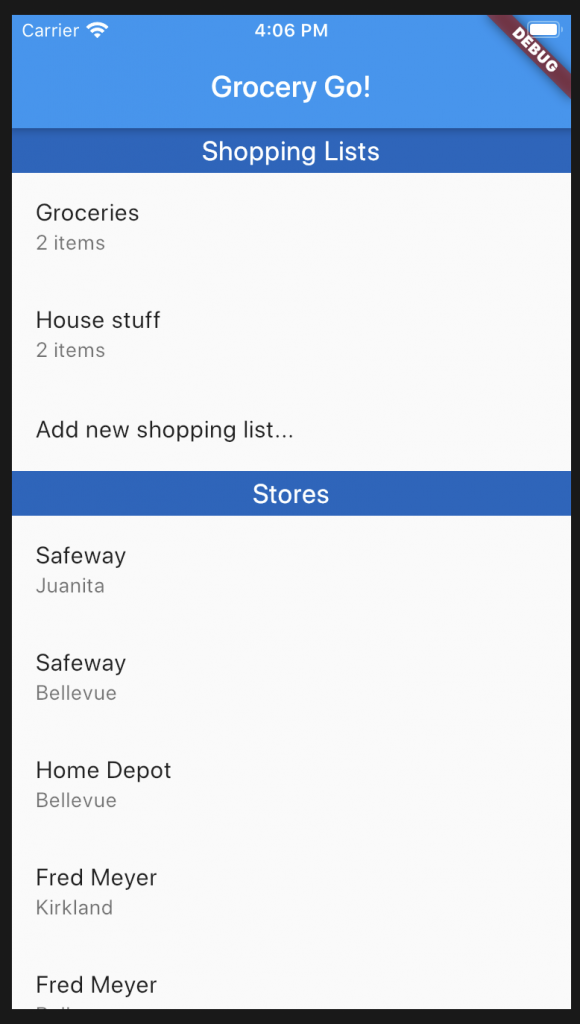
The list that contains individual shopping lists (such as “Groceries”, “House stuff”, etc.) and the list of the user’s stores (“Safeway”, “Fred Meyer”, etc.) appear in vertical lists the user can scroll up and down through.
Stores also display their address or location so the user can distinguish the Safeway near their office from the Safeway near their home.
Since I don’t know how many Shopping Lists or Stores a user might have saved, ListView builder seemed like a good widget to start with. I also put this in its own component from the beginning, which I named
grocery_go/lib/components/main_screen_list.dart
import 'package:flutter/material.dart';
import 'package:grocery_go/models/shopping_list.dart';

class MainScreenList extends StatelessWidget {

  final list;

  MainScreenList({Key key, @required this.list});

  @override
  Widget build(BuildContext context) {
    return ListView.builder(
        shrinkWrap: true, // gives it a size
        primary: false, // so it doesn't scroll
        itemCount: list.length,
        itemBuilder: (BuildContext context, int index) {
          return ListTile(
            title: Text(list[index].name),
            subtitle: Text(list[index] is ShoppingList ? list.length.toString() + ' items' : list[index].address),
          );
        }
    );
  }
}
Now all I need to do is pass in list objects from main.dart, which are declared as two separate lists of ShoppingList and Store objects.
I created two model files:
grocery_go/lib/models/shopping_list.dart
class ShoppingList {
  final String name;

  ShoppingList({this.name});
}
and
grocery_go/lib/models/store.dart
class Store {
  final String name;
  final String address;

  Store({this.name, this.address});
}
The last piece of the puzzle was to import the components and models in main.dart and change the body: property of the Scaffold that gets returned to use a LayoutBuilder that returns a SingleChildScrollView of a Column with children that are instances of my MainScreenListHeader and MainScreenList (whew – I’ll explain more after the code).
class _MyHomePageState extends State<MyHomePage> {
// Some placeholder data just so we can see things working final List<ShoppingList> shoppingLists = [ ShoppingList(name: "Groceries"), ShoppingList(name: "House stuff"), ];
return Scaffold( appBar: AppBar( // Here we take the value from the MyHomePage object that was created by // the App.build method, and use it to set our appbar title. title: Text(widget.title), ), body: LayoutBuilder( builder: (BuildContext context, BoxConstraints viewportConstraints) { return SingleChildScrollView( child: Column( mainAxisSize: MainAxisSize.min, mainAxisAlignment: MainAxisAlignment.start, children: <Widget>[ MainScreenListHeader(text: headerShoppingLists), MainScreenList(list: shoppingLists), MainScreenListHeader(text: headerStores), MainScreenList(list: stores), ], ), ); }), ); } }
These are the major widgets used in this layout and why I picked them:
Layout Builder – this widget sizes itself to its children at runtime (among other things, but that’s why I picked it). Since I don’t know how many Shopping Lists or Stores the user has, I need to build the layout with that in mind.
SingleChildScrollView – This is a container that scrolls, and you can fill it with whatever you want. I have multiple ListViews inside it but I want them to scroll as a single unit, so I’m going to turn off their own independent scrolling ability and let the SingleChildScrollView handle it instead.
Column – I want my elements to appear in a vertical column, one after another: header, list, header, list, and a Column makes that easy. I had to set mainAxisSize: mainAxisSize.min to get it to work with everything else I have going on.
ListView.builder – I don’t know how many Stores or Shopping lists will be displayed, so I used ListView.builder. There were two important properties I had to set on it:
primary: false – setting primary to false disables scrolling for this particular list. I want the SingleChildScrollView to handle the scrolling instead.
Here it is in Simulator: two ListViews inside a Column inside a SingleChildScrollView so they move as a unit. Hooray!
The next thing this UI needs is a “Add new list…” and “Add new store…” button at the end of each list. Tapping these buttons will take the user to a page where they can create a list or a store.
I changed the MainScreenList widget to take a listType string, which I will use on the “add new” button itself:
class MainScreenList extends StatelessWidget {

  final list;
  final String listType;

  MainScreenList({Key key, @required this.list, @required this.listType});

...
Also in main_screen_list.dart, I changed itemCount to be the list length plus one more, so that last iteration can be used to draw the button at the end of the list, and the “listType” string that got passed in will used in the title, like so:
...
itemCount: list.length + 1,
itemBuilder: (BuildContext context, int index) {
  if (index == list.length) {
    return ListTile(
        title: Text("Add new " +  listType  + "...")
    );
...
Back in main.dart, I now pass “shopping list” or “store” to MainScreenList.
One of my favorite classes in OSU’s online CS degree program was CS492 Mobile Development. I’ve always wanted to make my own iOS/Android app and CS492 gave me enough of a foundation to attempt it.
In this multi-part “journal” series, I’ll share all the major steps and decisions I made as I developed a Flutter app.
In this post: some set-up hurdles I encountered on my MacBook. If you want to skip setup and go to the beginning of the code, go ahead to part 2.
Initial Flutter set up
For the most part, setting up Flutter was easy – I followed the official docs and it took me about 45 minutes to get the sample app running. (I’m on a new MacBook running macOS Catalina 10.15.3.)
I ran into a few hurdles, though, which I’ve documented here for other Mac users and for my future self (because I will inevitably go through this again someday).
Adding Flutter to the $PATH on a Mac
I followed the doc’s example of creating a “development” folder in my Users/mandi directory.
The full directory structure surrounding my “flutter” development directory.
I wanted to follow the Flutter documentation example for adding Flutter to my path permanently, but I didn’t know how to find the PATH_TO_FLUTTER_GIT_DIRECTORY on my machine. I know I made a ‘development’ folder, but I don’t know what’s “before” it in its file path.
As it turns out, there’s a handy trick you can do using Finder and a Terminal window to get the full path to a directory or file.
Dragging the ‘development’ folder into Terminal reveals its full path.
Dragging the “development” folder into a Terminal window gives the complete path you need for setting the $PATH.
Unfortunately, this didn’t “stick” on my machine. It worked for the Terminal window I was in, but as soon as I opened a new Terminal window the “flutter” command was no longer found.
It’s still in there if I echo $PATH, so I’m not sure what’s wrong here. But I’m not the only person who ran into this issue, as evidenced by this Stack Overflow post. Kaushik Bharadwaj’s answer explains how to add it to the path file permanently.
In a Terminal window, enter:
sudo nano /etc/paths
Add the full path to the flutter/bin folder [this is what mine looks like, yours may vary] to this file and save it:
/Users/YOURNAMEHERE/development/flutter/bin
On my machine, the paths file looks like this:
Now the “flutter” command persists through Terminal window closures, reboots, etc.
IDE for Flutter
There are a bunch of choices but I’ve only used Android Studio for Flutter development so far. I’m happy with it and it’s pretty good at formatting Flutter’s copious amounts of nested code.
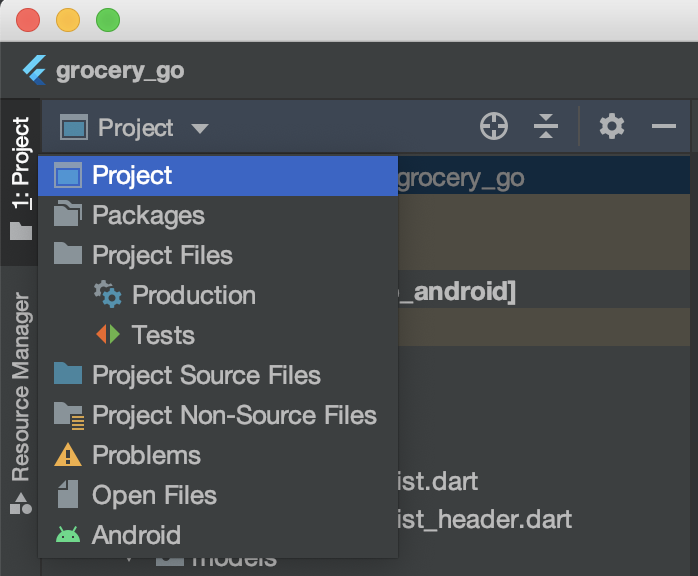
If you choose Android Studio, beware that the default project setting might be “Android”. You can change that by clicking the little Project dropdown in the upper left corner and selecting “Project” instead of “Android”.
That should give you a nice view of the project structure, like so:
This step is unnecessary but it’ll get rid of the weird “Java” folder that isn’t represented in the project structure if you view it in Terminal or Finder and it’ll make your environment look like the one I’ll be sharing in screenshots throughout this journal.
Emulators
There are a few to pick from. I’m on a MacBook and I find that the iOS Simulator runs way better than the Android simulator. In Android Studio, they appear here in the top bar:
On a Mac it “just works” with the built-in Simulator (which is iOS-specific). I’m not sure what’s involved in other dev environments but I’ll come back to this when I try to build for Android later.
Final checks with Flutter Doctor
In Terminal, using flutter doctor will show the status of your flutter setup. You don’t actually need a checkmark next to everything in this list to start coding, but when it’s time to push your app onto a device you’ll want to clear out the “!” and “x” marks where appropriate.
Here is my flutter doctor output at the time of this writing. I’ll come back to these later when it’s time to test on an actual device – this is good enough to get started.
With the project set up, it’s time to move on to Part 2 where I’ll show you how I built the main page’s UI.